Draw A Ear And Label It
Draw A Ear And Label It - Please thumbs up for my videos. The taylor swift effect strikes again—and this time, it's taking over the city of love. The external ear or the outer ear consists of. How to examine the ears. The left side of the curve should curl slightly into the center of the ear. Firstly, you will learn to draw basic shapes and lines that will make a foundation of the ear. Web in a 2021 paper, he wrote that “the sound of temperature likely helps to subtly set people’s aromatic flavor expectations,” even if unconsciously. The external auditory canal links the exterior ear to the inner or the middle ear. These shapes serve to give the ear a basic structure. The ear is anatomically divided into three portions:
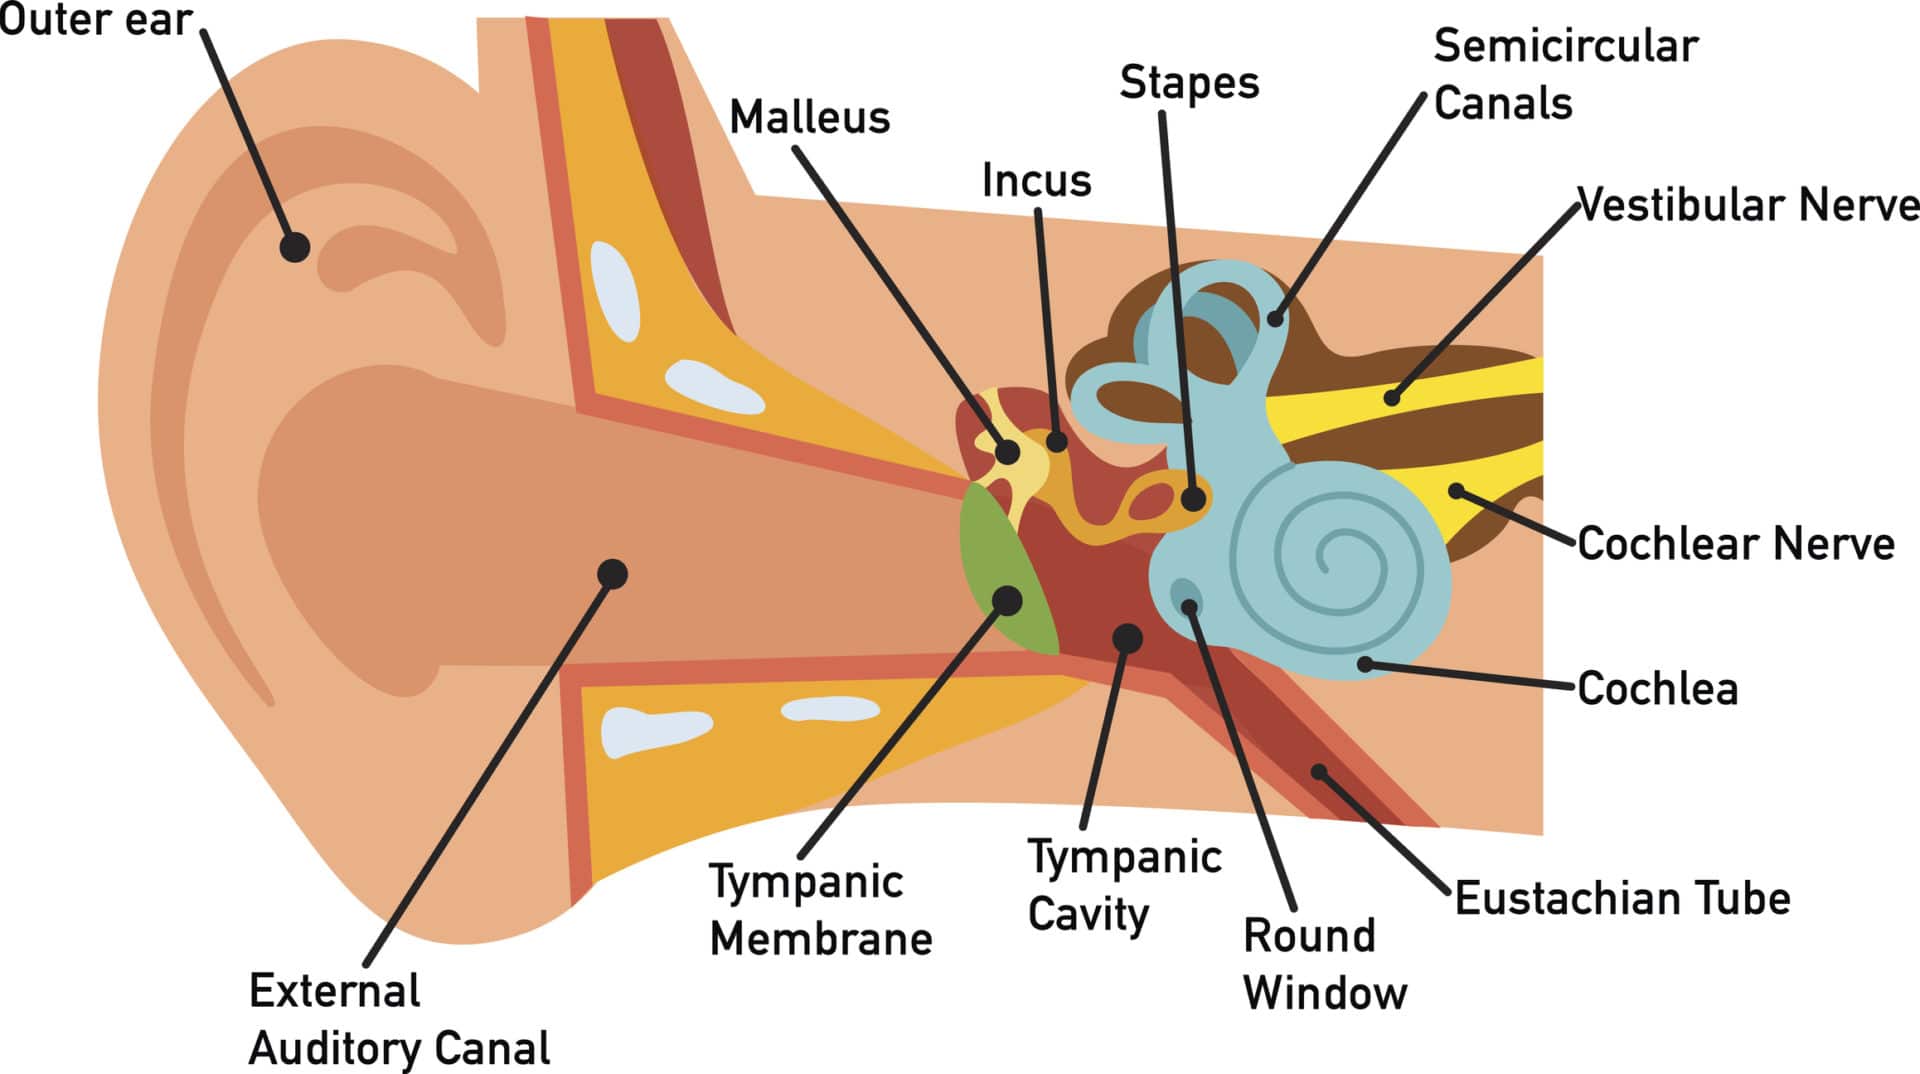
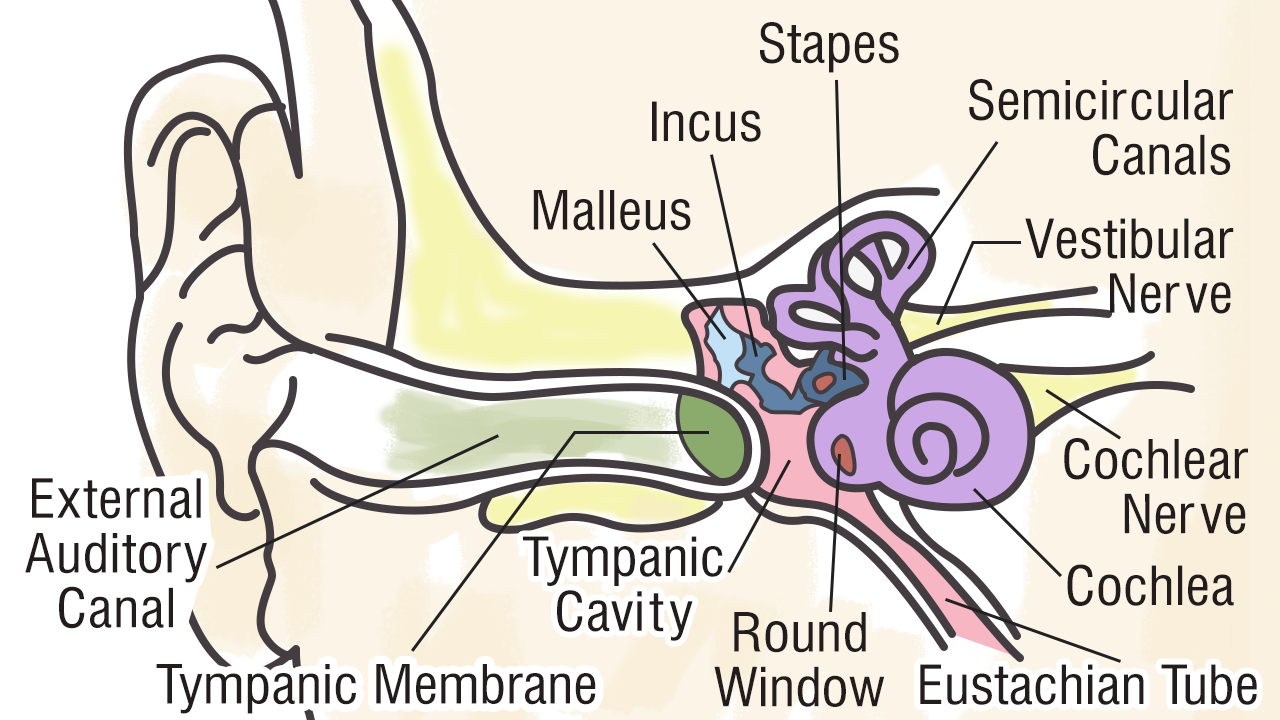
Drawing in perspective is simply creating a state between these two! This shows you all of the structures you’ve just learned about in the video, labeled on one diagram. Draw 2 curves to indicate the main folds within the ear. Web the ear is a complex part of an even more complex sensory system. The tympanic membrane, also known as the eardrum, separates the outer ear from the inner ear. The three small bones in the middle ear. It is the landmark of the outer ear, situated right above the pointy protrusion known as the tragus. This will help create a more realistic representation. The main functions of the ear are, of course, hearing, as well as constantly maintaining balance. Web let’s summarize what we covered together:
How do we determine how far the earring extends to. “very often we taste what we predict. You can make this curve as smooth or jagged as you want. When it comes to breaking down the surface anatomy of the ear, the helix is a great place to start because it allows you to define the overall contour of the ear before sketching in the remaining shapes to detail it out. Draw another set of large and small circles, and add two curved lines. Sketch a curve like a c that follows the outer rim, from the top. Firstly, you will learn to draw basic shapes and lines that will make a foundation of the ear. As i begin to sketch out the ear i like to begin with the helix. Web start by adding shading to the different areas of the ear to create depth and dimension. Web download a free printable outline of this video and draw along with us:

HOW TO DRAW PARTS OF EAR YouTube
Sketch a curve like a c that follows the outer rim, from the top. Now that you have the outer edge of your ear drawing, you can extend it a bit more in this next step. “very often we taste what we predict. Please thumbs up for my videos. The ear is anatomically divided into three portions:

How To Draw Outer Ear Diagram Ear Anatomy Easy And Simple Ear
The ear captures sound and helps you recall that sound throughout your life. This will help create a more realistic representation. How to draw an ear in perspective. The reference image will give you a great idea of the length this should be. Pinna/auricle is the outermost section of the ear.

Parts Of The Ear Drawing at GetDrawings Free download
Web in a 2021 paper, he wrote that “the sound of temperature likely helps to subtly set people’s aromatic flavor expectations,” even if unconsciously. Web five steps to an exceptional ear. Draw another set of large and small circles, and add two curved lines. These shapes serve to give the ear a basic structure. Web the guide lines are finished,.

Illustration of Ear Anatomy Stock Image F031/5228 Science Photo
The external auditory canal links the exterior ear to the inner or the middle ear. Web draw two lines connecting the circles. Web #humanear #ear #eardiagrama beautiful drawing of human ear. This shows you all of the structures you’ve just learned about in the video, labeled on one diagram. Sketch a curve like a c that follows the outer rim,.
How You Hear Northland Audiology
Web i begin my drawing using a combination of strategies. Web let’s summarize what we covered together: Follow along as expert artists guide you through the steps of sketching and shading an ear. Web the ear is a complex part of an even more complex sensory system. Web five steps to an exceptional ear.

1 Diagram showing the structure of the human ear, detailing the parts
The main functions of the ear are, of course, hearing, as well as constantly maintaining balance. “very often we taste what we predict. Then, you will learn to apply tones and finally, you will work on adding some shades that will make the painting seem more realistic. Web the ear is a complex part of an even more complex sensory.

Ear Diagram drawing CBSE easy way Draw Human Ear anatomy Step
When it comes to breaking down the surface anatomy of the ear, the helix is a great place to start because it allows you to define the overall contour of the ear before sketching in the remaining shapes to detail it out. Web a ci is composed of a microphone and some electronics that reside outside the skin, generally behind.
Parts Of The Ear Drawing at Explore collection of
Web may 9, 2024. Follow along as expert artists guide you through the steps of sketching and shading an ear. Drawing in perspective is simply creating a state between these two! Web for this, we’ll be testing your ability to label the ear. Sketch a curve like a c that follows the outer rim, from the top.

How to draw the Human Ear Labeled Science Diagrams YouTube
It is the cartilage curve that is situated parallel to the helix. Web the ear is another extraordinary organ of the house of wonders, that is, the human body. Web for this, we’ll be testing your ability to label the ear. The external auditory canal links the exterior ear to the inner or the middle ear. Loosen up a bit.

Parts Of The Ear Drawing at Explore collection of
Web the guide lines are finished, so now you can draw the final lines and shade the ear. The taylor swift effect strikes again—and this time, it's taking over the city of love. The first curve should line the middle to top part of the ear. Ear diagrams (labeled and unlabeled) overview image showing the structures of the outer ear.
This Will Help Create A More Realistic Representation.
How do we determine how far the earring extends to. Sketch a curve like a c that follows the outer rim, from the top. Web a ci is composed of a microphone and some electronics that reside outside the skin, generally behind the ear (as shown in figure 2.3.1), which transmits a signal to an array of electrodes placed. Sketch the head to have a base for the ear.
This Is Probably The Most Essential Stage Of The Process, So Make Sure Your Lines Are Up To Par.
The main functions of the ear are, of course, hearing, as well as constantly maintaining balance. And i will hope to see your comments.please don’t forget to subsc. When it comes to breaking down the surface anatomy of the ear, the helix is a great place to start because it allows you to define the overall contour of the ear before sketching in the remaining shapes to detail it out. This shows you all of the structures you’ve just learned about in the video, labeled on one diagram.
Web I Begin My Drawing Using A Combination Of Strategies.
How to examine the ears. The left side of the curve should curl slightly into the center of the ear. Remember to leave a small amount of room around the edge. It is the cartilage curve that is situated parallel to the helix.
Web Start By Adding Shading To The Different Areas Of The Ear To Create Depth And Dimension.
Web let’s summarize what we covered together: Then, you will learn to apply tones and finally, you will work on adding some shades that will make the painting seem more realistic. Add the hole of the ear using two curved lines that meet at a point. The taylor swift effect strikes again—and this time, it's taking over the city of love.