Draw A Lizard Step By Step
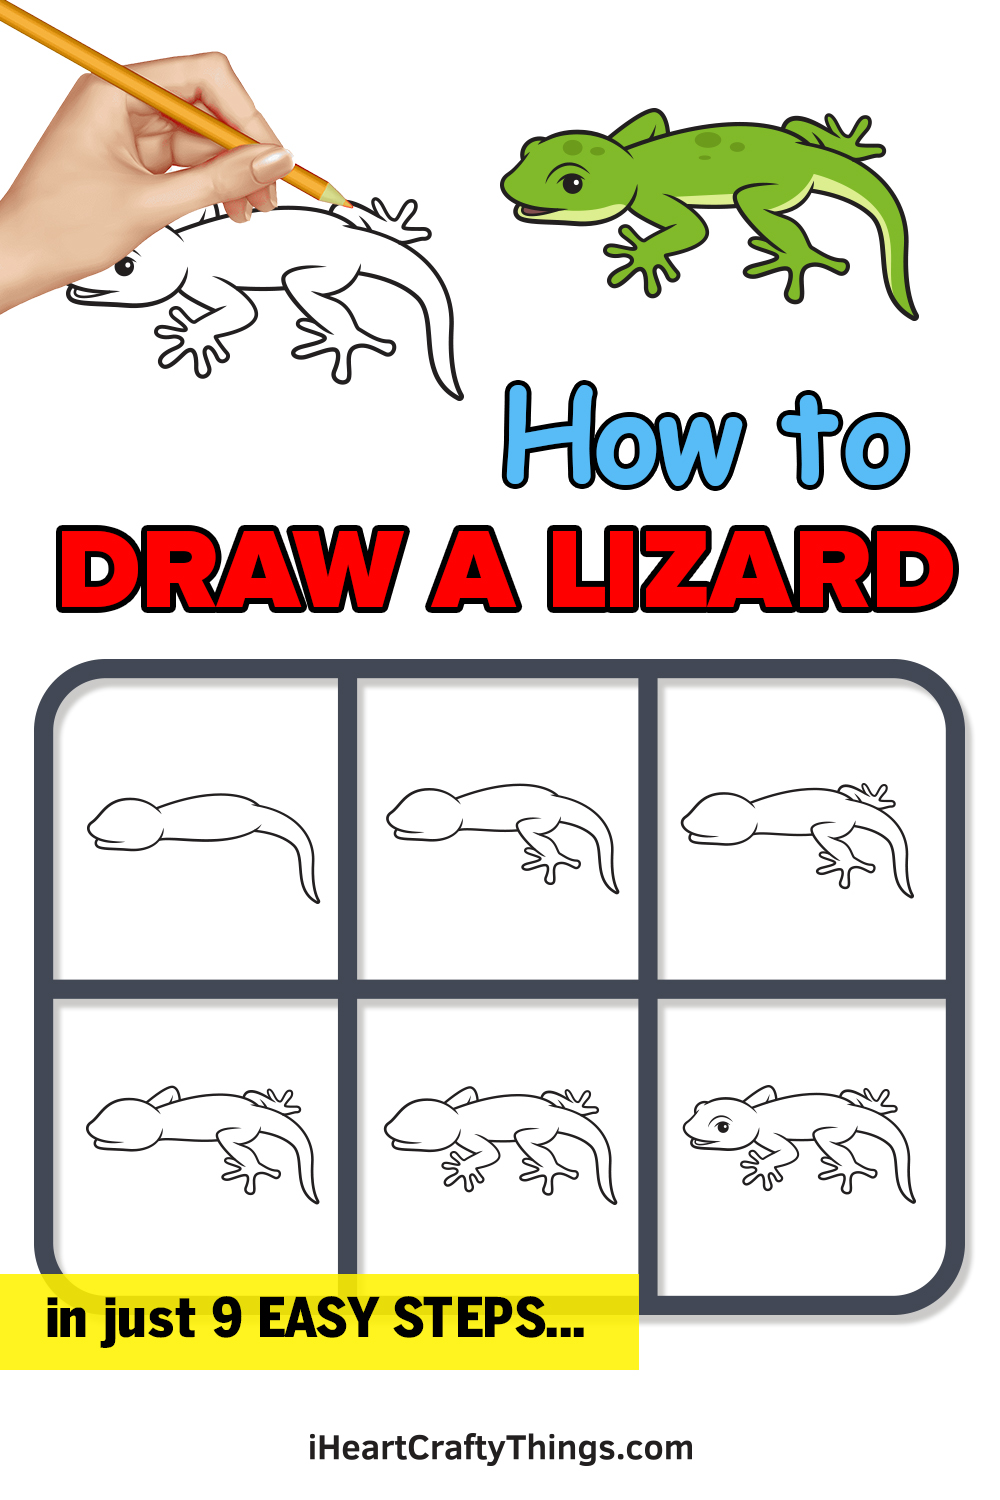
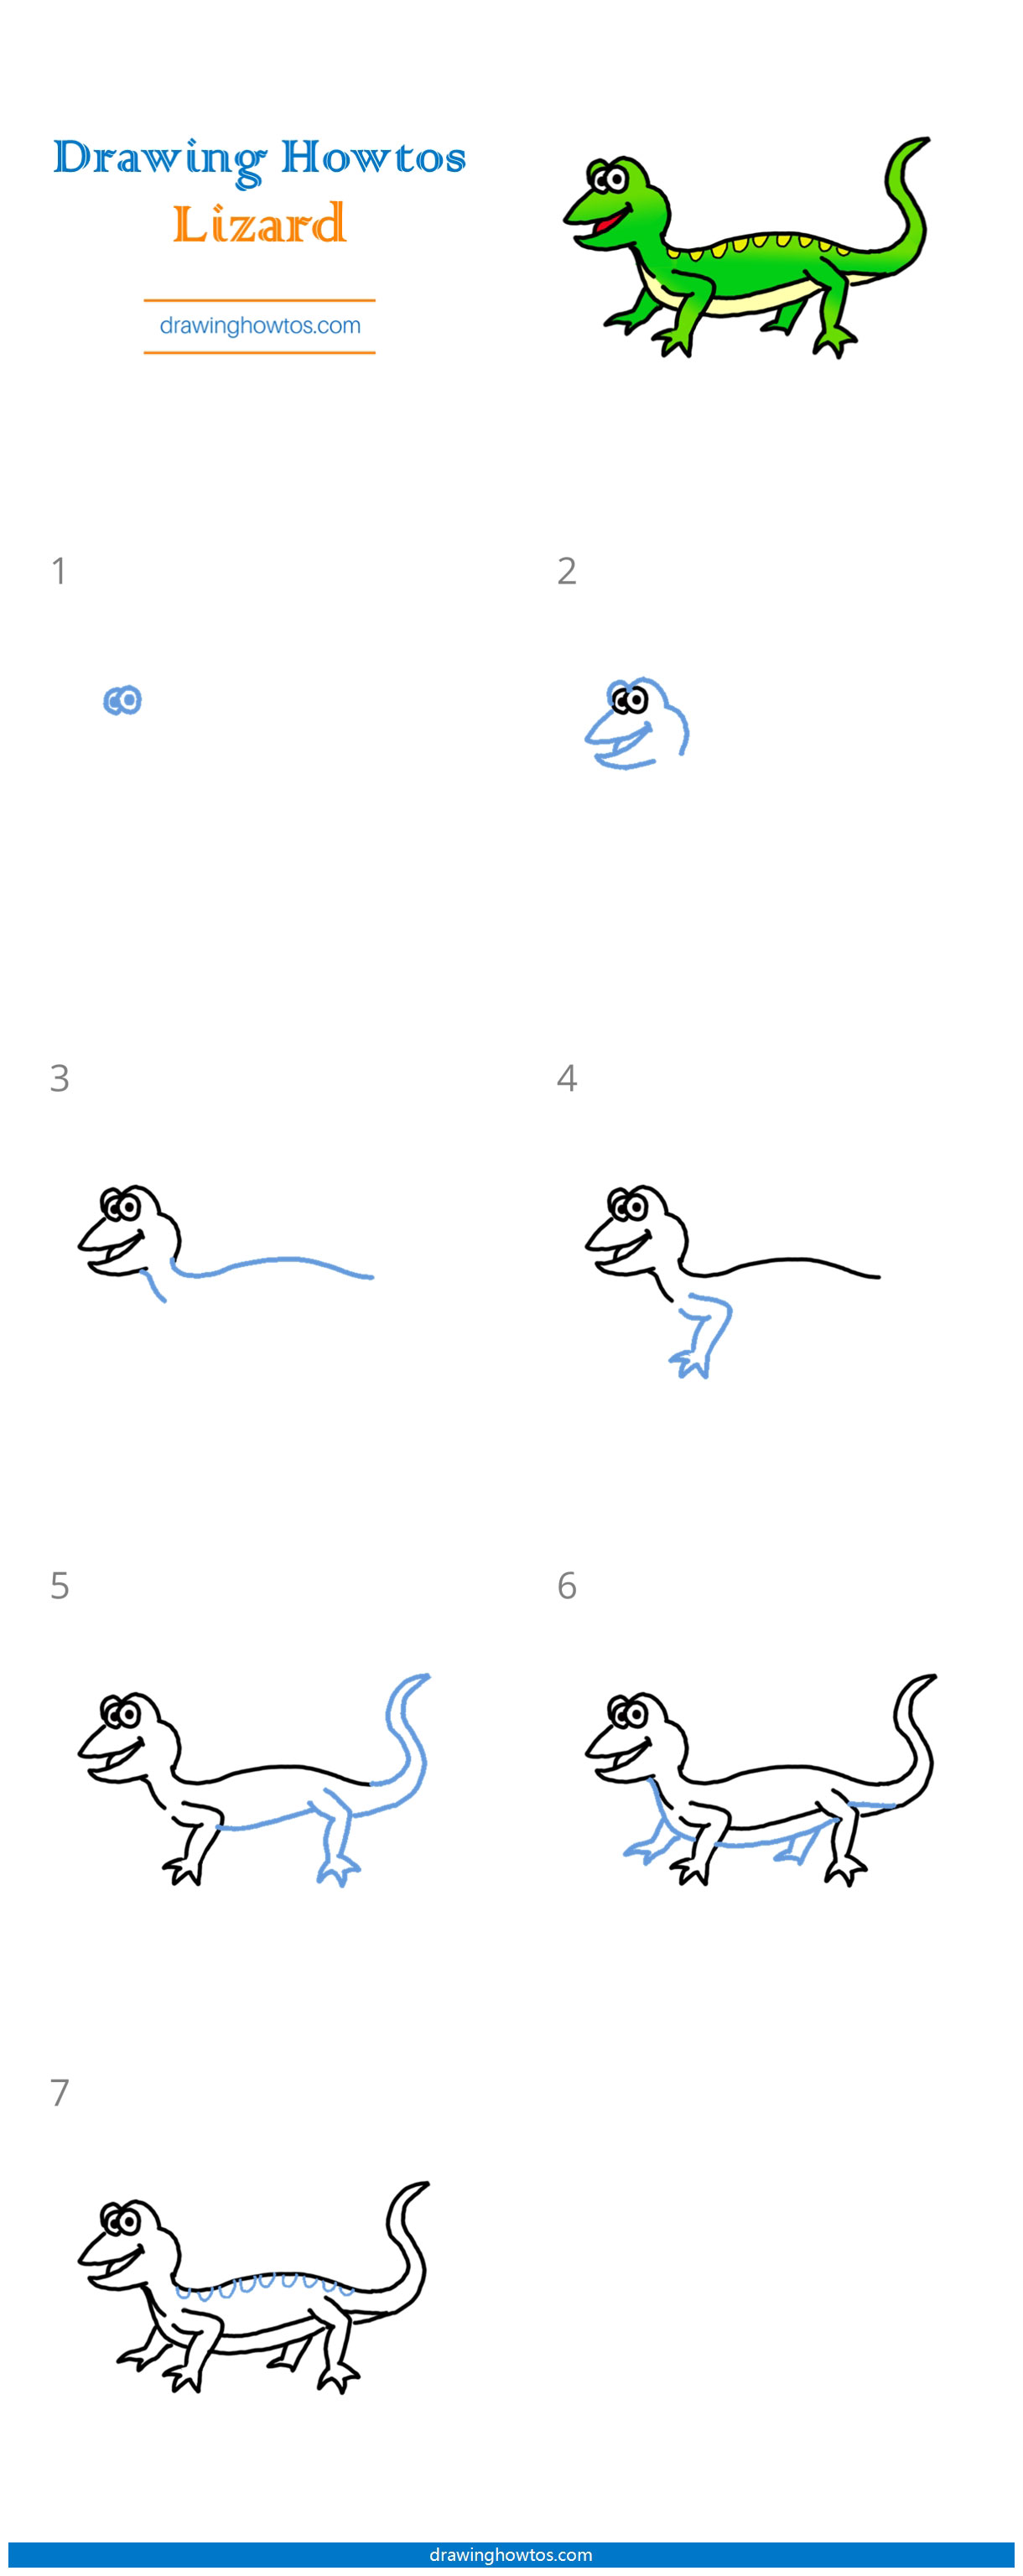
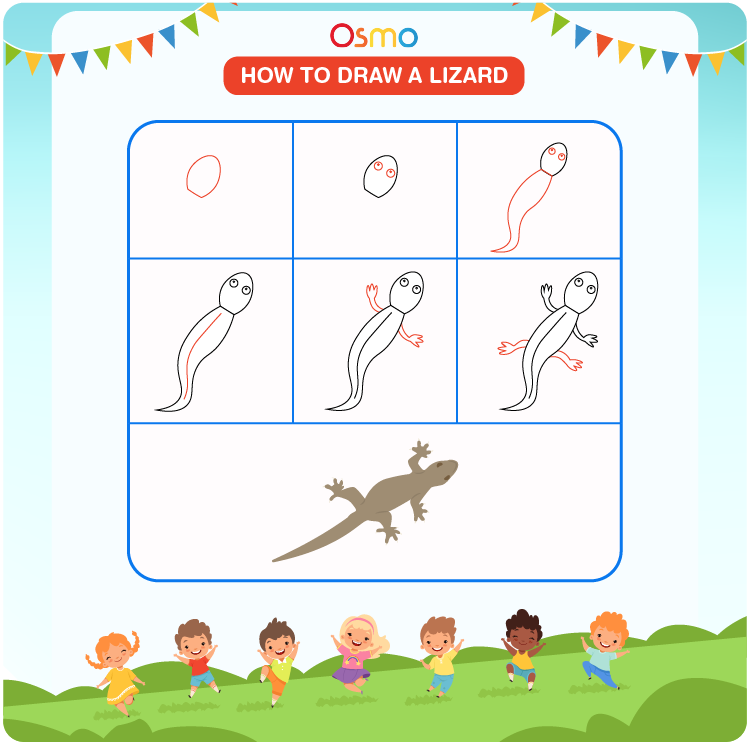
Draw A Lizard Step By Step - Web whether you’re a parent, teacher, or art enthusiast, our newsletter is packed with fun activities, inspiring artwork, and exclusive content just for you. Start drawing the outline of the torso. Follow my step by step drawing tutorial and make your own lizard drawing easy!👇. Inside the head, draw two intersecting lines. Use darker green and brown to add depth and detail to the scales. Then draw a curved line from the line of the arm all the way down. Web hi everyone, in this video i show you how to draw a lizard step by step 🦎. Follow along with the how to draw a lizard drawing guide below by sketching the red portion of each of the six steps, super easy! Web how to draw a lizard easy (option 1) draw a curving curve that is the middle of the lizard’s body. Lizards typically have five toes on each leg.
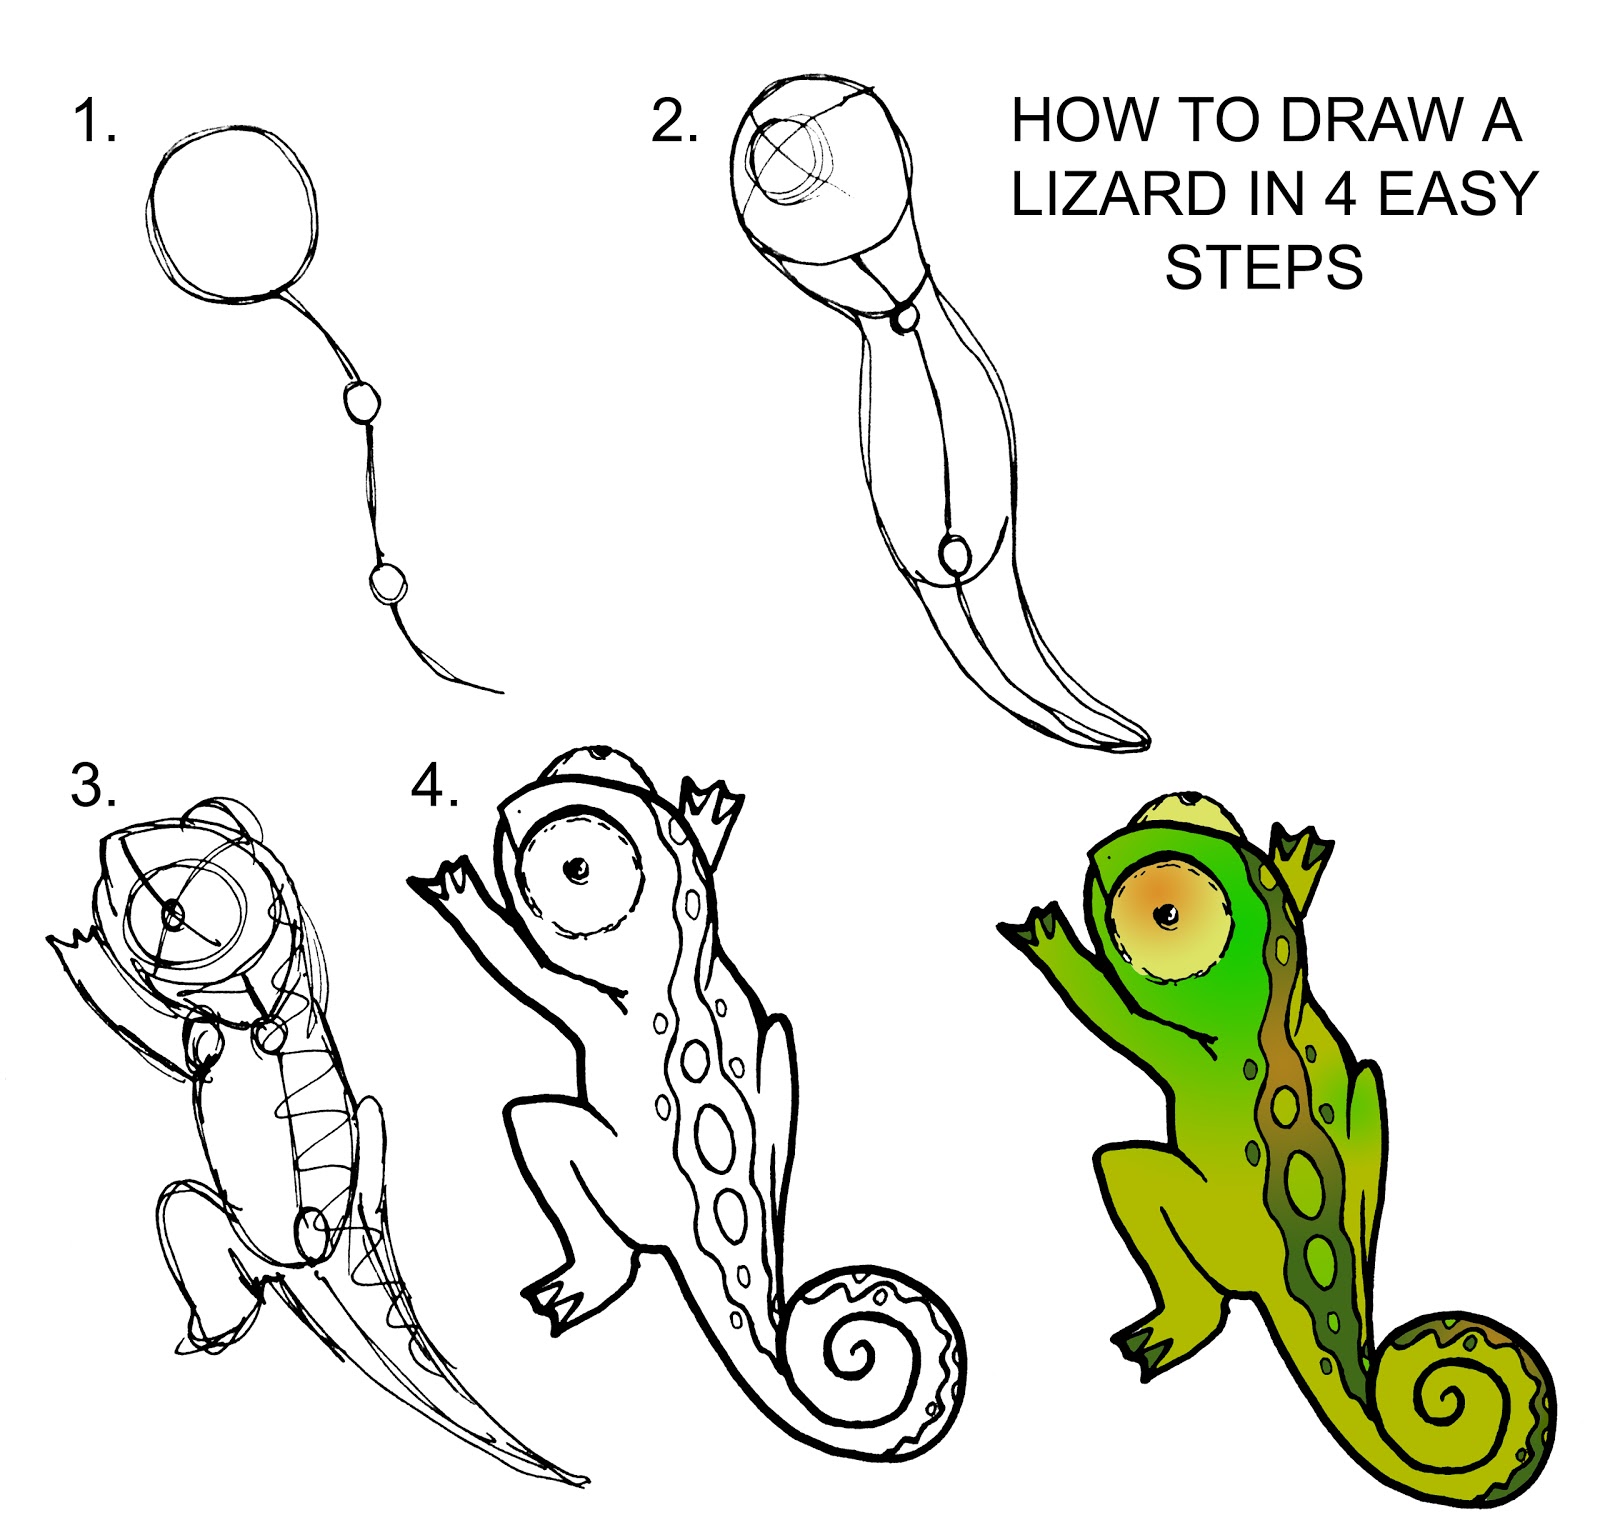
Web do you remember that feeling of awe and curiosity when you first encountered a lizard in the wild? Before we begin the how to draw a lizard drawing lesson, here are some fun facts about lizards. The way it moved, its intricate patterns, and the way its eyes seemed to hold a world of secrets… Draw a hand with fingers and erase inside line. Structure the lizard’s right hind leg by drawing an angled line with four visible toes at the bottom. Inside the head, draw two intersecting lines. This creates the lizard’s body outline. Then, extend another curved line below the nose, forming the lower jaw and overlapping the line of the neck. At the end of the front legs, draw five lines splayed out. Draw the shape of the lizard’s body.
Make sure to create a slight curve in the toes to make them look more realistic. Erase the line and add spots and draw a branch. Watch our short youtube video, and download our free printable. At the end of each leg, sketch five small ovals to represent the lizard’s toes. Erase the inside ovals and draw the face. Lizards typically have five toes on each leg. Fun step by step instructions on how to draw a lizard for kids! Then, draw three lines on the back legs. Structure the lizard’s right hind leg by drawing an angled line with four visible toes at the bottom. From there, we can proceed by drawing an arrowhead shape at one end of the line.
DARYL HOBSON ARTWORK How To Draw A Lizard Step By Step
Web this step by step lesson progressively builds upon each previous step until you get to the final rendering of a lizard. Connect the head to the body and add a mouth. Inside the head, draw two intersecting lines. Draw three short, angled lines underneath the lizard's body as guides for the legs and feet. Then draw a curved line.
Lizard Drawing — How To Draw A Lizard Step By Step
Sign up now and be part of our creative community! Form the nose and upper part of the mouth using a u shaped line. Web #artlandhowtodraw #cute #cutelizardstep by step video on how to draw a cute lizard!!!don't forget to subscribe!!!check out our art land products!merchandiseh. Quickly sketch the basic shape of the lizard, defining the perspective in the process..
How to Draw a Lizard Step by Step Easy Drawing Guides Drawing Howtos
Parents, be sure to hop over to our website and sign your kids up for more exclusive lessons. Sketch two circles on each side of the head for the eyes and two small lines for the nostrils. To draw a lizard, there are key steps to follow. This creates the lizard’s body outline. Next, connect the body and head by.

How To Draw A Lizard Step by Step Tutotrial Lizard, Super coloring
Quickly sketch the basic shape of the lizard, defining the perspective in the process. Web whether you’re a parent, teacher, or art enthusiast, our newsletter is packed with fun activities, inspiring artwork, and exclusive content just for you. This creates the lizard’s body outline. Using our hb pencils, we want to begin by drawing a curved line on the page..
How to Draw a Simple Lizard for Kids
Draw three short, angled lines underneath the lizard's body as guides for the legs and feet. These are guides that will help in placing the lizard's facial features later on. Web this step by step lesson progressively builds upon each previous step until you get to the final rendering of a lizard. Then draw a curved line from the line.

How to Draw a Bearded Dragon Lizard in a Few Easy Steps Drawing
Fun step by step instructions on how to draw a lizard for kids! Then, extend another curved line below the nose, forming the lower jaw and overlapping the line of the neck. The way it moved, its intricate patterns, and the way its eyes seemed to hold a world of secrets… Follow along with the how to draw a lizard.
How to Draw a Lizard Easy Drawing Tutorial For Kids
Sign up now and be part of our creative community! Web how to draw a lizard step by step. Next, set the length of the head (top), the location of its paws. Watch our short youtube video, and download our free printable. Leave a bit of space and draw another line going down to meet this one so that it.

How to Draw a Lizard Really Easy Drawing Tutorial
Web add the toes and face detail. Draw the shape of the lizard’s body. First, pick the colors you want. Now at the bottom of the lizzard, draw the first arm as i have done over here. Parents, be sure to hop over to our website and sign your kids up for more exclusive lessons.
How to Draw a Lizard A StepbyStep Tutorial for Kids
Web this lesson was originally posted in our art club a while back! Structure the lizard’s right hind leg by drawing an angled line with four visible toes at the bottom. Web thanks for watching!#drawing #art #simpledrawing #kids Choose one with a medium or soft lead that allows for easy shading and erasing. The way it moved, its intricate patterns,.

How to draw a Lizard Step By Step For Kids & Beginners
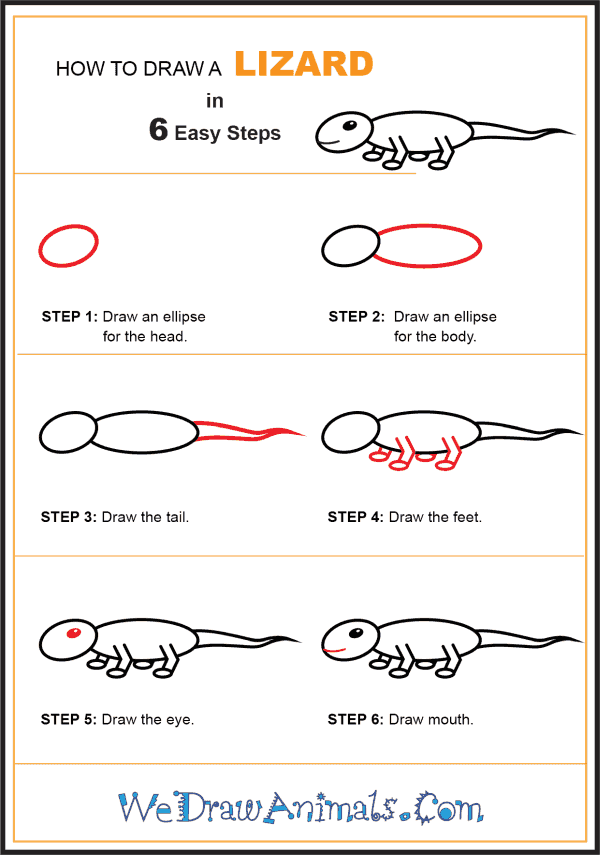
Web how to draw a lizard step by step. Define the places for the lizard’s legs. These are guides that will help in placing the lizard's facial features later on. Mark off the width and height of the lizard. Use darker green and brown to add depth and detail to the scales.
Inside The Head, Draw Two Intersecting Lines.
Form the nose and upper part of the mouth using a u shaped line. This is going to establish the flow of the lizard’s body. Web whether you’re a parent, teacher, or art enthusiast, our newsletter is packed with fun activities, inspiring artwork, and exclusive content just for you. Web haw to draw a village scenery ##very easly step by stap##2024####welcome to our drawing vedio and enjoy
Before We Begin The How To Draw A Lizard Drawing Lesson, Here Are Some Fun Facts About Lizards.
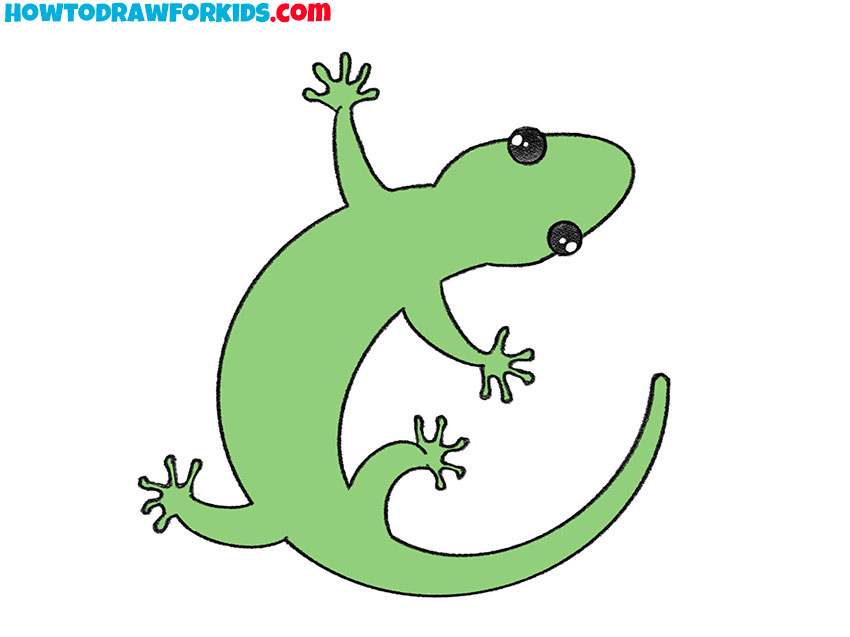
Then, fill in the body and tail with a light shade of green. Follow along with the how to draw a lizard drawing guide below by sketching the red portion of each of the six steps, super easy! A good quality eraser is essential for correcting mistakes and refining your drawing. Look for a soft eraser that won’t smudge the paper.
Watch Our Short Youtube Video, And Download Our Free Printable.
Next, set the length of the head (top), the location of its paws. Add a rounded triangle to the bottom of the oval for the head. Web add the toes and face detail. At the end of each leg, sketch five small ovals to represent the lizard’s toes.
Web Hi Everyone, In This Video I Show You How To Draw A Lizard Step By Step 🦎.
For the chin and the legs, draw these shapes lightly, as you will be adjusting them later. Next, connect the body and head by drawing the neck. This forms the head of the lizard and sets the foundation for proportion. Web next to the head, draw an uneven curved line for the body of the lizard.