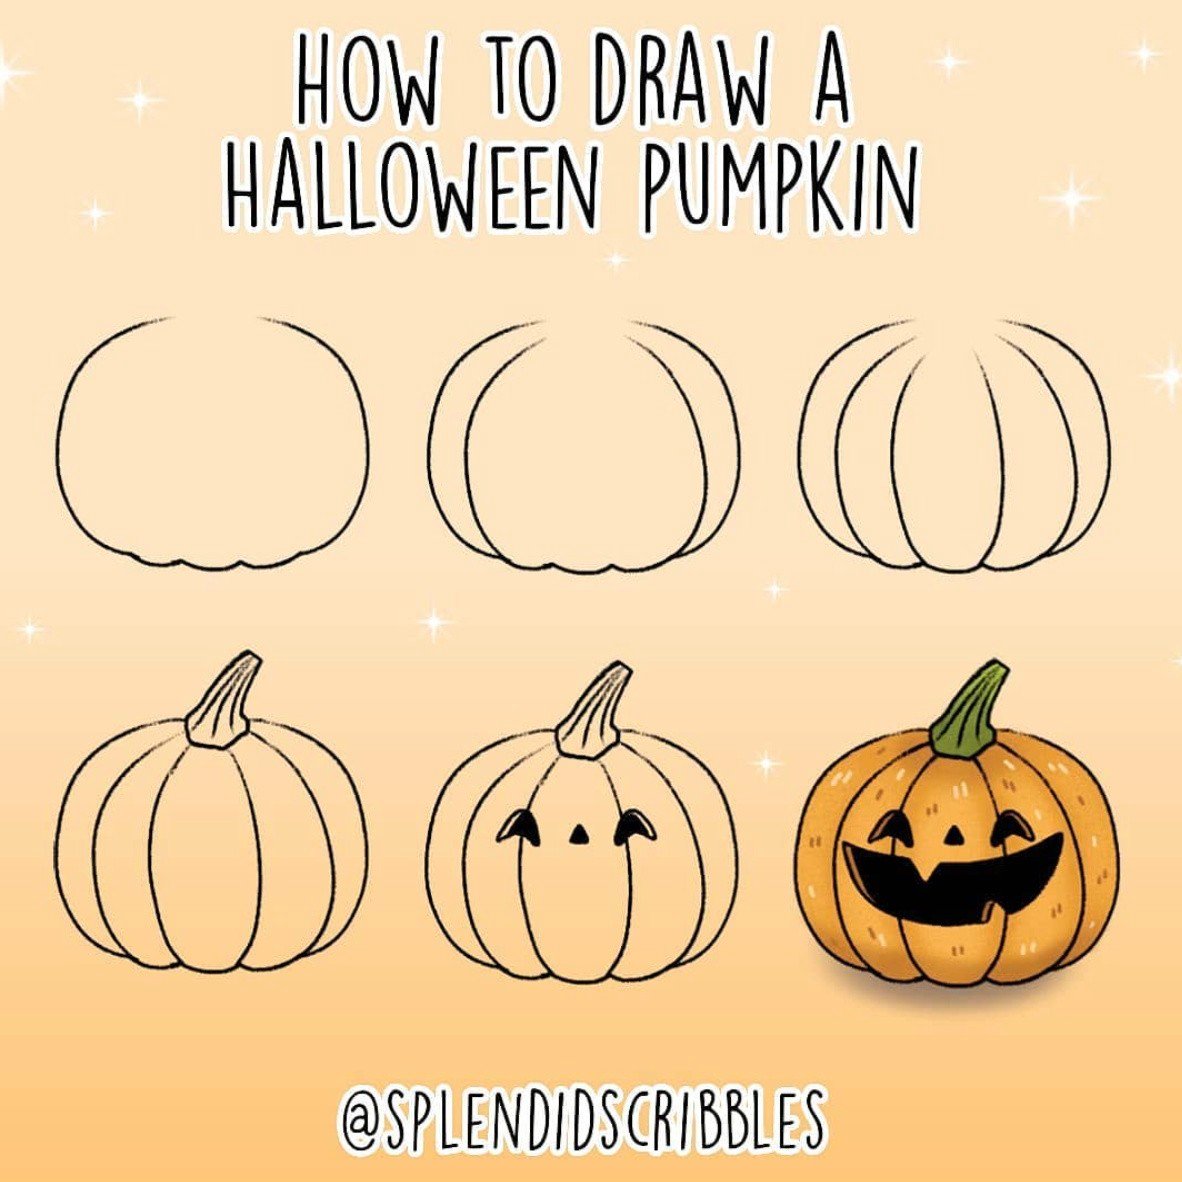
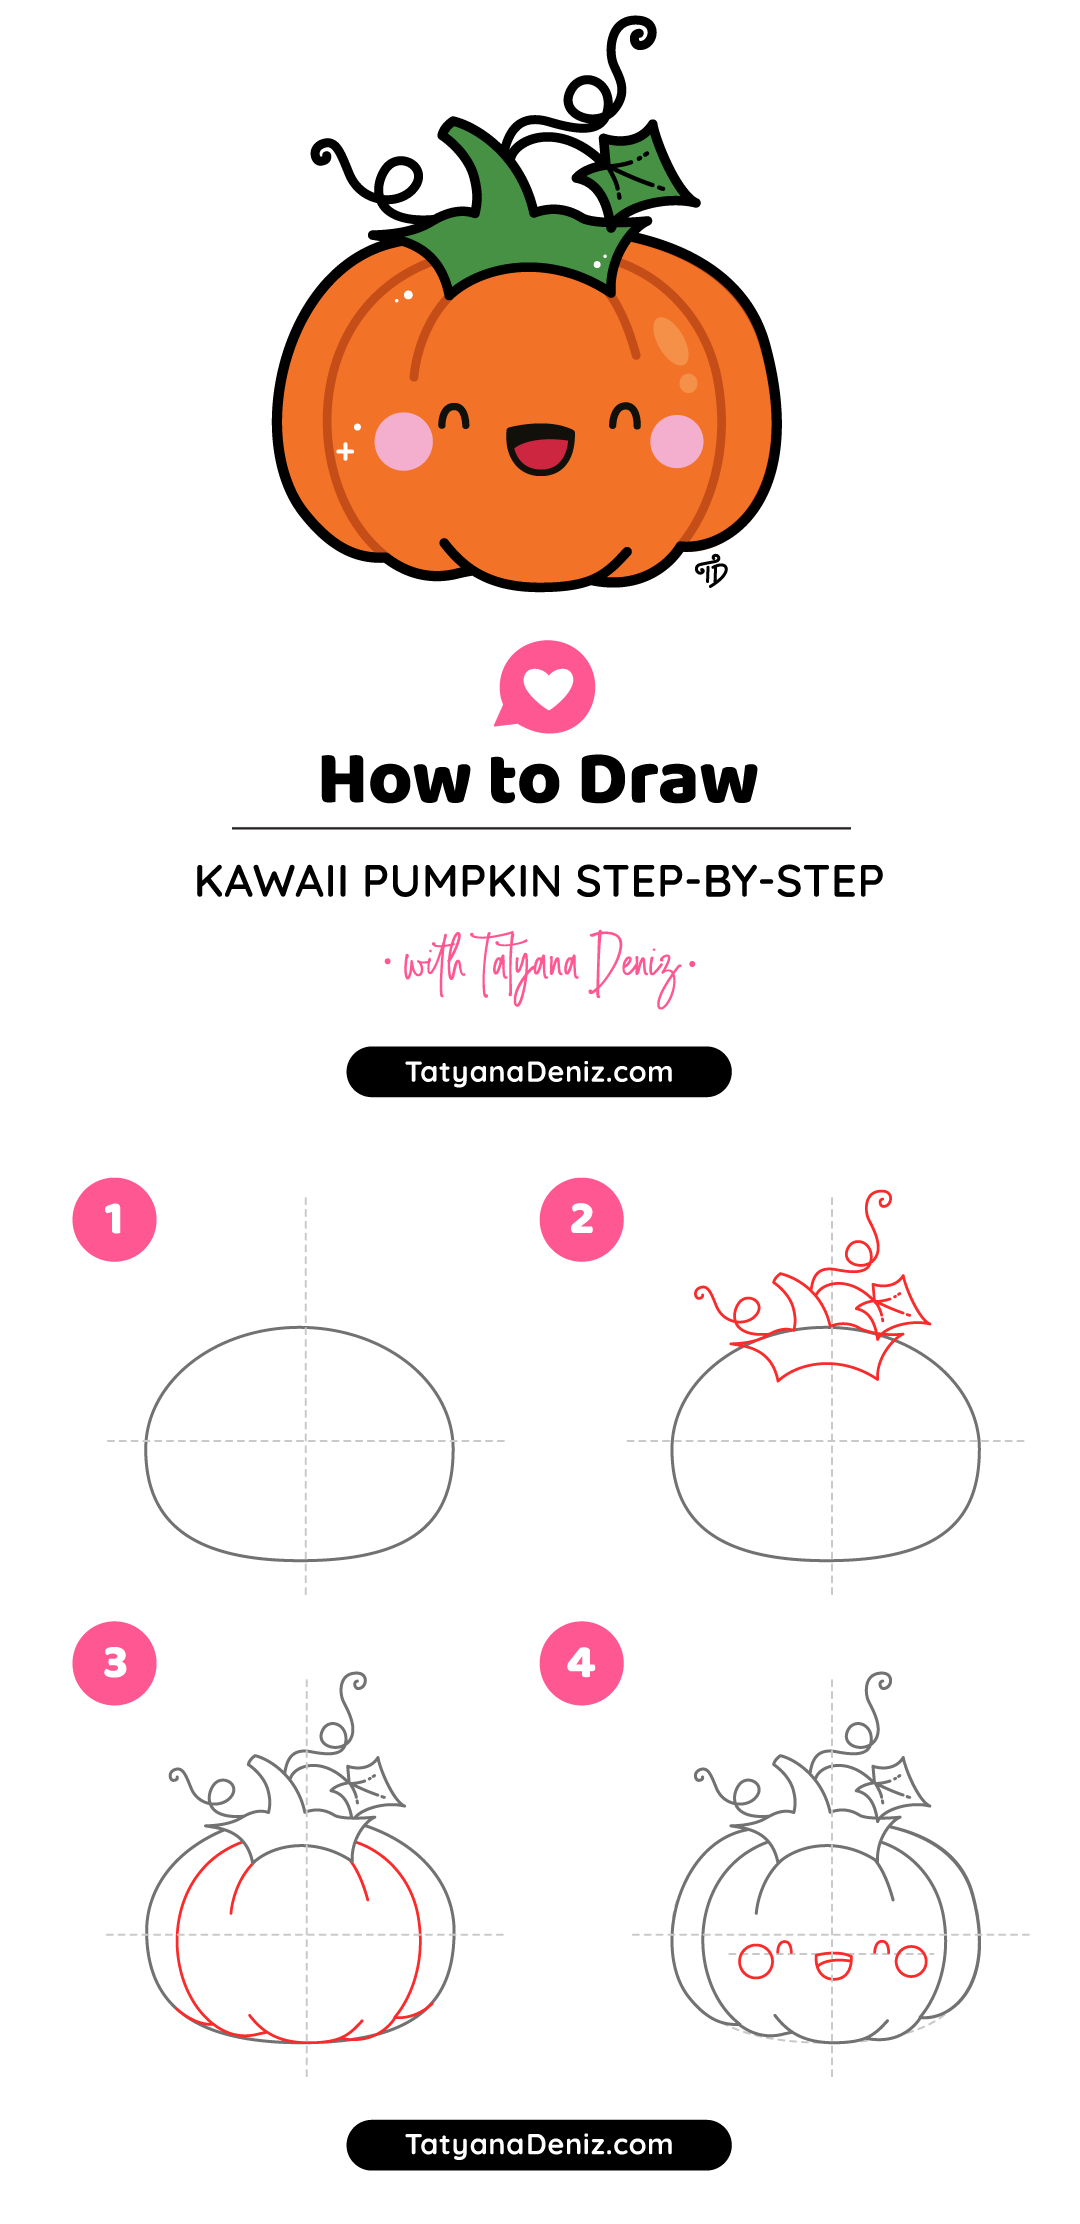
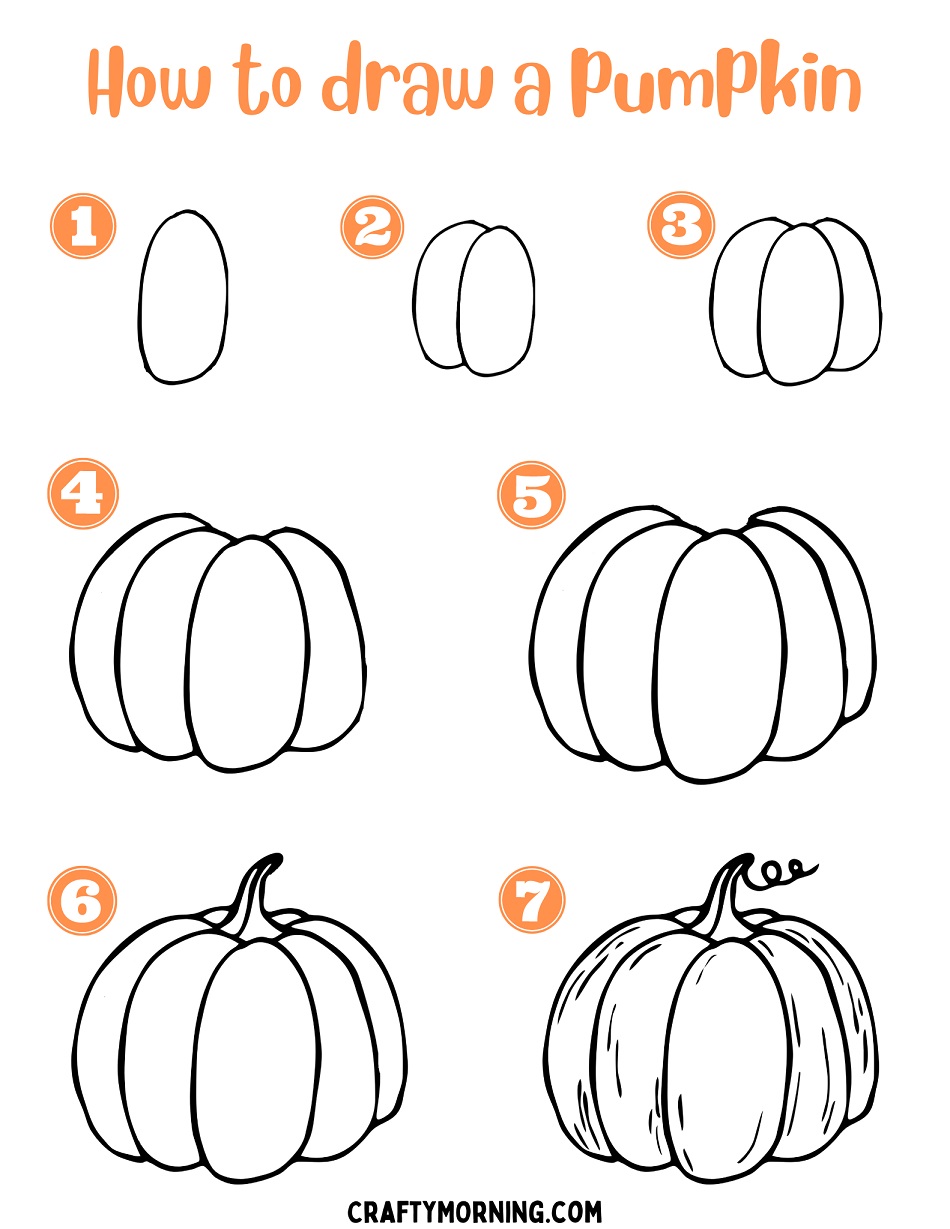
Draw A Pumpkin Step By Step
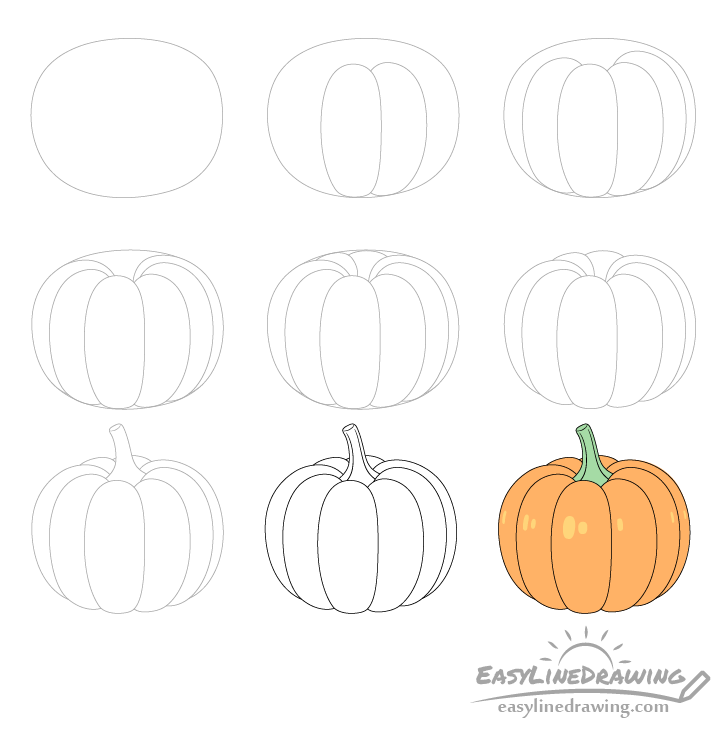
Draw A Pumpkin Step By Step - Web to do this, begin by drawing a curved line towards the top of your pumpkin. Draw a curved shape on the left. Divide the oval into 5 parts using curved lines. Sketch a wide oval with some indentations at the bottom. There are all sorts of stems you could draw. Add yet another set of ribs. Use a curved line to enclose the end of the stem. Start small at the top and make it bigger as you go down. And then draw your stem coming out of that curved line. The next step is to draw small stems on the top of the pumpkin.
Now you have a pumpkin coloring page to. Next we can sketch in the stem. Pumpkin usually tend to be shaped like a sort of sphere with a squashed in top and bottom. Web learn how to draw a small pumpkin patch to celebrate the fall season! This one should pretty much run along the sides of the outline drawn in step one. And then draw your stem coming out of that curved line. Start by drawing the overall shape of your pumpkin with a two curved lines. Web hi everyone, in this video i show you how to draw a pumpkin step by step 🎃 pumpkin drawing easy. Then, texture the stem with curved lines. Finally add the last set of ribs in the back (as shown in the example).
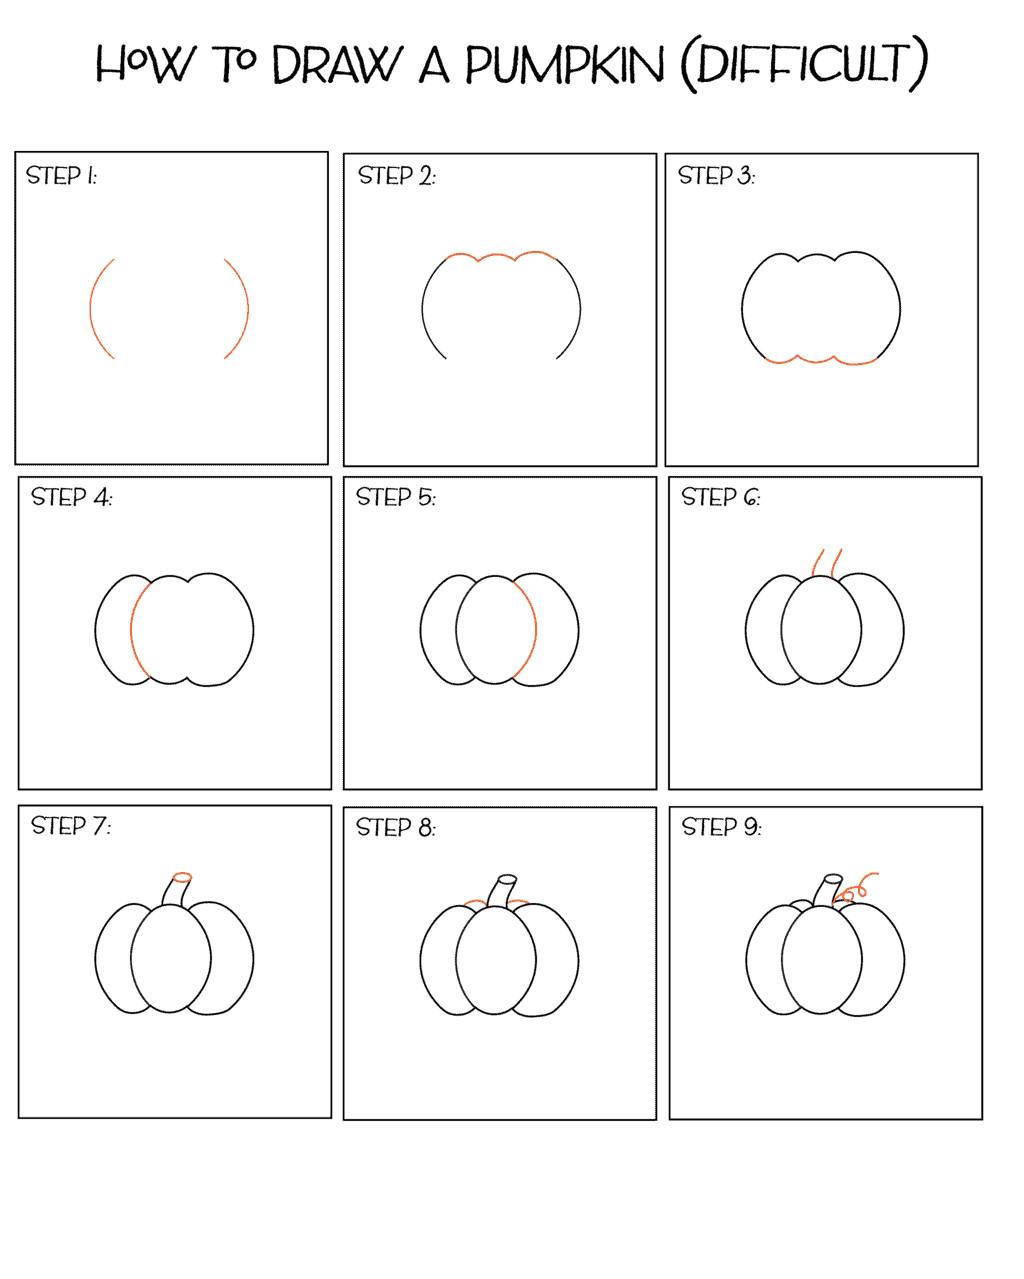
Draw a circle connecting the two lines. Use additional short lines to begin enclosing the ribs visible behind the stem. In this case the pumpkin itself and the stem. Use a curved line to enclose the end of the stem. Finally add the last set of ribs in the back (as shown in the example). Our printable drawing guide (optional) pencil or black marker; We’re using a pencil for now, as this will be a guide for drawing in the rest of the pumpkin and you’ll be erasing the pencil a bit later. Next we can sketch in the stem. The next step is to draw small stems on the top of the pumpkin. Web learn how to draw a small pumpkin patch to celebrate the fall season!
How to draw halloween stuff step by step The Smart Wander
Web how to draw pumpkin in easy steps for beginners lesson.tutorial of drawing technique.drawing tutorial,art tutorial youtube videoyou can watch the video at. Web be it a fall or halloween drawing lesson, this how to draw a pumpkin step by step drawing tutorial will make the task easy peasy.get template here: Use additional short lines to begin enclosing the ribs.
How to draw easy and cute Halloween pumpkin stepbystep
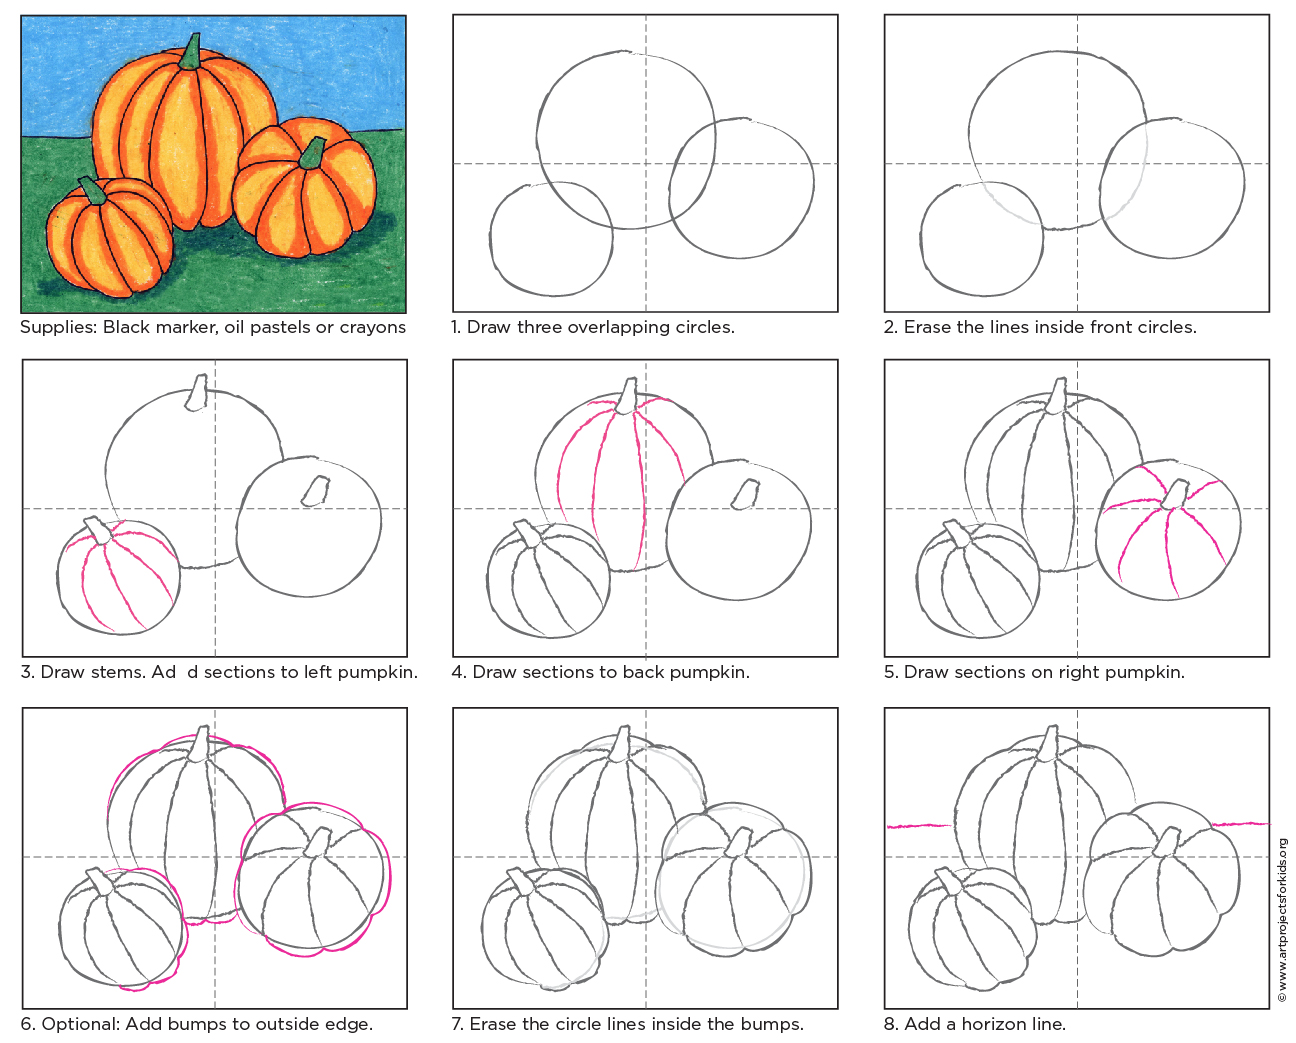
The first step is to draw one larger circle in the middle and two others overlapping the middle one on either side. Draw a vine with leaves and a horizon line. Web in a large bowl, whisk together the flour, baking powder, baking soda, pumpkin pie spice, and ½ teaspoon salt. Draw another curved line across it to give the.
How to Draw a Pumpkin (Easy Step by Step) Crafty Morning
Finally add the last set of ribs in the back (as shown in the example). Leave a little opening at the top for the stem. Add a curved shape on the right. Draw two curved lines to make the firs rib of your pumpkin. Draw the vine with a squiggly line.
How To Draw A Pumpkin StepByStep So Festive!
Draw a curved shape on the left. Draw a curved line on the left side of the pumpkin shape. Use a curved line to enclose the end of the stem. Draw a guideline for the leaf. In this case the pumpkin itself and the stem.
Pumpkin Drawing · Art Projects for Kids
Start by drawing the overall shape of your pumpkin with a two curved lines. Leave a little opening at the top for the stem. Web how to draw flower step by step. Web how to draw a broken heart step by step||drawing of a broken heart #shorts#heart#broken#drawing#short#drawdraw sukuna jujutsu kaisen #short #draw #anime #dra. Draw the vine with a squiggly.

How to draw pumpkin step by step The Smart Wander
This shape drawing can be fairly rough and can omit the smaller bends and curves in the shape. Our printable drawing guide (optional) pencil or black marker; Add a curved shape on the right. And then draw your stem coming out of that curved line. Draw another curved line across it to give the tip of the stem an oval.
How to Draw a Pumpkin Step by Step EasyLineDrawing
The first step is to draw one larger circle in the middle and two others overlapping the middle one on either side. At this stage of your drawing you can make your stem just a rough sketch. Web mark off the width and height of the picture. Draw the general shape of the pumpkin. We’re using a pencil for now,.

How To Draw A Pumpkin Easy For Beginners AESTHETIC DRAWING
At this stage of your drawing you can make your stem just a rough sketch. Web the simplest pumpkin drawing method uses just circles and basic curved lines. With a variety of animals, magical creatures, vehicles, foods, plants and more your kids will never get bored. Add a curved shape on the right. The first step is to draw one.

Step By Step Pumpkin Drawing at Drawing Tutorials
Web to do this, begin by drawing a curved line towards the top of your pumpkin. Web pumpkin drawing step 1. Now you have a pumpkin coloring page to. Web how to draw flower step by step. Draw, cutout and decorate your house this halloween.

How to draw pumpkin step by step YouTube
With a variety of animals, magical creatures, vehicles, foods, plants and more your kids will never get bored. Create the pumpkin’s eyes by drawing two triangles and a mouth. Then, draw a matching curved line on the right side of the pumpkin to make it round. Draw a curved shape on the left. Sketch a wide oval with some indentations.
Begin The Pumpkin Drawing By First Getting It’s Major Shapes.
There are all sorts of stems you could draw. Take a look at the middle arch on top and on the bottom. Sketch a wide oval with some indentations at the bottom. Our how to draw book is here!
Be Sure Allow Some Space Between Each Line.
Now add a couple of lines on the pumpkin root at the top. Draw another curved line across it to give the tip of the stem an oval shape. Pumpkin usually tend to be shaped like a sort of sphere with a squashed in top and bottom. Draw a circle connecting the two lines.
Show, With Light Lines, The Main Proportions Of The Pumpkin, Its Leaf And Its Stem.
Add new lines to show the shape of the pumpkin. To start the process of learning how to draw a pumpkin, the first thing that you should start with is drawing an oval shape using a pencil. Connect the dots 3 times. The first step is to draw one larger circle in the middle and two others overlapping the middle one on either side.
Web Hi Everyone, In This Video I Show You How To Draw A Pumpkin Step By Step 🎃 Pumpkin Drawing Easy.
This shape drawing can be fairly rough and can omit the smaller bends and curves in the shape. Add yet another set of ribs. Draw the vine with a squiggly line. Follow my step by step drawing tutorial and make your own p.