Draw And Label A Microscope
Draw And Label A Microscope - Web the labeling worksheet could be used as a quiz or as part of direct instruction. Below this, draw another curved line, leaving the shape open on one side. The lens the viewer looks through to see the specimen. Answers pdf printable version here. Mechanical parts of a compound microscope foot or base. Useful as a means to change focus on one eyepiece so as to correct for any difference in vision between your two eyes. This forms the arm of the microscope. Then, draw three straight, parallel lines. In this tutorial, writing master shows you how to draw a realistic microscope with labels step by step. Web this worksheet can also be printed by teachers to hand out as a parts of a microscope quiz for students.
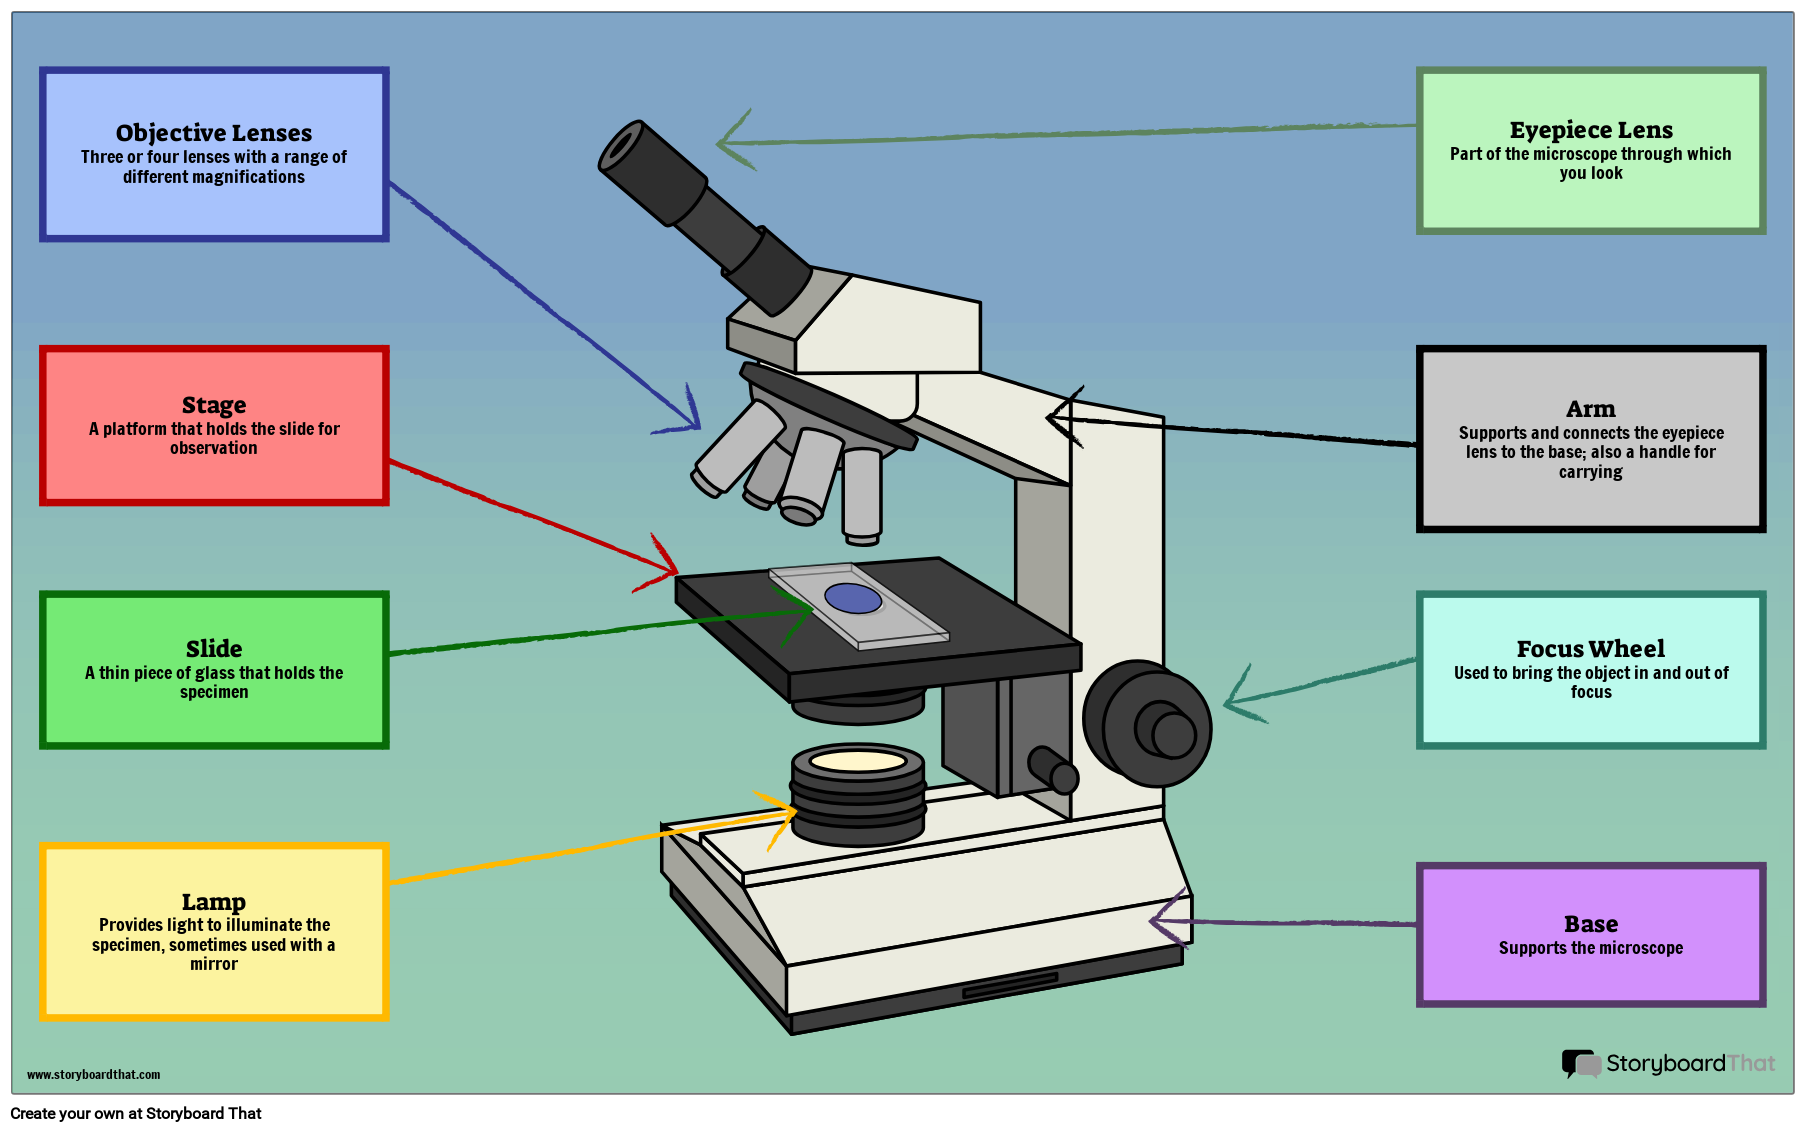
It is important to make sure you have the correct information before labeling your microscope. Check the manual or the label on the microscope to confirm its make and model. The lens the viewer looks through to see the specimen. The arm is the component of the microscope that connects the eyepiece tube to the base of the instrument as well as. Use this with the microscope parts activity to help students identify and label the main parts of a microscope and then describe their functions. The arm connects between the base and the head parts. Lay the foundation of the microscope by making two long parallel lines that will be the arm or body of the microscope. Make sure to use a font that is easy to read and not too small. It is used to visualize opaque objects that cannot be visualized using a compound microscope. Place a cover slip on the suspension and view at 1000x total magnification.
Place a cover slip on the suspension and view at 1000x total magnification. Web all microscopes share features in common. Drag and drop the text labels onto the microscope diagram. Attached to the right side of the head from the previous step, draw two curving lines. Web the labeling worksheet could be used as a quiz or as part of direct instruction. It is also called a body tube or eyepiece tube. Mechanical parts of a compound microscope foot or base. Then they answer short fill in the blank sentences about the proper use of the microscope. The base serves as the microscope’s support and holds the illuminator.; Make sure to use a font that is easy to read and not too small.

How to Draw a Microscope and Label Nesecale Thiptin
Connect them at the bottom using curved lines. Notice the bend in the middle of each line. Web ready to take your drawing skills to the next level? Useful as a means to change focus on one eyepiece so as to correct for any difference in vision between your two eyes. Attached to the right side of the head from.
Simple Microscope Definition, Principle, Magnification, Parts
Microscopy is shared under a cc by 4.0 license and was authored, remixed, and/or curated by orange county biotechnology education collaborative. Web here’s how you can draw a microscope beginning with the arm: Notice the bend in the middle of each line. The arm connects between the base and the head parts. The base serves as the microscope’s support and.

Simple Microscope Drawing at GetDrawings Free download
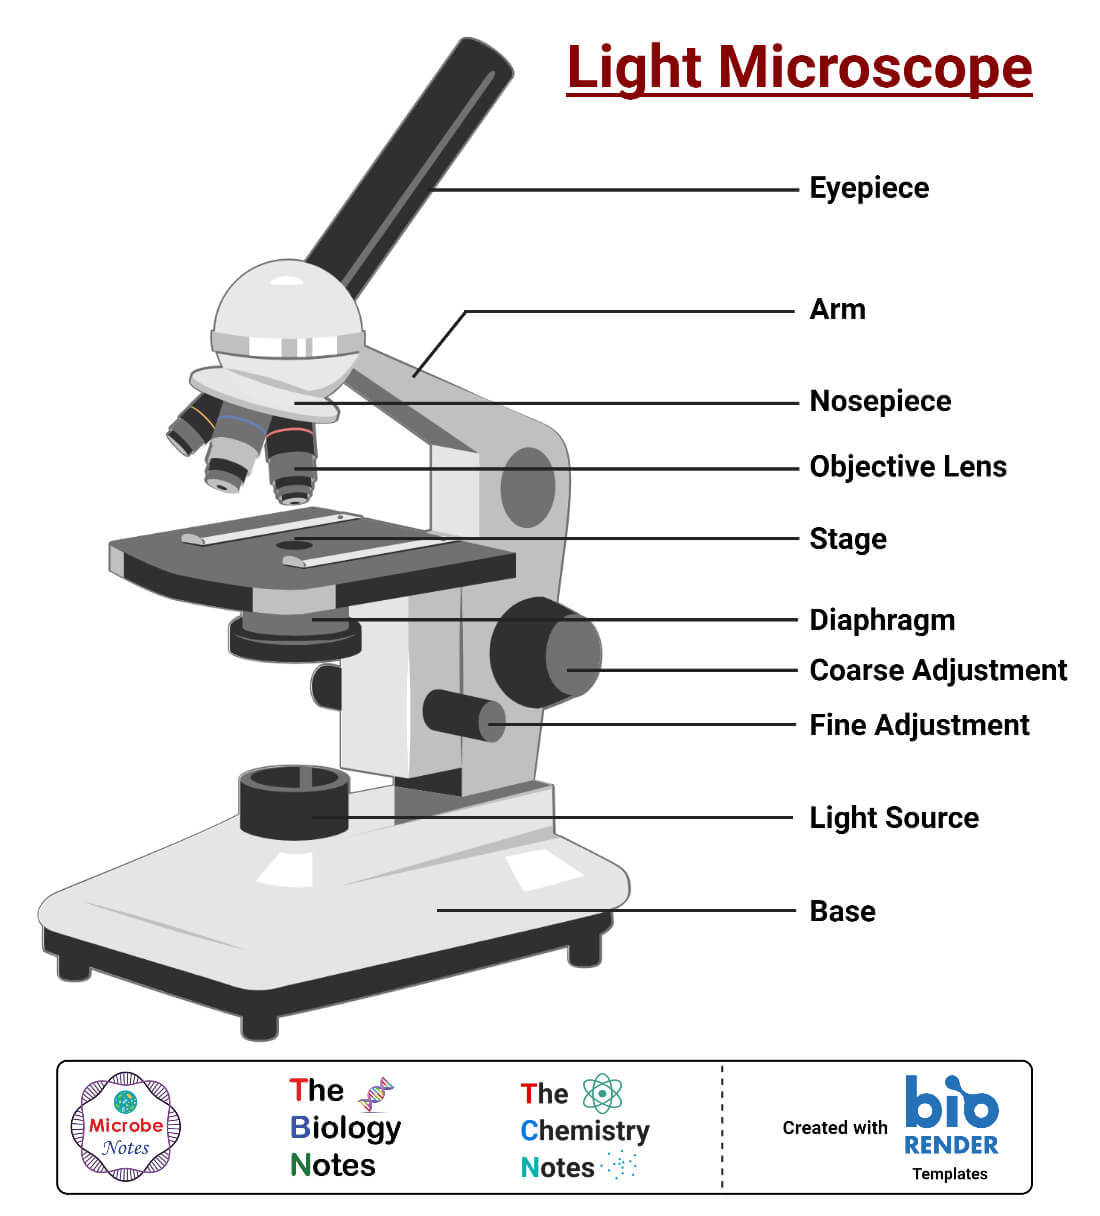
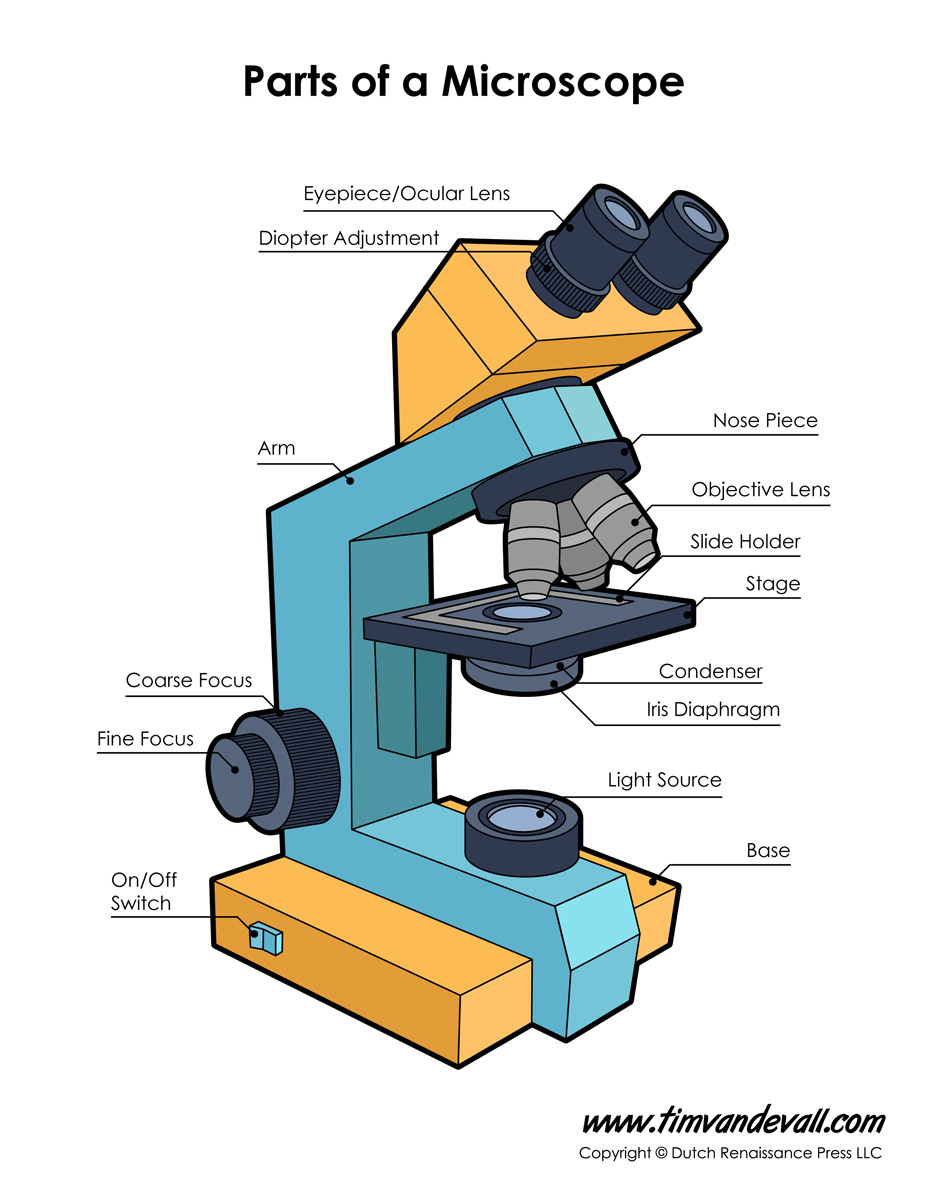
Useful as a means to change focus on one eyepiece so as to correct for any difference in vision between your two eyes. Notice the bend in the middle of each line. Diagram of parts of a microscope. Download the label the parts of the microscope: In this interactive, you can label the different parts of a microscope.
Parts Of A Microscope With Functions And Labeled Diagram Images
The body tube connects the eyepiece to the objective lenses. We are now going to draw the arm that the microscope uses to swivel back and forth. The eyepiece usually contains a 10x or 15x power lens. Attached to the right side of the head from the previous step, draw two curving lines. Structural support that holds & connects the.
Parts of a Microscope Labeling Activity
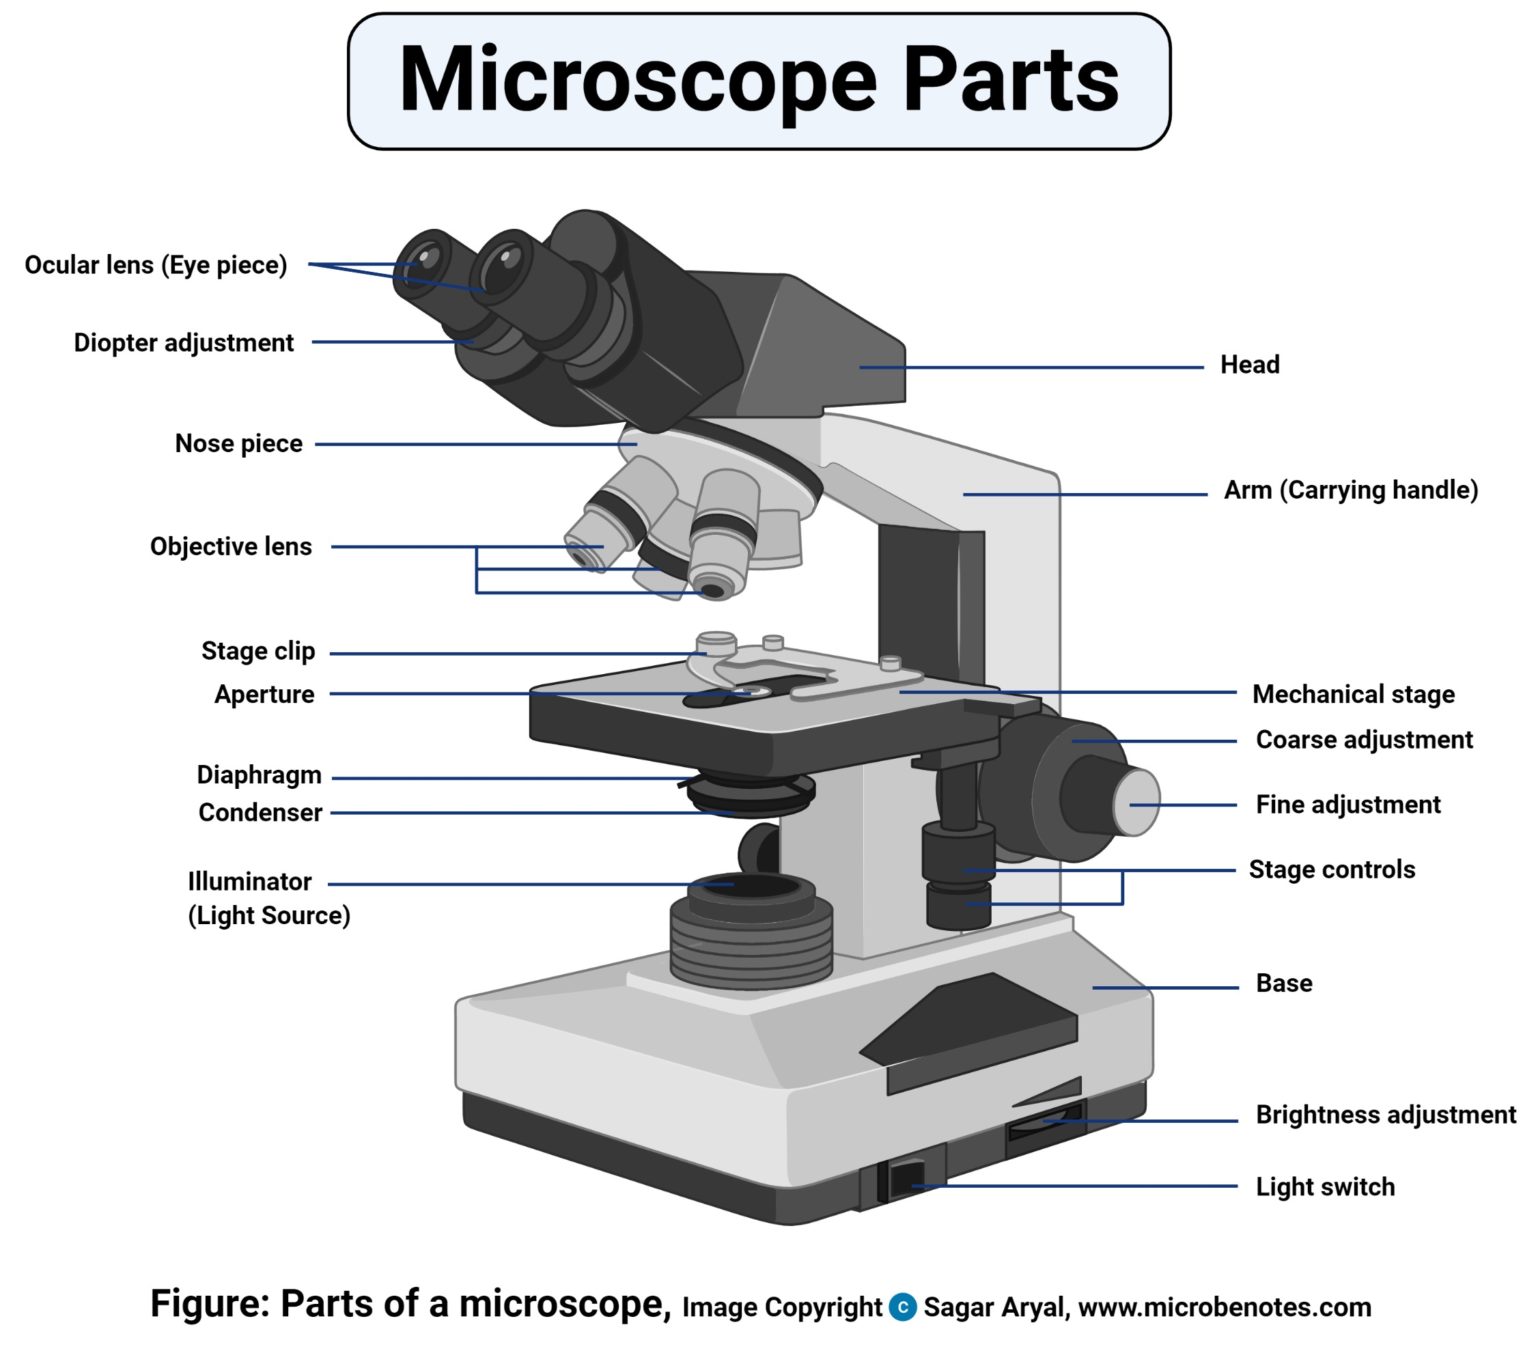
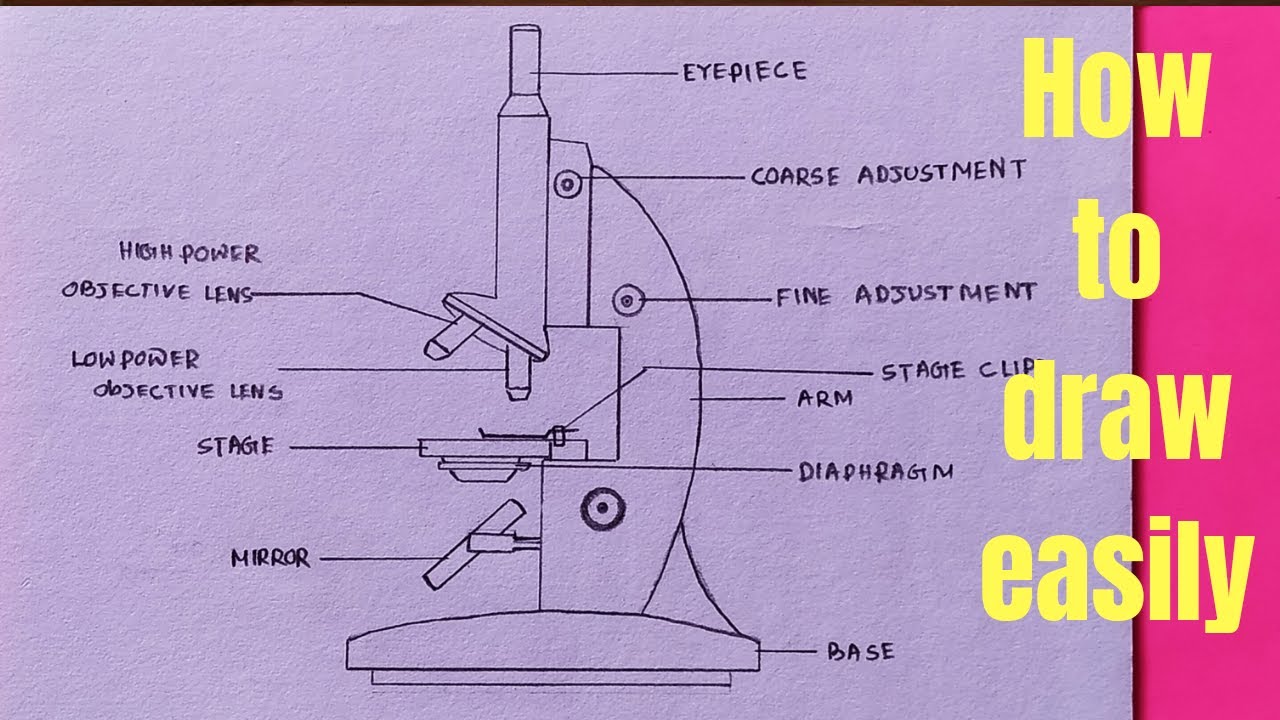
Below this, draw another curved line, leaving the shape open on one side. The circled parts of the microscope are the fine and coarse adjustment knobs. It is important to make sure you have the correct information before labeling your microscope. Students label the microscope as you go over what each part is used for. This example doesn't show the.
Parts of a microscope with functions and labeled diagram
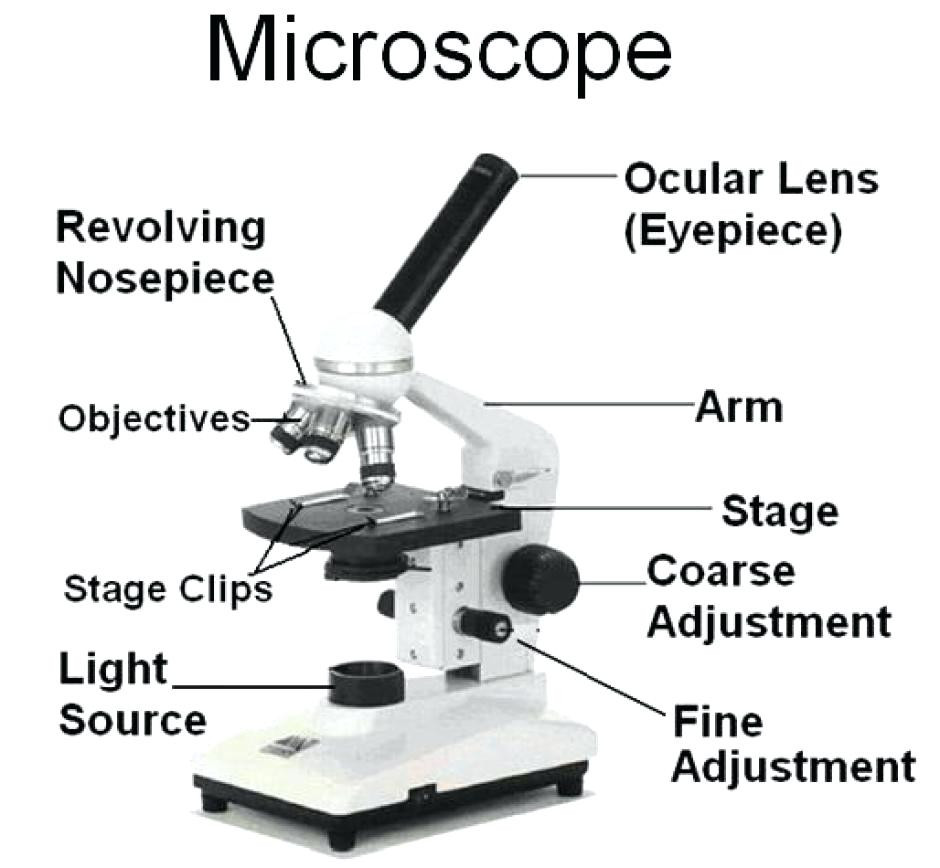
The google slides shown below have the same microscope image with the labels for. The arm connects between the base and the head parts. Web gently scrape the inside of your cheek with a toothpick and swirl it in the dye on the slide. Web all microscopes share features in common. Web eyepiece (ocular lens) with or without pointer:
Microscope Diagram Labeled, Unlabeled and Blank Parts of a Microscope
Students label the microscope as you go over what each part is used for. The base acts as the foundation of microscopes and houses the illuminator. Web the head comprises the top portion of the microscope, which contains the most important optical components, and the eyepiece tube.; The lens the viewer looks through to see the specimen. Use this with.

How To Draw A Microscope 🔬 YouTube
Use a light microscope to make observations of biological specimens and produce labelled scientific drawings. The lens the viewer looks through to see the specimen. The base serves as the microscope’s support and holds the illuminator.; If you want to redo an answer, click on the. Answers pdf printable version here.
How To Draw A Microscope Step By Step
The eyepiece usually contains a 10x or 15x power lens. Web gently scrape the inside of your cheek with a toothpick and swirl it in the dye on the slide. Place a cover slip on the suspension and view at 1000x total magnification. Mechanical parts of a compound microscope foot or base. Web ready to take your drawing skills to.

Labeled Microscope Diagram Tim's Printables
In this tutorial, writing master shows you how to draw a realistic microscope with labels step by step. The base serves as the microscope’s support and holds the illuminator.; To use a light microscope to observe, draw and label a selection of plant and animal cells, including a magnification scale. Connect them at the bottom using curved lines. Web ready.
The Google Slides Shown Below Have The Same Microscope Image With The Labels For.
Attached to the right side of the head from the previous step, draw two curving lines. Web the labeling worksheet could be used as a quiz or as part of direct instruction. Web ready to take your drawing skills to the next level? Web there are three major structural parts of a compound microscope.
Web All Microscopes Share Features In Common.
The eyepiece usually contains a 10x or 15x power lens. Add two lines on top of it at a 45° angle to make the eye tube. Web eyepiece (ocular lens) with or without pointer: Make sure to use a font that is easy to read and not too small.
If You Want To Redo An Answer, Click On The.
It is important to make sure you have the correct information before labeling your microscope. The majority of the microscope models today have the knobs mounted on the same part of the device. The base acts as the foundation of microscopes and houses the illuminator. Drag and drop the text labels onto the microscope diagram.
The Circled Parts Of The Microscope Are The Fine And Coarse Adjustment Knobs.
This example doesn't show the head as clearly as other microscope pictures do, so to do yours better look at a few other microscope images. Blank microscope to label parts. Web draw the “e” in table 5.2 as you view it with your eyes (not through the microscope). This forms the arm of the microscope.