Draw Cake Step By Step
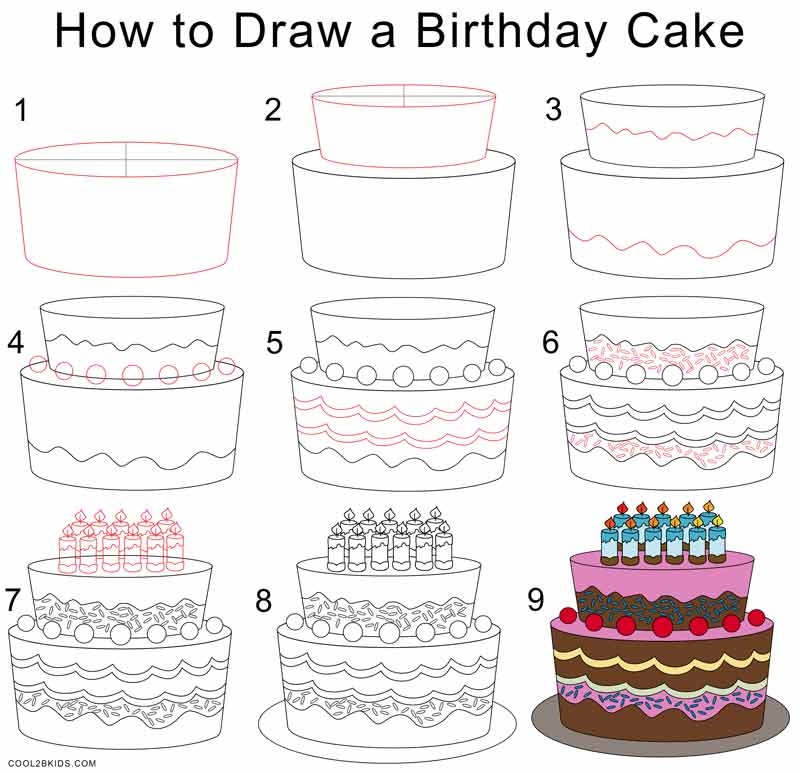
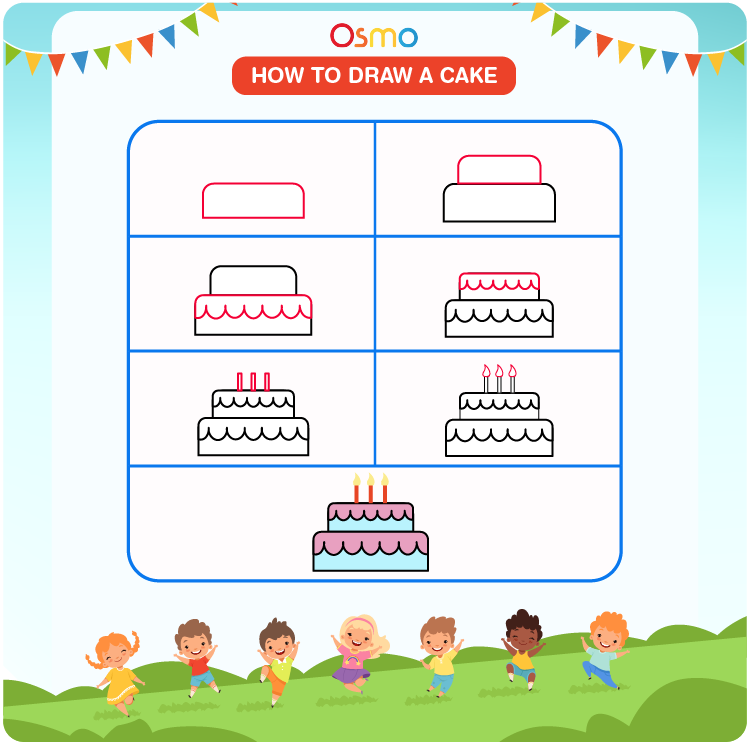
Draw Cake Step By Step - Web directions to draw a birthday cake step by step. Draw smooth, curved lines to connect the layers and give the cake a cohesive look. In doing this, we will start at the base and move up. Learn how to create a whimsical masterpiece by drawing a simple cake with a magical unicorn! Web leave a little bit of space between the bottom of your second tier and the edge of your first tier. Web how to draw a birthday cake easy and step by step. Following these steps, you’ll have a cake to color and decorate in no time! Next, draw the top of your second tier. Add a line under each side of the ellipse. This curve will form the bottom edge of the cake and should be as smooth as possible.
When you do this, make sure you squish it the same amount as your first tier. Next, draw the layers of the cake. Our printable drawing guide (optional) pencil or black marker; Lastly, fill in the plate with a pink crayon. Perfect for young artists of all ages, this vi. Draw an ellipse (a flat circle). In doing this, we will start at the base and move up. Draw a curved line from one side of the cake to the other, outlining the round top and straight sides. Afterwards, add a short vertical line at the bottom of the flame. Add another drippy edge of frosting.
The cake will be rather squared in shape, but the corners will be a bit rounded. Leave space above and below your ellipse, since this will serve as the top of your cake and you don't want to run out of room for the strawberries or the bottom layers. Add detail to the decorations on the cake. For part two of your cake drawing, we will be using the shape that you drew in step one to build upon. If not, your cake drawing will not look right. Lastly, fill in the plate with a pink crayon. Web how to draw a happy birthday cake easy | birthday cake drawing step by step Here’s a look at may 13, 2024 results for each game: In doing this, we will start at the base and move up. This will also fill in the space that you left at the top of the plate earlier.
How to Draw a Birthday Cake (Step by Step Pictures)
Web how to draw a happy birthday cake easy | birthday cake drawing step by step Add another drippy edge of frosting. The cake will be rather squared in shape, but the corners will be a bit rounded. Lastly, fill in the plate with a pink crayon. Web complete the cake drawing.

How to Draw a Cake (Step by Step) HelloArtsy
Williamson says, the cake can also be cut in a large grid. Our how to draw book is here! Erase line, add a smaller tube on top. Web how to draw a happy birthday cake easy | birthday cake drawing step by step If not, your cake drawing will not look right.
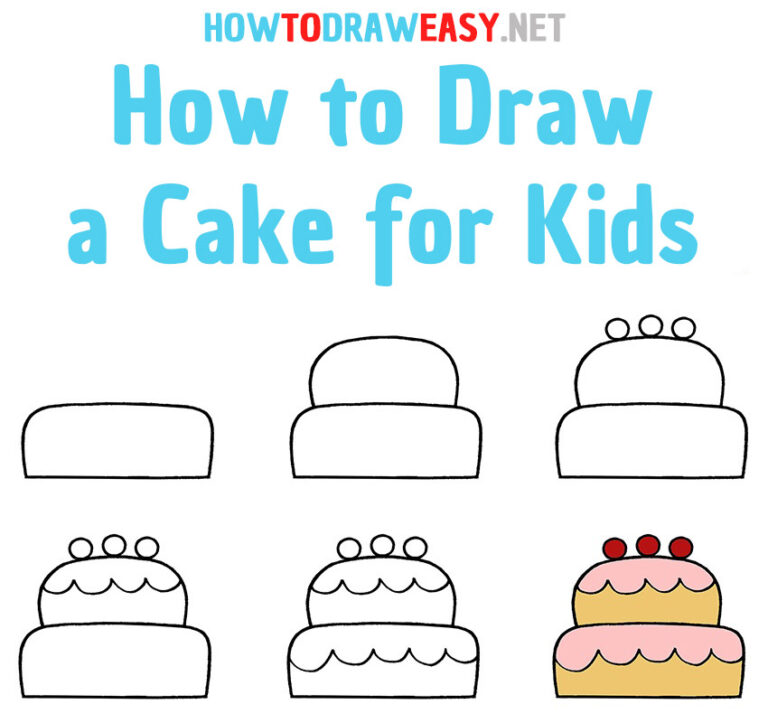
How to Draw a Cake for Kids How to Draw Easy
Our printable drawing guide (optional) pencil or black marker; Perfect for beginners and aspiring artists, this comprehensive guide breaks. Web how to draw a cute cake easy step by stepdrawing and coloring, draw, coloring, how to draw, kawaii drawings, pencil sketch, drawings tumblr, painting, drawin. Add the top of the cake. With a variety of animals, magical creatures, vehicles, foods,.

HOW TO DRAW BIRTHDAY CAKE FOR KIDS STEP BY STEP DRAWING OF CAKE FOR
When you do this, make sure you squish it the same amount as your first tier. Web how to draw a birthday cake easy and step by step. Draw a curved line from one side of the cake to the other, outlining the round top and straight sides. Erase line and draw drippy frosting. Starting from the top of your.
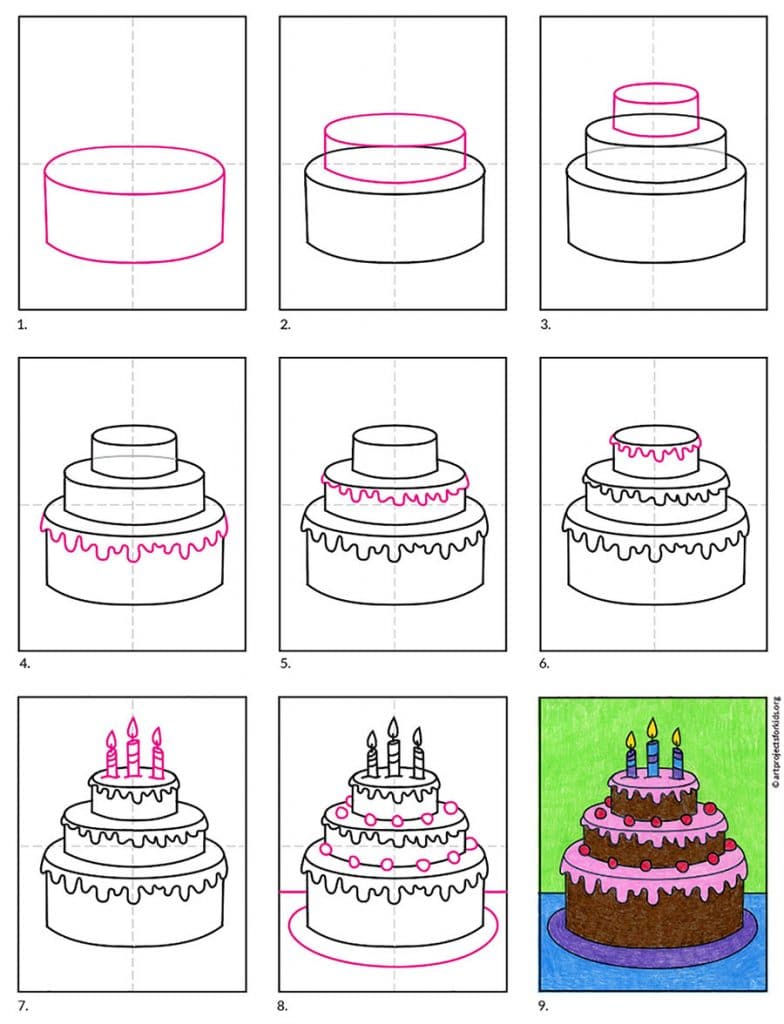
Easy How to Draw Birthday Cake Tutorial · Art Projects for Kids
Above this layer, draw two more parallel vertical lines, and connect them at the bottom using a curved line. If not, your cake drawing will not look right. Following these steps, you’ll have a cake to color and decorate in no time! Add the last drippy edge of frosting. We will also be adding some of the.

Cake Drawing Step By Step at Drawing Tutorials
Add the last drippy edge of frosting. Web how to draw a happy birthday cake easy | birthday cake drawing step by step Web how to draw a birthday cake easy and step by step. Web how to draw flower step by step. This will also fill in the space that you left at the top of the plate earlier.
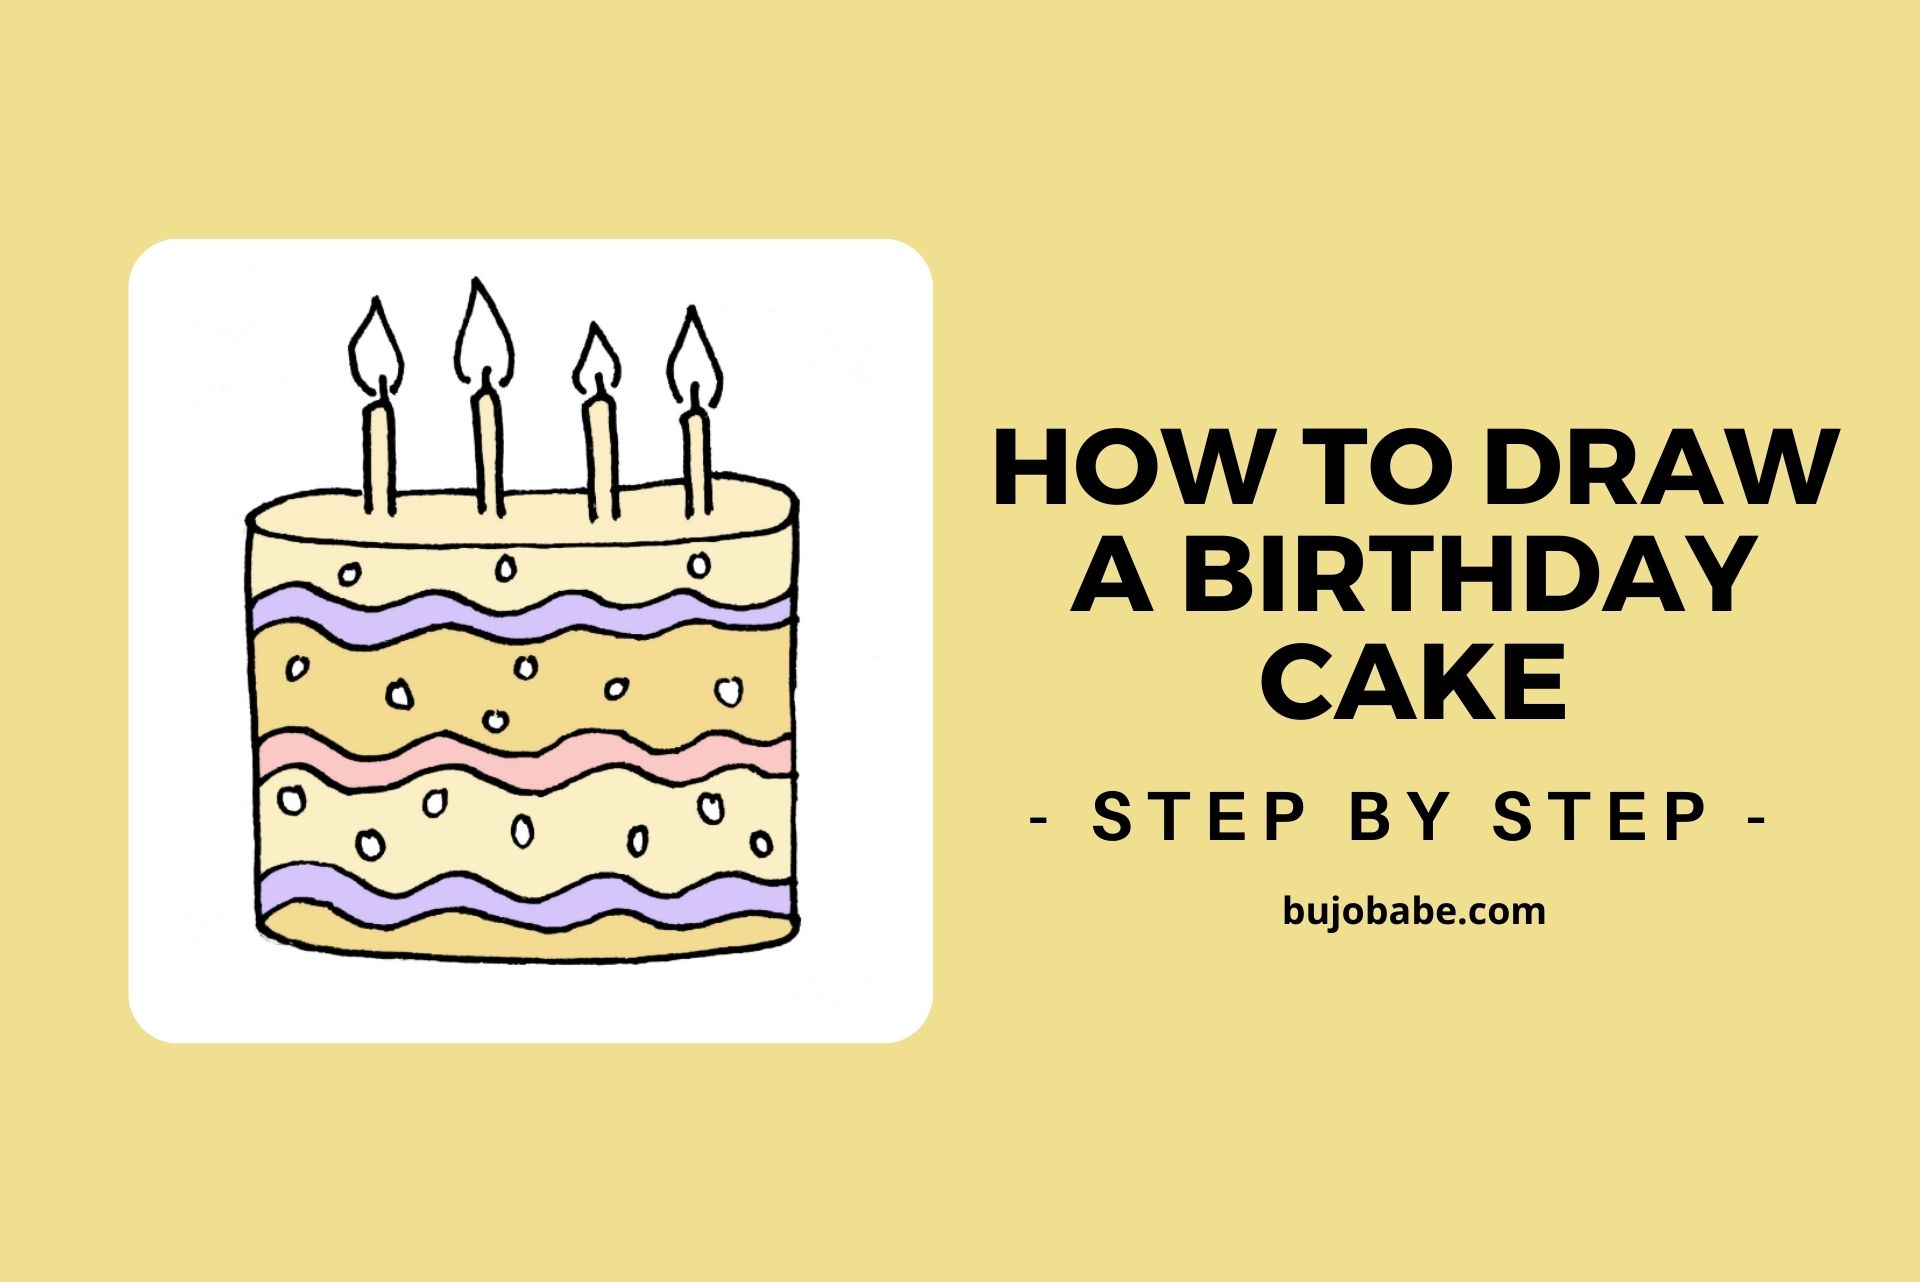
How To Draw A Birthday Cake (Step By Step Tutorial) Bujo Babe
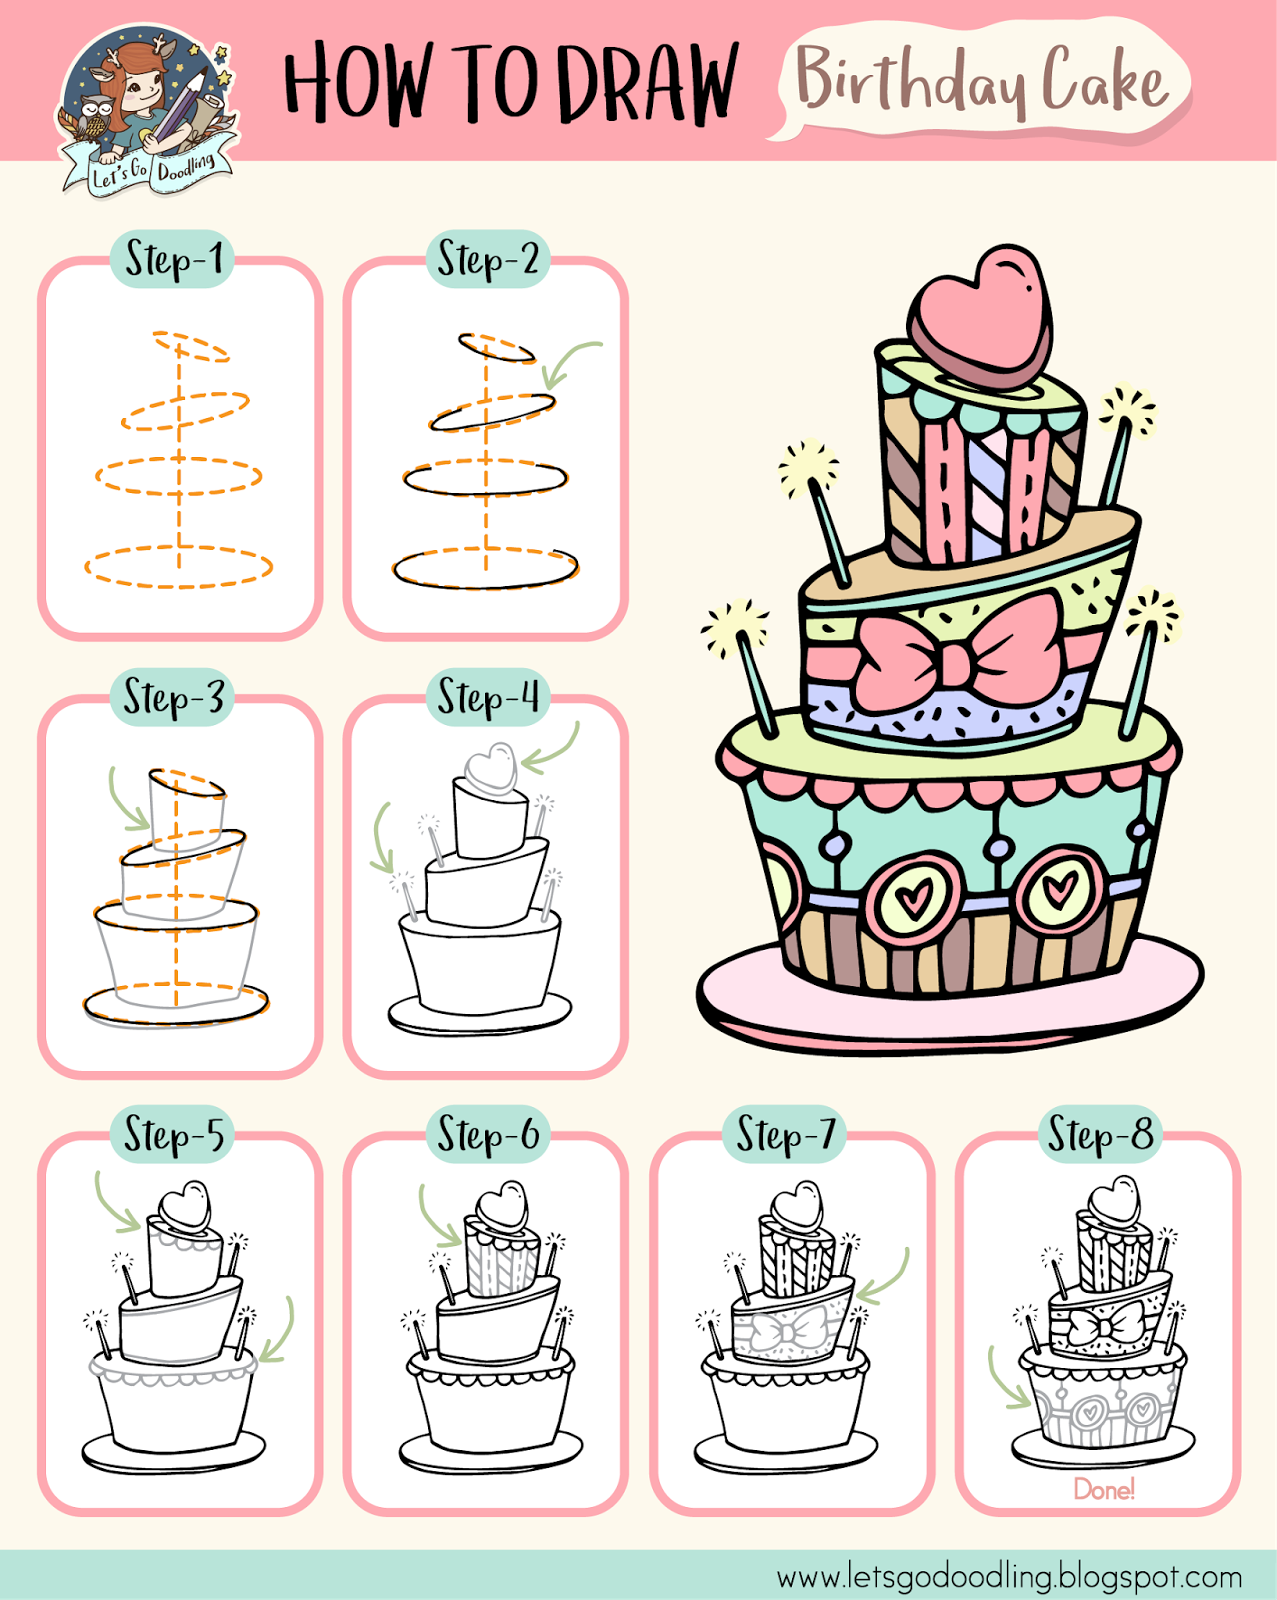
Then, from the tip of the candle wick, draw a diagonal line with a drip shape at the bottom to create the melted candle wax effect. Erase line, add a smaller tube on top. Add another drippy edge of frosting. Erase line and draw drippy frosting. Leave space above and below your ellipse, since this will serve as the top.
How to Draw a Cake A StepbyStep Tutorial for Kids
Web directions to draw a birthday cake step by step. Add cherries or candy and a plate. Here’s a look at may 13, 2024 results for each game: We will also be adding some of the. Web complete the cake drawing.
How To Draw Birthday Cake Easy Step By Step Drawing Tutorial
If not, your cake drawing will not look right. Make sure your cakes are bigger at the bottom and smaller as they move up. Draw a tube for the bottom layer. Above this layer, draw two more parallel vertical lines, and connect them at the bottom using a curved line. Our how to draw book is here!

How to Draw a Cake Step by Step Drawing Tutorial EN Vik News
Make sure your cakes are bigger at the bottom and smaller as they move up. Web learn how to draw this super yummy cute cake with an ice cream and cone on top to celebrate draw so cute 300k+ subscribers and the 300th video upload. Our printable drawing guide (optional) pencil or black marker; This will also fill in the.
Draw This Birthday Cake By Following This Drawing Lesson.
Above this layer, draw two more parallel vertical lines, and connect them at the bottom using a curved line. Afterwards, add a short vertical line at the bottom of the flame. Web how to draw a cute cake easy step by stepdrawing and coloring, draw, coloring, how to draw, kawaii drawings, pencil sketch, drawings tumblr, painting, drawin. Remember to gather the necessary materials, sketch the basic shape, add details, refine the outline, add shading and highlights, optionally add color, finalize the details, and preserve your artwork.
Draw An Ellipse (A Flat Circle).
Web learn how to draw this super yummy cute cake with an ice cream and cone on top to celebrate draw so cute 300k+ subscribers and the 300th video upload. Perfect for young artists of all ages, this vi. Draw a curved line from one side of the cake to the other, outlining the round top and straight sides. Add a line under each side of the ellipse.
Lastly, Fill In The Plate With A Pink Crayon.
Express your creativity and create unicorn drawings that will amaze everyone. Draw two more layers of cake, erasing as necessary. Web simple cake with unicorn drawing. Our how to draw book is here!
Make Sure Your Cakes Are Bigger At The Bottom And Smaller As They Move Up.
Sketch the cake, add layers, decorate it, draw the unicorn, add colors, and add final touches. Next, draw the top of your second tier. If not, your cake drawing will not look right. First, draw two slightly curved lines coming down from the oval that you drew.