Drawing Pine Trees In Pencil
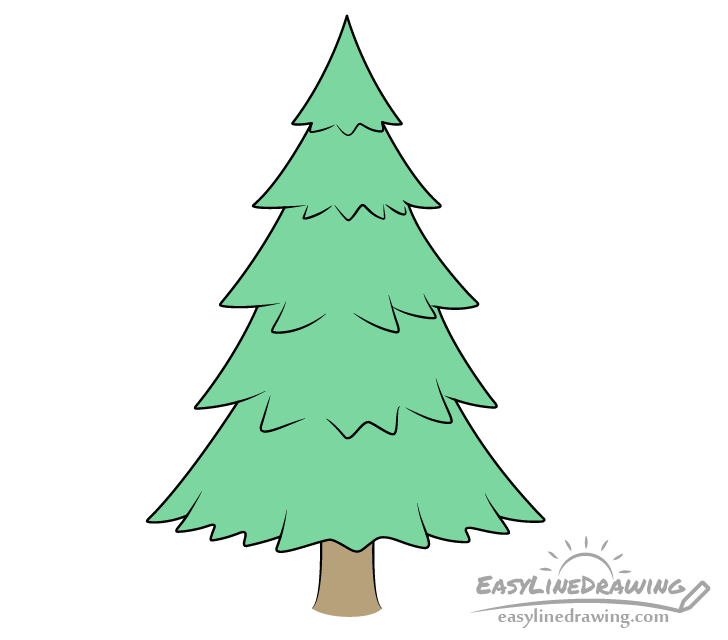
Drawing Pine Trees In Pencil - Web return your attention to the top of the tree trunk, and use your pencil to create numerous branches that spider in different directions. In almost all landscapes, they play an integral part in the scene. Web let me shed some light on the subject. The shape of a pine tree like the one in this example is similar to a stack of cones that get smaller towards the top. :)you can also support me on patreon where you can find a lot more content: Web do your pine trees look like children's christmas drawings? Here's the link to the second part: Web first, draw the branch that overlaps a tree, then the tree trunk. I really hope this is helpful in some way. Below the top of the pine, add two more curved lines and connect their ends with a zigzag.
Blend the base of the tree to its surroundings. how to draw pine trees is specially recorded for the beginning a. Start the drawing going top to bottom with sets of curved set the size of these “cones”. Do the same for the right side. This will define the upper part of the canopy and the general. Sketch the trunk and branches. In almost all landscapes, they play an integral part in the scene. Web how to draw realistic trees. Web let me shed some light on the subject. Web the hahnemühle lettering pads of bright white paper i’ve been drawing on for a while are excellent and come in a variety of sizes;
Web templates & workbooks: In almost all landscapes, they play an integral part in the scene. This time, they should be narrower and even more ragged. Sketch the trunk and branches. Draw the top of the pine tree. Blend the base of the tree to its surroundings. Web here's a quick video on how to sketch a pine tree. The shape of a pine tree like the one in this example is similar to a stack of cones that get smaller towards the top. For trees that have a complex structure, with many branches, you can use a pencil to draw the basic shapes. Better yet, vol 3 of my pen and ink drawing workbooks covers drawing pine trees in detail with additional techniques and compositions based on pine trees.
How to Draw a Pine Tree Step by Step EasyLineDrawing
:)you can also support me on patreon where you can find a lot more content: How the trees, grass and foliage are represented in a drawing have a direct impact on the entire mood and success of the drawing. Depict two curved lines, and then connect their lower ends with a zigzag. Draw the outline of the trunk; Add details.

Pin by Samantha Bailey on Sam's Brucius tattoo Tree drawing, Pine
Try it today and see how enjoyable it is to learn to draw pen and. Then for the dark pencil, a four or six. Materials are really simple for this class, we just want our three standard pencils that we normally use, a middle and a dark pencil. Next, extend several diagonal lines from the top of the trunk to.

How to Draw and Paint Evergreen Trees Tree drawing, Trees drawing
The shape of a pine tree like the one in this example is similar to a stack of cones that get smaller towards the top. Keep a lot of empty areas between them. And finally, under the canopy, sketch the trunk. Below the top of the pine, add two more curved lines and connect their ends with a zigzag. :)you.
Pine Tree Pencil Drawing
Sketch the trunk and branches. Web let me shed some light on the subject. One branch goes to the left and one to the right. Next, extend several diagonal lines from the top of the trunk to create branches. Trees are also one of the most complex and intimidating subject matter to draw.

Wheeler+Knoll+Pines2.JPG (1243×1600) Tree drawing, Pine tree drawing
Next, add large circles to the bare branches of the oak tree. Next, add a triangular shape that is bisected by the trunk line. Continue doing so until you have growth in all directions. Web how to draw realistic trees. Depict two curved lines, and then connect their lower ends with a zigzag.

Drawing a Pine Tree in Colored Pencil YouTube
Draw the outline of the trunk; Web in this friday's tutorial, we will be taking a close look at how a pinetree is build up. The easiest way to draw trees is to follow these three steps: [4] vary the sizes of the branches so they look more natural. Remember to vary the length and angle of the branches for.

Step By Step Realistic Pine Tree Drawing Easy Drawing Ideas
Web return your attention to the top of the tree trunk, and use your pencil to create numerous branches that spider in different directions. Web just like with the oak, draw the clouds on the pine tree branches drawing. Continue to draw more branches. Web how to draw realistic trees. Web 'how to draw a tree?' is a question that.

Black and white drawings of pine trees. Tree sketches, Tree drawings
I really hope this is helpful in some way. Web just like with the oak, draw the clouds on the pine tree branches drawing. Web here's a quick video on how to sketch a pine tree. Do the same for the right side. The triangular shape helps to mimic the pine tree’s natural growth pattern.
Pencil Drawing Pine Trees pencildrawing2019
I really hope this is helpful in some way. how to draw pine trees is specially recorded for the beginning a. Web the hahnemühle lettering pads of bright white paper i’ve been drawing on for a while are excellent and come in a variety of sizes; Depict light, shadow, and textures by tonal rendering. Web in this friday's tutorial, we.

Step by step drawing a pine tree Tree drawing simple, Tree drawings
Continue to draw more branches. The strategy explained and demonstrated in this video will make drawing any species of pine tree. Draw the top of the pine tree. Web templates & workbooks: Please don't forget to subscribe to my channel for support.
This Will Define The Upper Part Of The Canopy And The General.
Continue to draw the lines for the right side of the pine tree. Web here's a quick video on how to sketch a pine tree. Better yet, vol 3 of my pen and ink drawing workbooks covers drawing pine trees in detail with additional techniques and compositions based on pine trees. Here's the link to the second part:
Next, Extend Several Diagonal Lines From The Top Of The Trunk To Create Branches.
Web how to draw realistic trees. Keep drawing the lines for the left of the pine tree. One branch goes to the left and one to the right. Web 'how to draw a tree?' is a question that i get asked often, online an offline, so i decided to make this tutorial here.
Start The Drawing Going Top To Bottom With Sets Of Curved Set The Size Of These “Cones”.
***this post contains affiliate links.*** for me drawing trees is all about branches Keep a lot of empty areas between them. Materials are really simple for this class, we just want our three standard pencils that we normally use, a middle and a dark pencil. Draw the top of the pine tree.
For Trees That Have A Complex Structure, With Many Branches, You Can Use A Pencil To Draw The Basic Shapes.
Please don't forget to subscribe to my channel for support. Add the second tier of the pine tree. Below the top of the pine, add two more curved lines and connect their ends with a zigzag. Do the same for the right side.