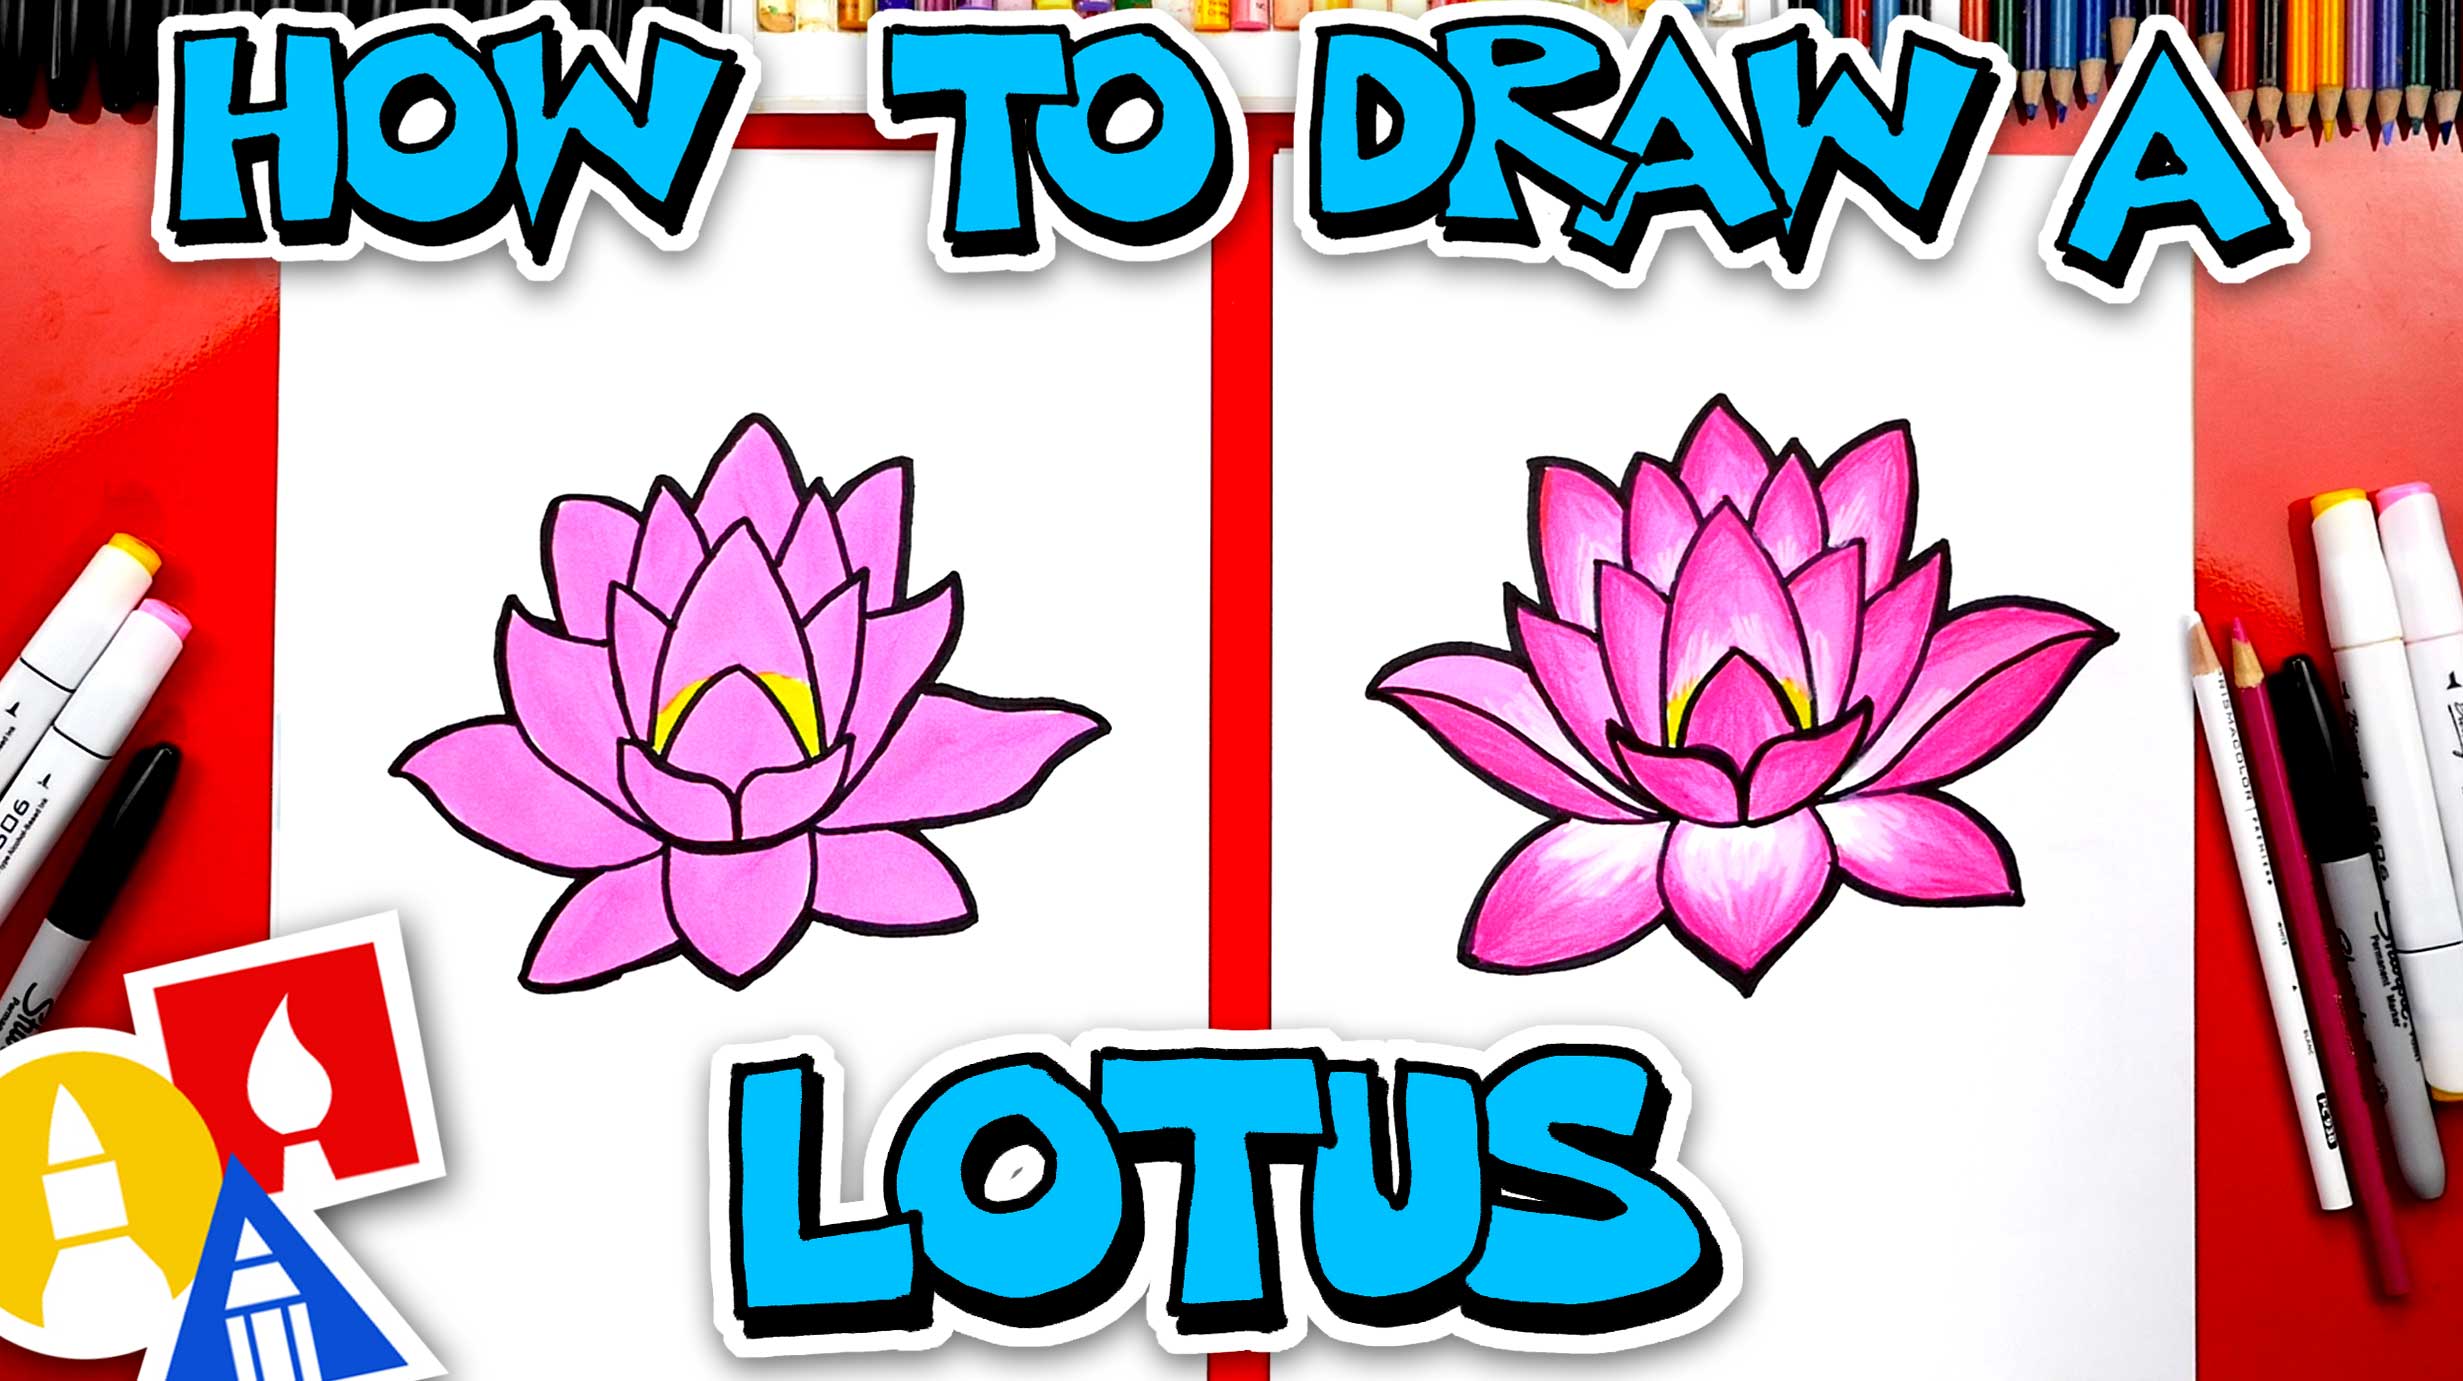
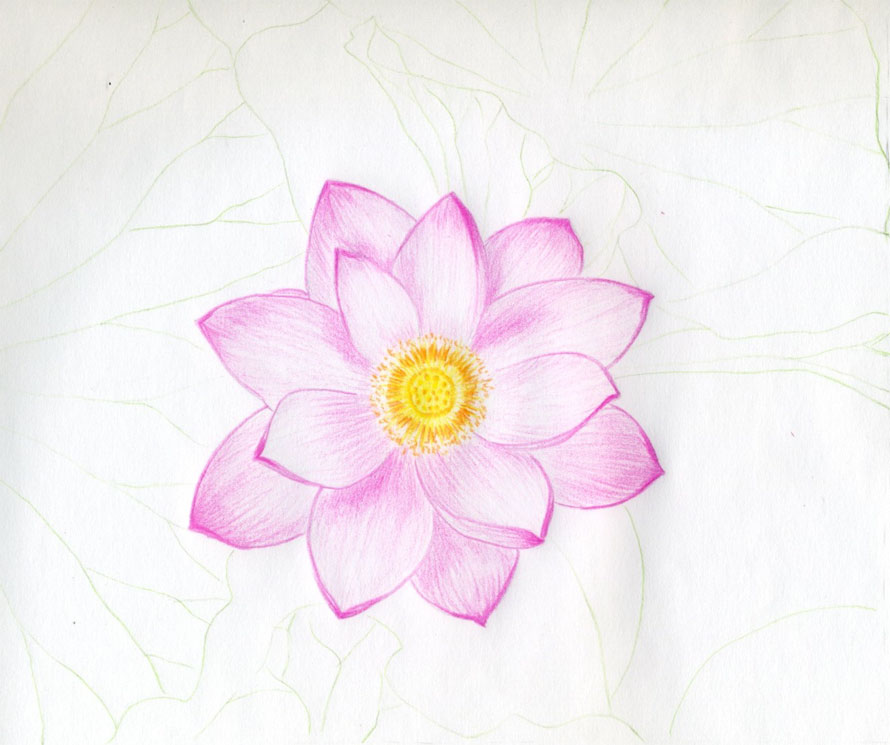
Easy Lotus Flower Drawing
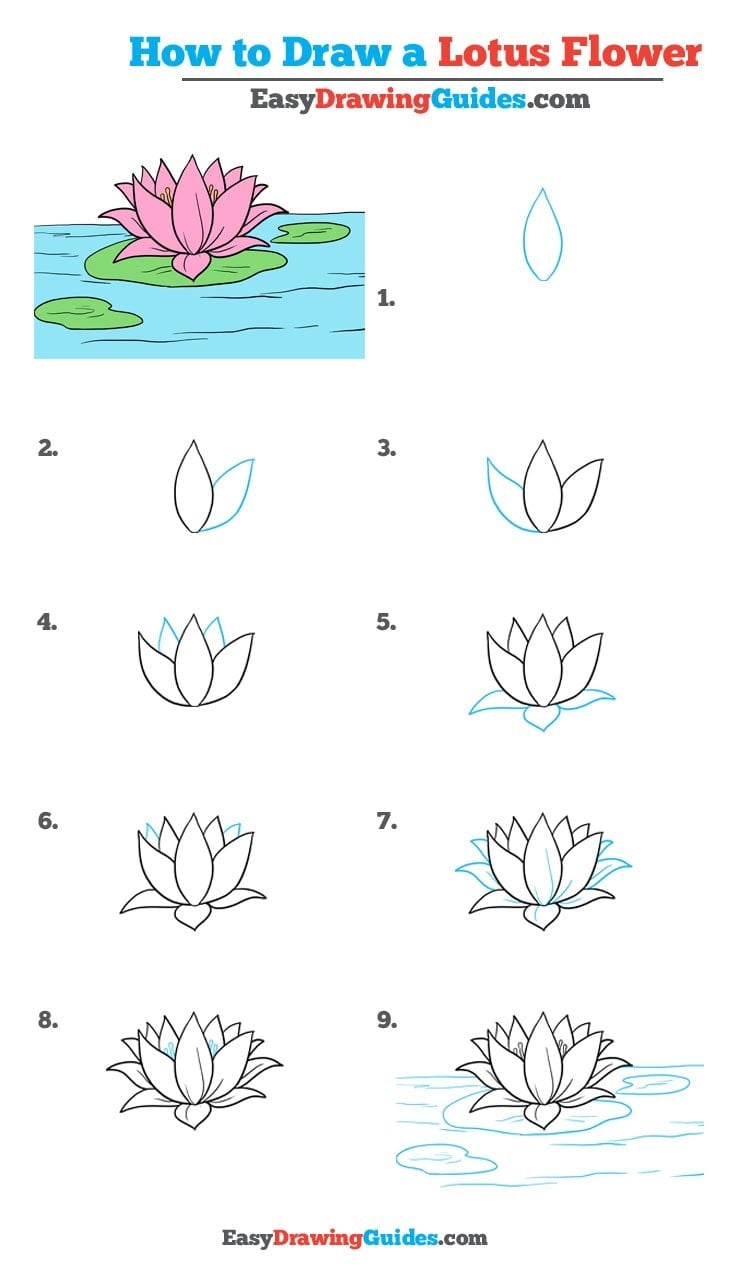
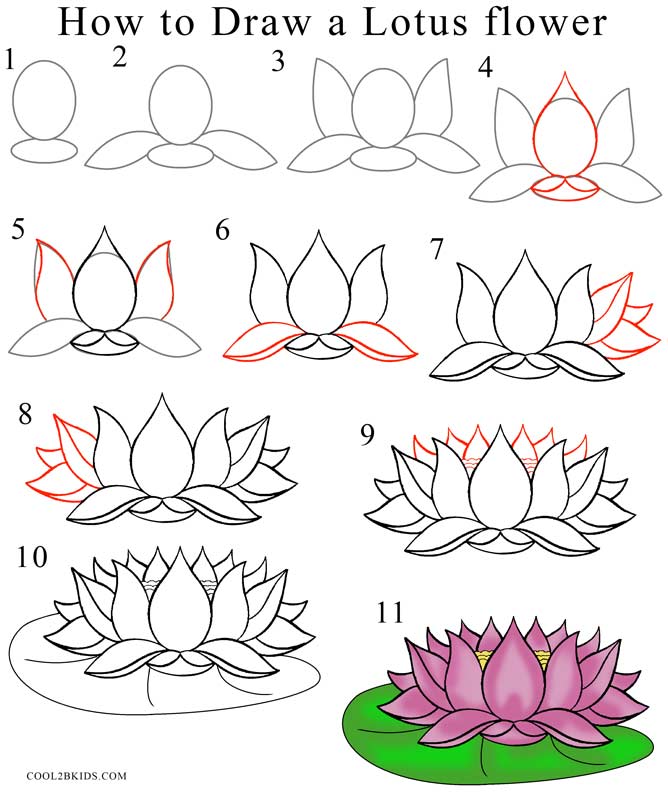
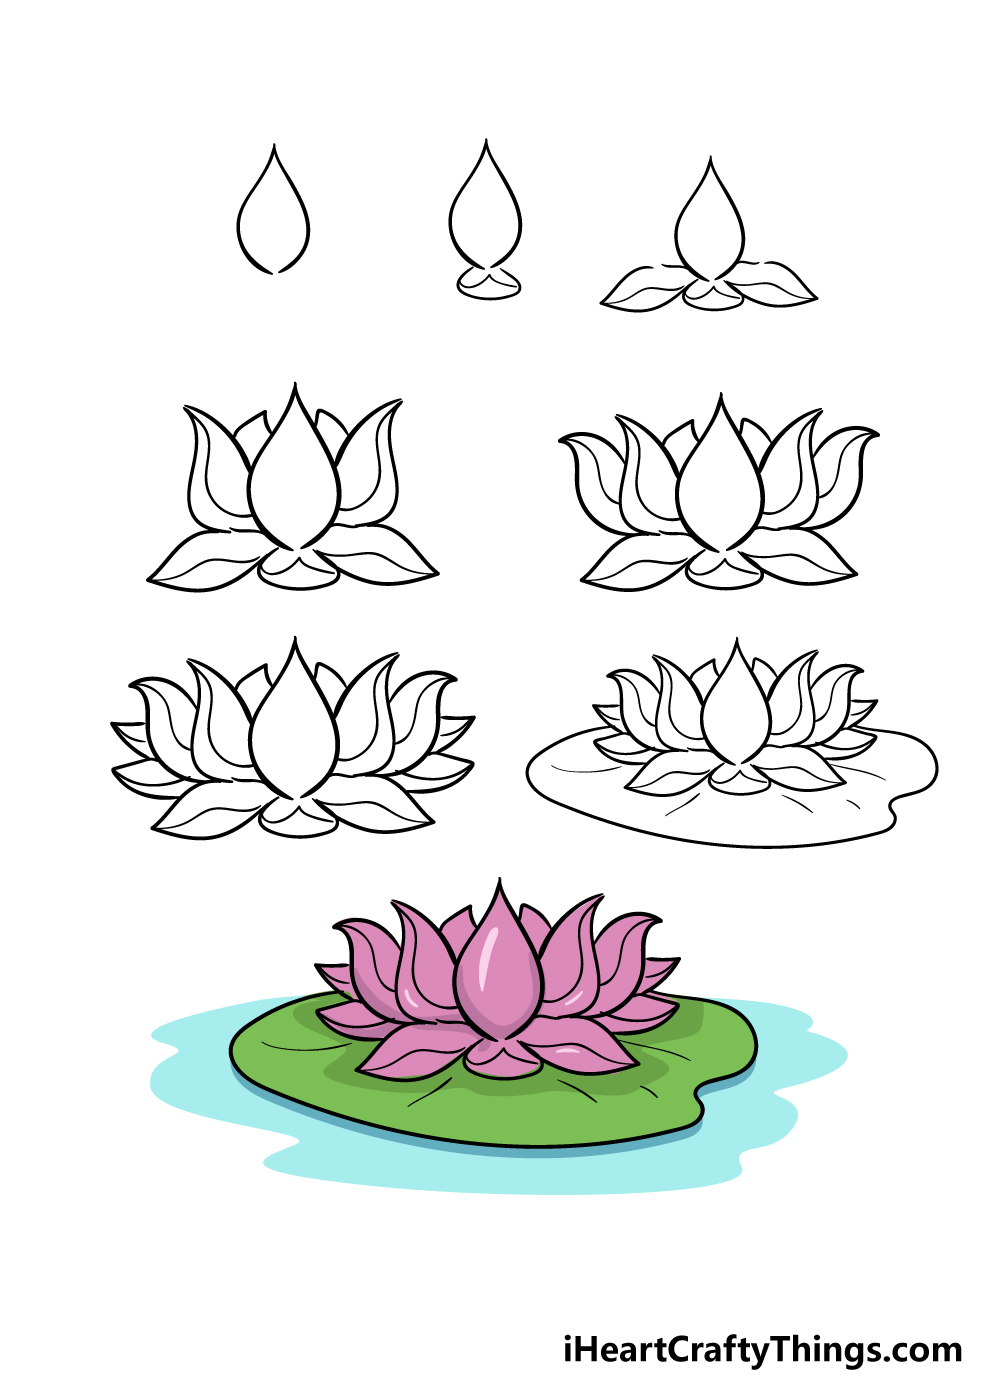
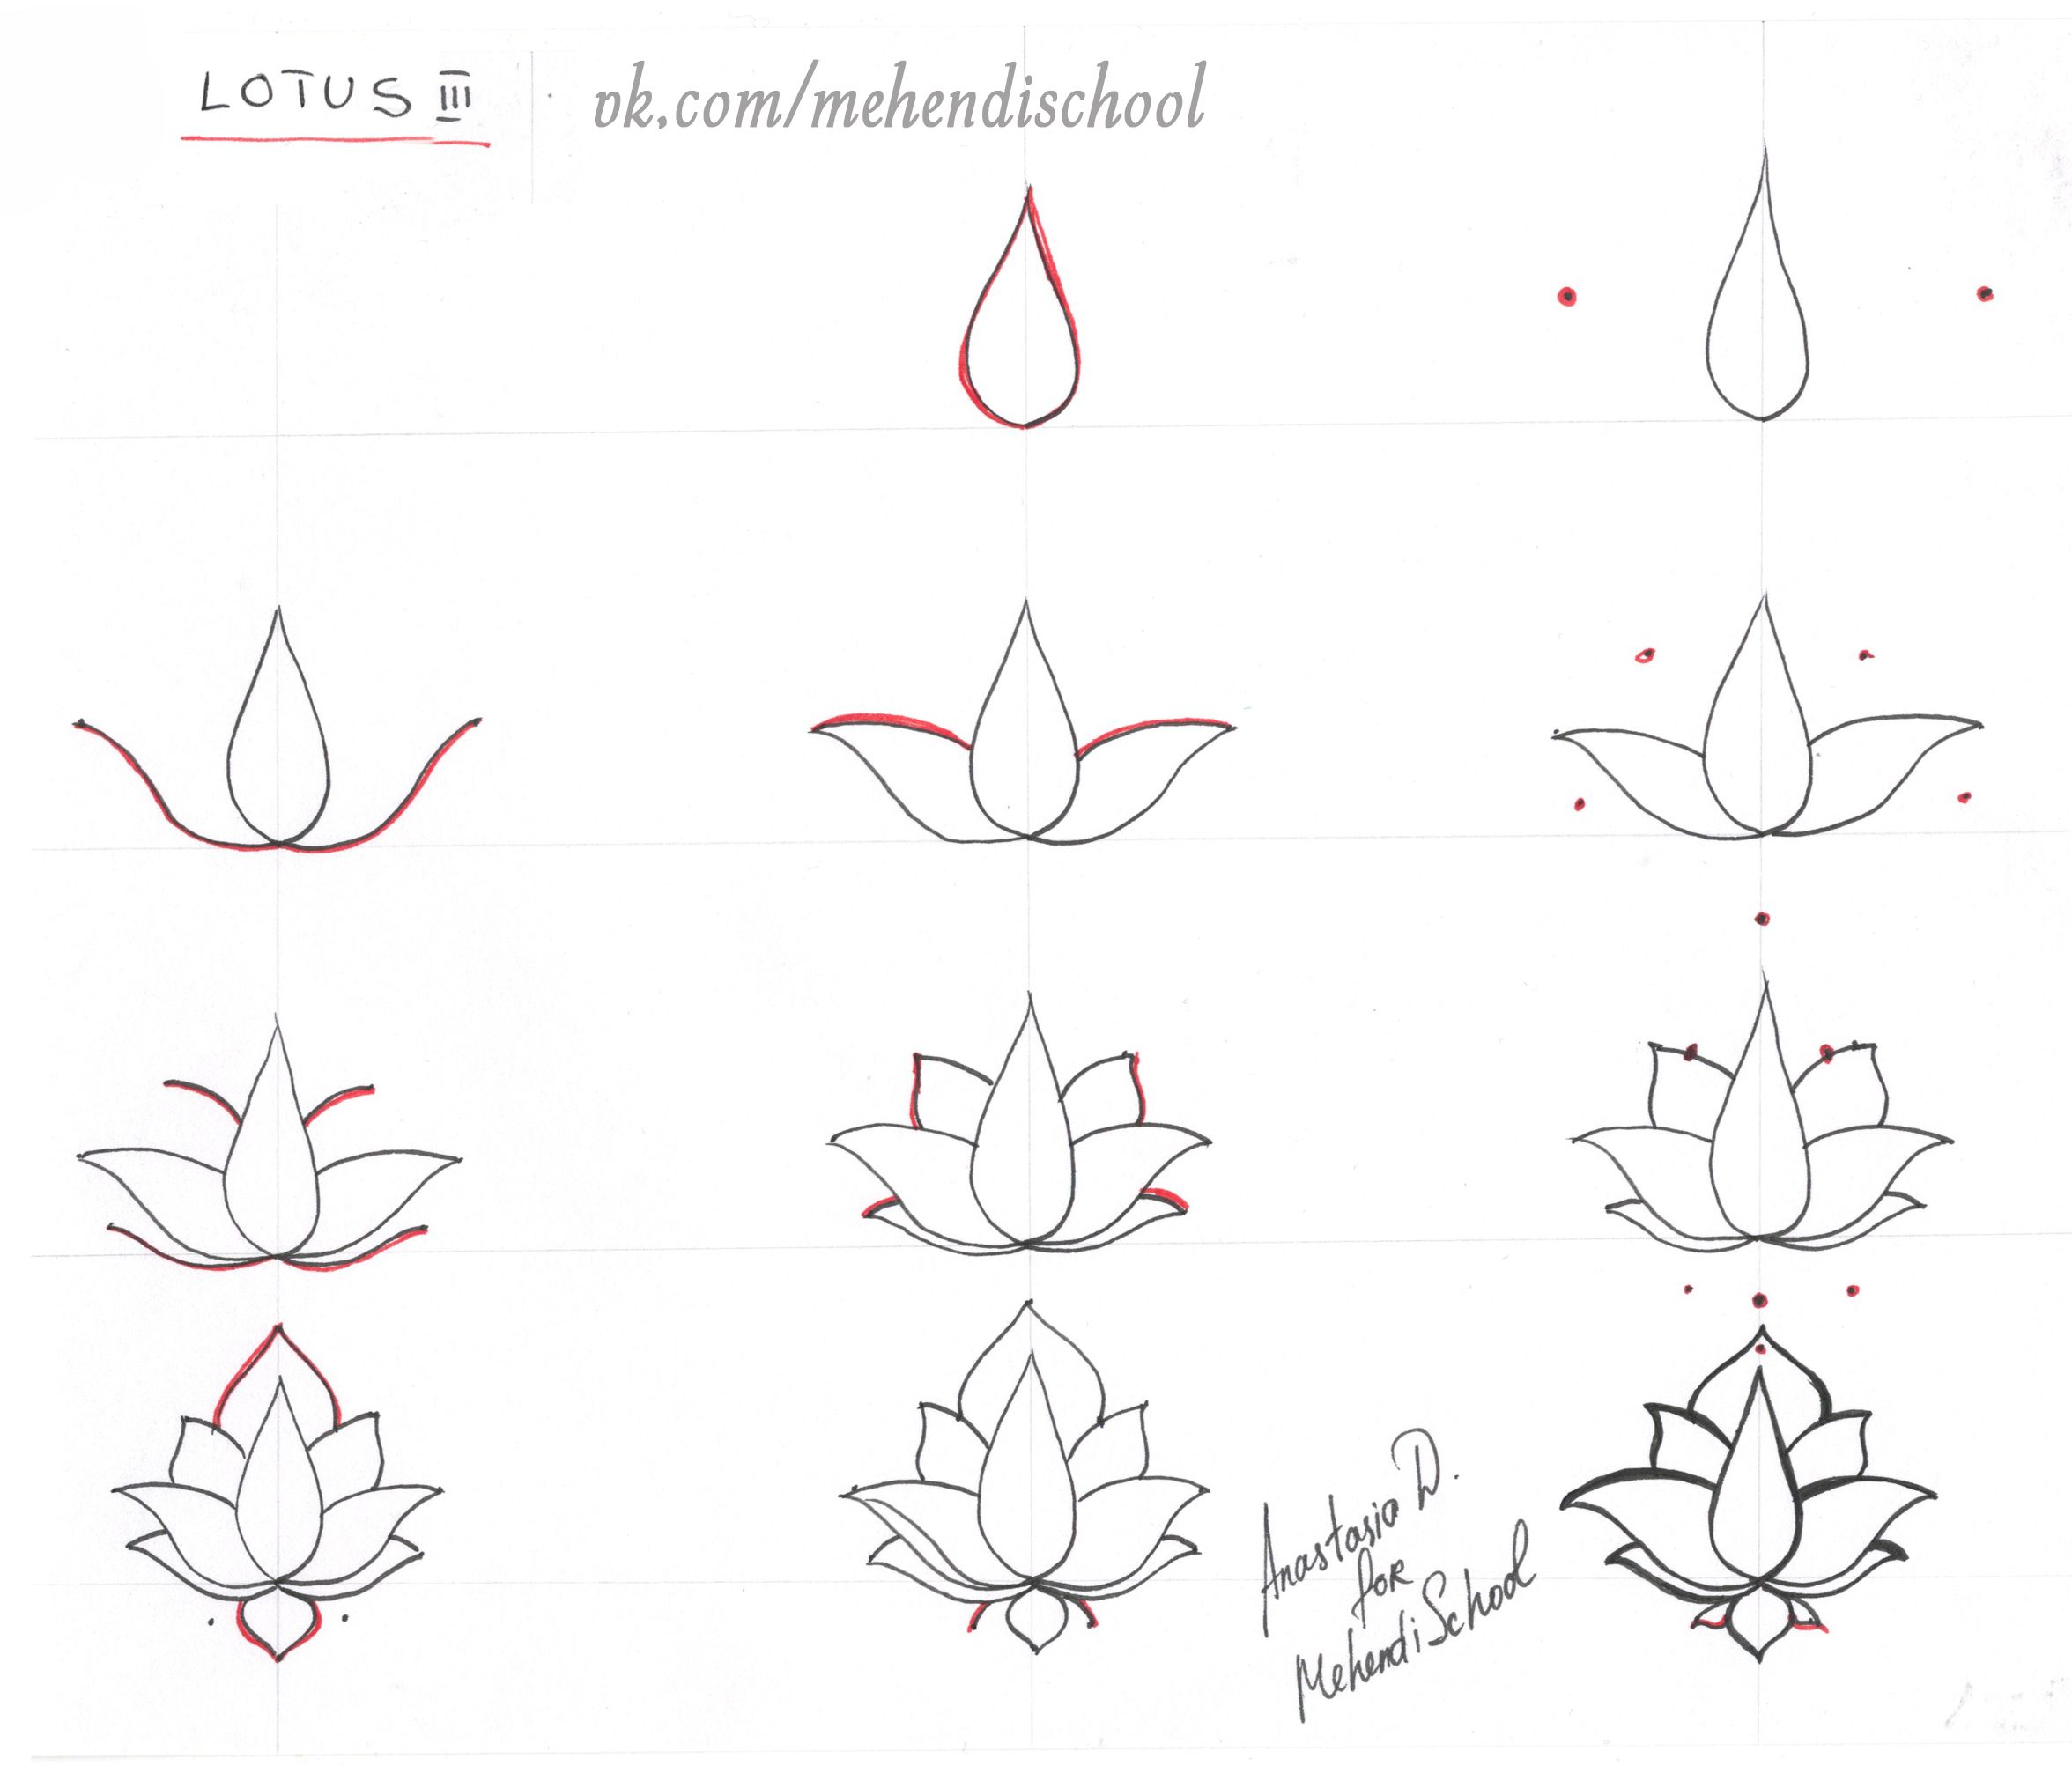
Easy Lotus Flower Drawing - Easy, step by step flower drawing. 👩🎨 join our art hub member. Now, let’s add the petals to our lotus flower. Draw the stamens around the seedpod. Web drawing a lotus flower can be a therapeutic and relaxing practice. Draw a large petal shape around the oval center, curving it upwards at the edges. Remember to vary the sizes and. Repeat this step, adding more petals around the first one. Next, draw the sepals at the base of the lotus flower, add the veins for the sepals and petals. To add complexity, draw a second layer of petals around the first, then add 2 or 3 curved lines to the tip and base of each petal.
Draw the second layer of petals. To add complexity, draw a second layer of petals around the first, then add 2 or 3 curved lines to the tip and base of each petal. Remember to vary the sizes and. Draw a large petal shape around the oval center, curving it upwards at the edges. Draw the stamens around the seedpod. Draw some sepals at the base of the flower. Add the petals by drawing ovals or teardrop shapes around the center circle starting at the top and working your way around. Web drawing a lotus flower can seem difficult at first, but with a few simple steps, anyone can draw this beautiful flower!my flower drawing tutorial book on ama. Next, draw the sepals at the base of the lotus flower, add the veins for the sepals and petals. Now, let’s add the petals to our lotus flower.
Draw a large petal shape around the oval center, curving it upwards at the edges. You can add watercolors to bring vibrant. Web learn how to draw and color a beautiful lotus flower or water lily flower with a dragon fly. Draw a few more lily pads, each an irregular circle like a pie with a slice cut from it. Begin by drawing a circle to represent the center of the flower. The lotus flower is one of the most popular subjects in art, symbolizing purity, beauty, and enlightenment. Remember to vary the sizes and. This will be the base for the petals. Draw some sepals at the base of the flower. Remember, it's ok if your drawings look different then ours.
How to Draw a Lotus Flower Really Easy Drawing Tutorial
Next, draw the sepals at the base of the lotus flower, add the veins for the sepals and petals. This will be the base for the petals. Draw a layer of petals around the seed pod to give it shape, then add stamens between the pod and petals. Remember, it's ok if your drawings look different then ours. Web drawing.
HOW TO DRAW A LOTUS IN EASY STEPS FOR CHILDREN, KIDS, BEGINNERS
The lotus flower is one of the most popular subjects in art, symbolizing purity, beauty, and enlightenment. Now, let’s add the petals to our lotus flower. Draw the outermost layer of petals, which are usually larger and more open. Web learn how to draw a beautiful lotus flower! Draw a layer of petals around the seed pod to give it.
How to Draw Lotus Flower (Step by Step Pictures) Cool2bKids
To add complexity, draw a second layer of petals around the first, then add 2 or 3 curved lines to the tip and base of each petal. Web to draw a lotus flower, start by sketching an oval with dots inside to represent the seed pod. Draw the outermost layer of petals, which are usually larger and more open. Draw.
How To Draw A Lotus Flower Step By Easy Best Flower Site
From the center, draw small curved lines extending outward to form the stamen of the lotus flower. To draw a lotus flower follow these steps: Easy, step by step flower drawing. Remember, it's ok if your drawings look different then ours. Draw a slightly curved horizon line passing behind the flower.

Simple Step By Step Simple Lotus Flower Easy Drawing Ideas
Web to draw a lotus flower, start by sketching an oval with dots inside to represent the seed pod. Draw some sepals at the base of the flower. To draw a lotus flower follow these steps: Web learn how to draw a beautiful lotus flower! Lotus flowers typically have multiple layers of petals, so feel free to add as many.
How To Draw A Lotus Flower Art For Kids Hub
Next, draw the sepals at the base of the lotus flower, add the veins for the sepals and petals. Draw the second layer of petals. Web learn how to draw a beautiful lotus flower! 👩🎨 join our art hub member. To add complexity, draw a second layer of petals around the first, then add 2 or 3 curved lines to.
Lotus Drawing Simple at Explore collection of
Add two long, curved lines for the stem. Begin by drawing a circle to represent the center of the flower. Draw the second layer of petals. Web learn how to draw a beautiful lotus flower! Repeat this step, adding more petals around the first one.
Lotus Flower Drawings Made Easy
Web learn how to draw a beautiful lotus flower! 👩🎨 join our art hub member. Next, draw the sepals at the base of the lotus flower, add the veins for the sepals and petals. Repeat this step, adding more petals around the first one. This will be the base for the petals.
How To Draw Lotus Easy StepByStep Guide
Draw the stamens around the seedpod. If you want to learn how to draw a lotus flower, you're in the right place. To add complexity, draw a second layer of petals around the first, then add 2 or 3 curved lines to the tip and base of each petal. You can add watercolors to bring vibrant. Remember to vary the.

How to Draw a Lotus Flower Really Easy Drawing Tutorial
Remember to vary the sizes and. Web learn how to draw and color a beautiful lotus flower or water lily flower with a dragon fly. The lotus flower is one of the most popular subjects in art, symbolizing purity, beauty, and enlightenment. Draw the stamens around the seedpod. Remember, it's ok if your drawings look different then ours.
Draw The Outermost Layer Of Petals, Which Are Usually Larger And More Open.
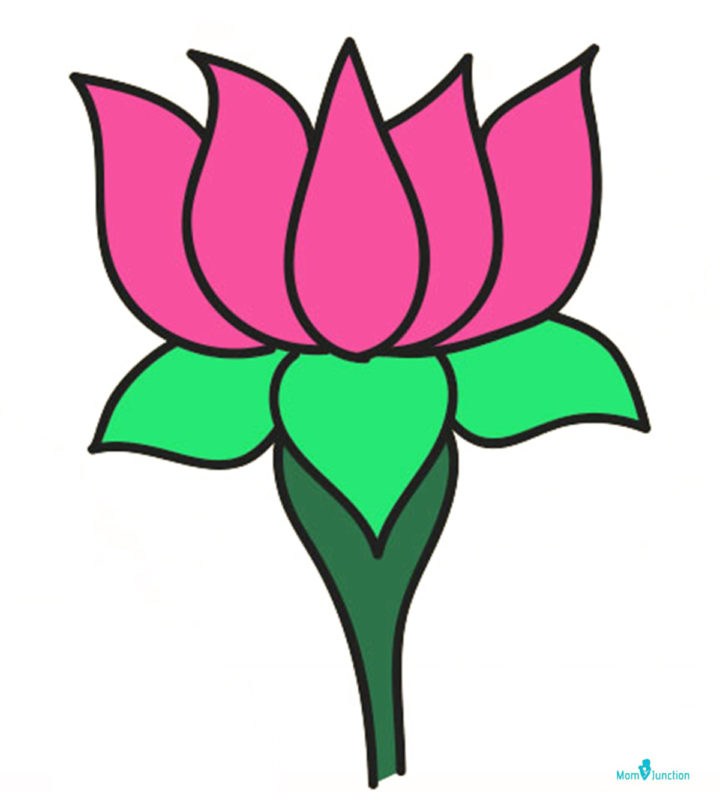
Remember, it's ok if your drawings look different then ours. The lotus flower is one of the most popular subjects in art, symbolizing purity, beauty, and enlightenment. Draw a layer of petals around the seed pod to give it shape, then add stamens between the pod and petals. Add the petals by drawing ovals or teardrop shapes around the center circle starting at the top and working your way around.
Easy, Step By Step Flower Drawing.
Add two long, curved lines for the stem. Draw a slightly curved horizon line passing behind the flower. From the center, draw small curved lines extending outward to form the stamen of the lotus flower. To draw a lotus flower follow these steps:
You Can Add Watercolors To Bring Vibrant.
Web learn how to draw a beautiful lotus flower! Lotus flowers typically have multiple layers of petals, so feel free to add as many as you like. Draw a large petal shape around the oval center, curving it upwards at the edges. Begin by drawing a circle to represent the center of the flower.
Draw A Lily Pad Beneath It By Enclosing An Irregular Circular Shape.
Repeat this step, adding more petals around the first one. Draw the stamens around the seedpod. Web to draw a lotus flower, start by sketching an oval with dots inside to represent the seed pod. To add complexity, draw a second layer of petals around the first, then add 2 or 3 curved lines to the tip and base of each petal.