Easy Pumpkin Drawing Step By Step
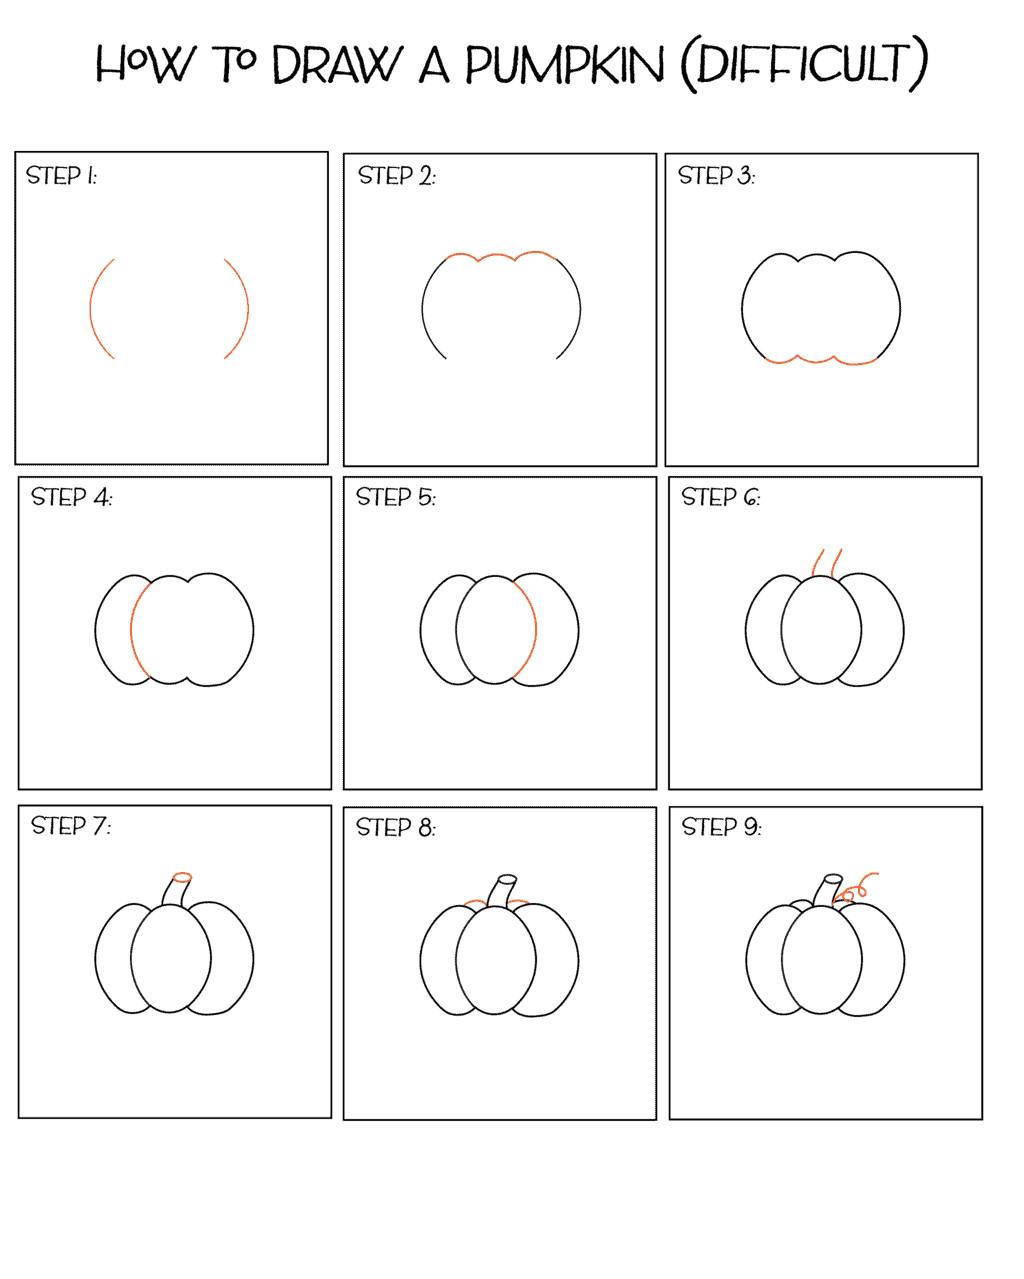
Easy Pumpkin Drawing Step By Step - Draw two curved lines to make the firs rib of your pumpkin. Draw a curved shape on the left. This one can be a bit wider. Now add a couple of lines on the pumpkin root at the top. Draw two identical curved lines that point in opposite directions like a mirror image. There are all sorts of stems you could draw. Halloween pumpkin drawing for kids and beginners. Add a curve beneath the line on the left, then connect both lines with two curves. This one should pretty much run along the sides of the outline drawn in step one. Leave a little opening at the top for the stem.
Use additional short lines to begin enclosing the ribs visible behind the stem. Finally add the last set of ribs in the back (as shown in the example). We’re using a pencil for now, as this will be a guide for drawing in the rest of the pumpkin and you’ll be erasing the pencil a bit later. If you are drawing an old pumpkin, make the shape thinner and more curved. Add a curve beneath the line on the left, then connect both lines with two curves. Sketch a wide oval with some indentations at the bottom. Draw a circle connecting the two lines. Place the pumpkin stem on top of the shape from the last step. Join the email list so you don't miss exclusive 2d animation courses: Web our how to draw book is here!
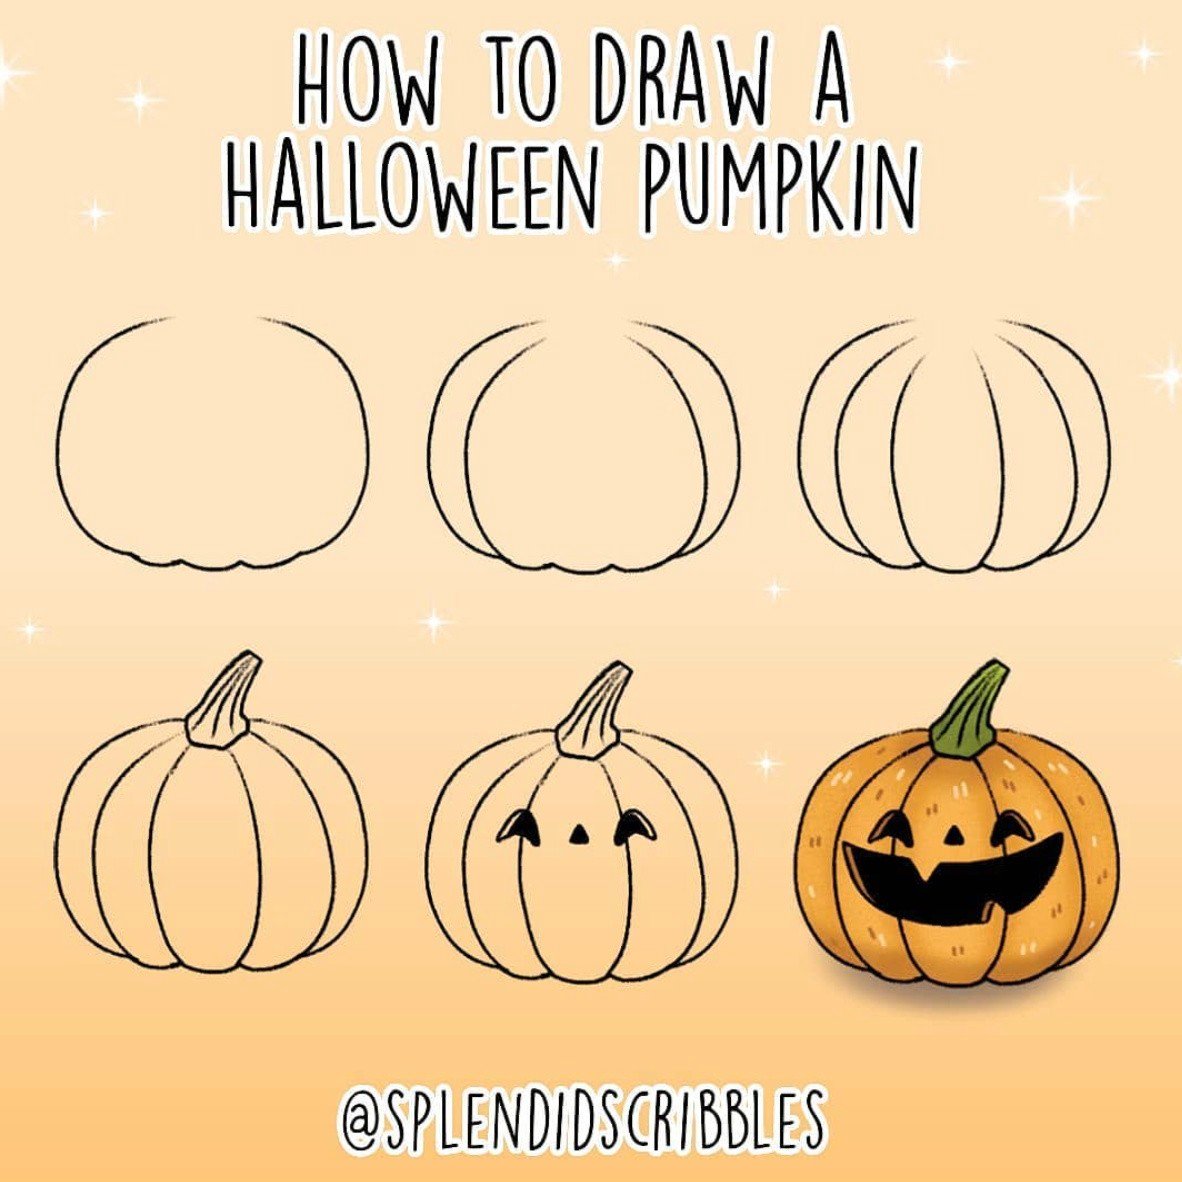
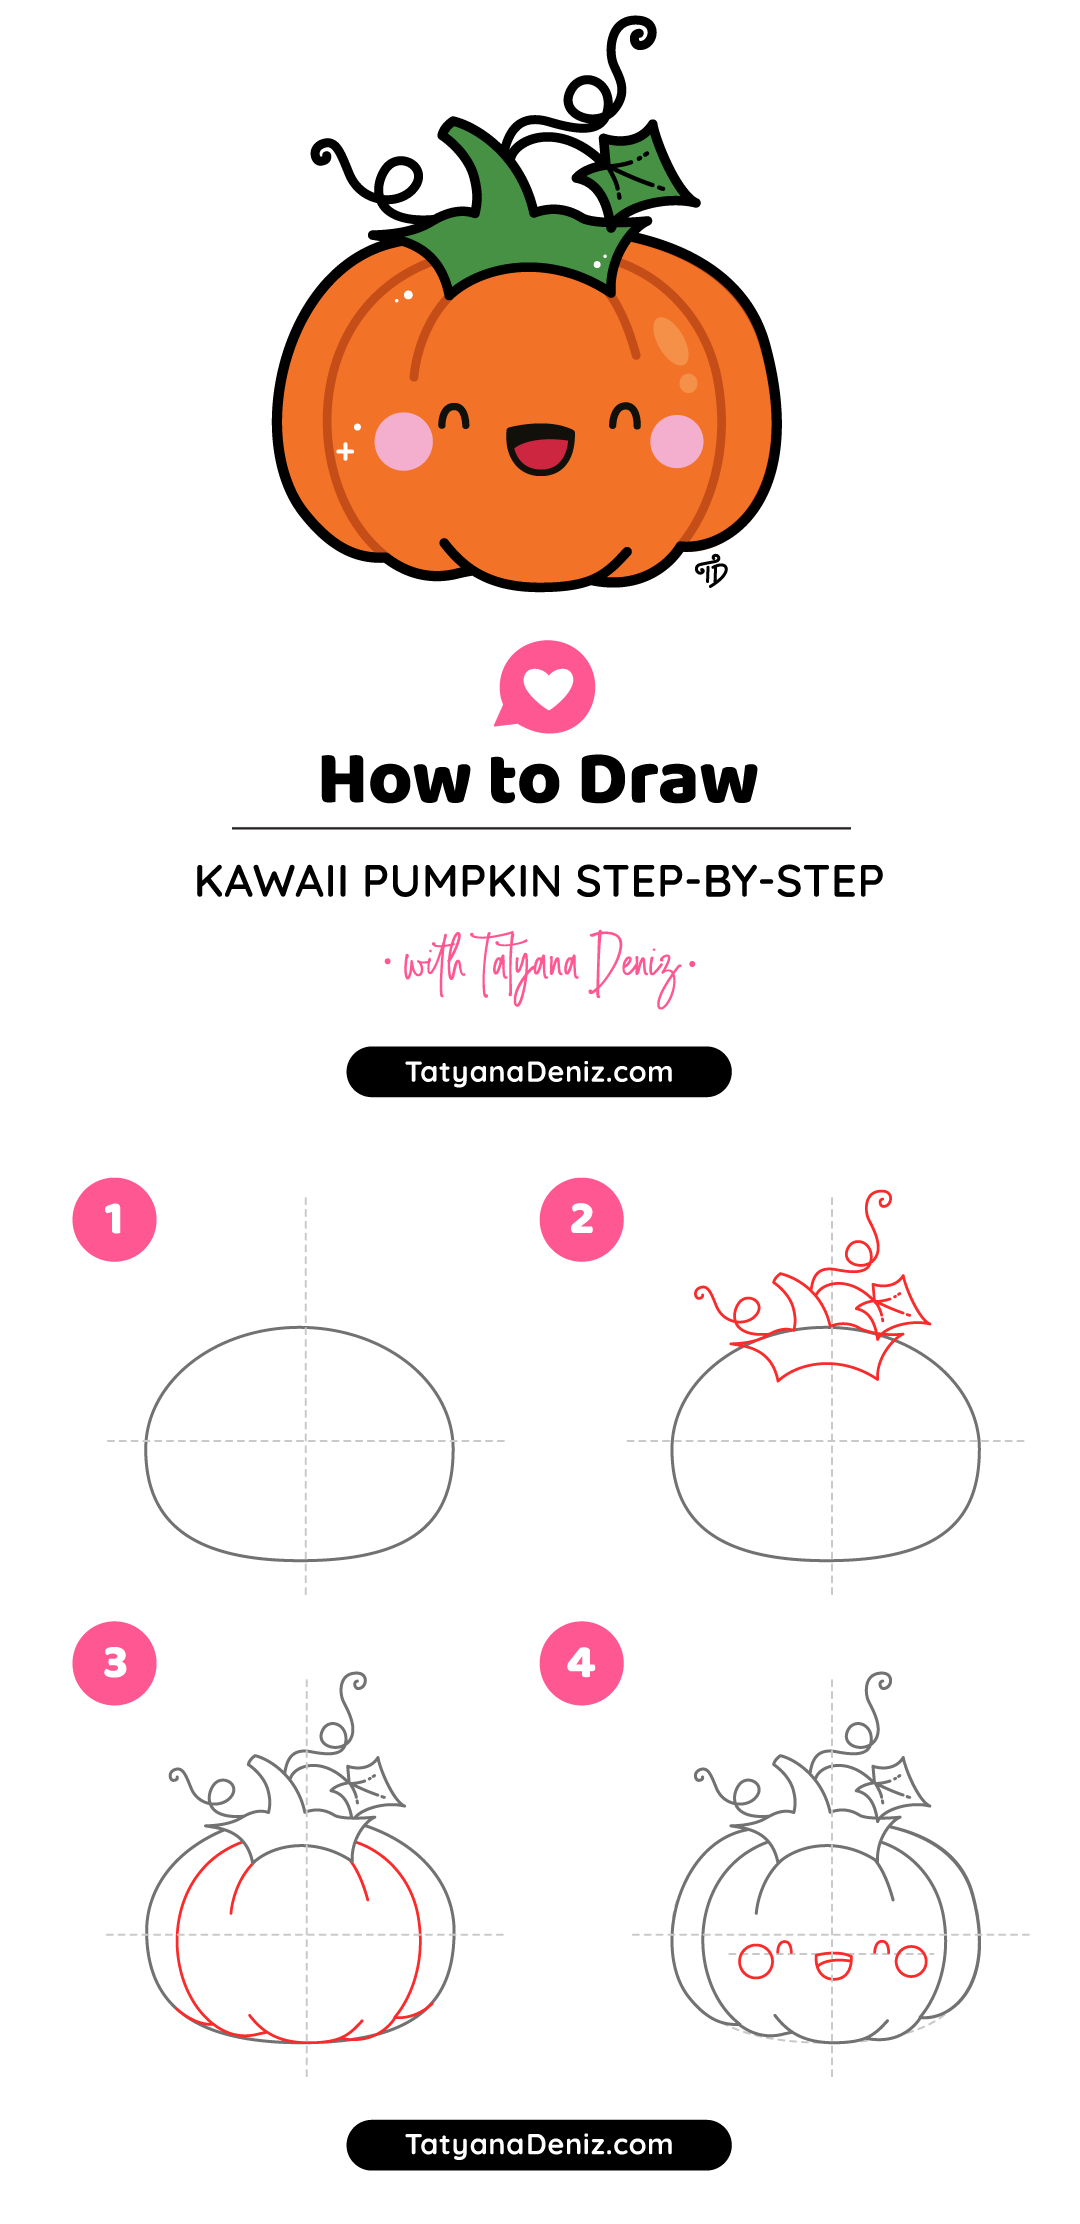
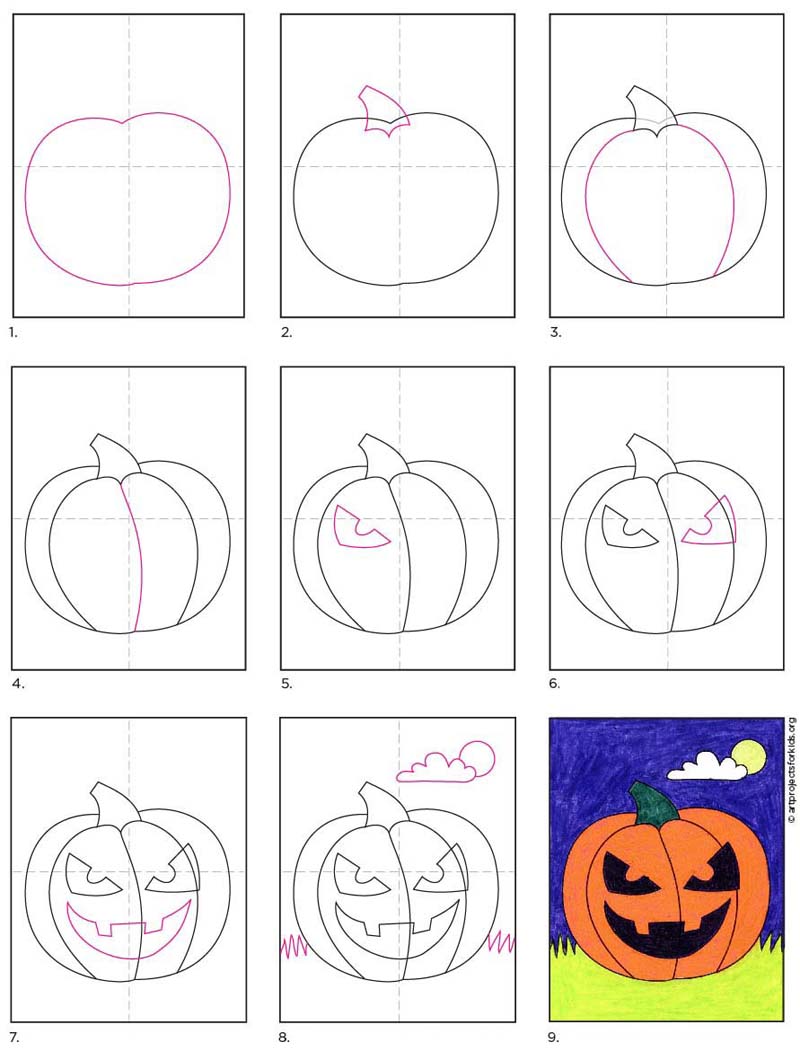
Create the pumpkin’s eyes by drawing two triangles and a mouth. Web to do this, begin by drawing a curved line towards the top of your pumpkin. Web drawing and coloring a cute birthday cake drawing | easy step by step for kids 🥮🎂🍰#howtodraw #cakedrawing #cutecake#drawingforkids #beautifulcakedrawing#k. You’ll be refining the details a little later in the process. Draw two curved lines to make the firs rib of your pumpkin. Then, texture the stem with curved lines. Let’s start by drawing the four lines down the face starting at the top and down to the bottom point of the pumpkin as shown in the reference image above. Draw another curved line across it to give the tip of the stem an oval shape. Be sure allow some space between each line. Draw a curved shape on the left.
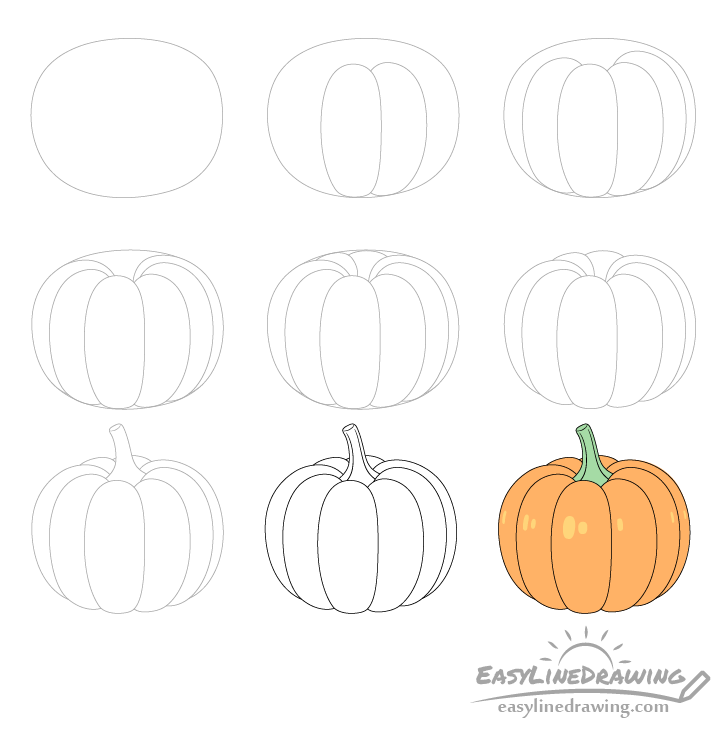
How to Draw a Pumpkin Step by Step EasyLineDrawing
You’ll be refining the details a little later in the process. Add a curve beneath the line on the left, then connect both lines with two curves. Leave a little opening at the top for the stem. Add a curved shape on the right. Wipe the pumpkin clean with a soft damp cloth and dry.
How To Draw A Pumpkin StepByStep So Festive!
In this video tutorial we are unveiling all the tricks to draw a pumpkin step by step. The next step is to draw small stems on the top of the pumpkin. Web easy step by step tutorial on how to draw a pumpkin, pause the video at every step to follow the steps carefully. Take a look at the middle.

How To Draw A Pumpkin Step By Step Drawing Tutorial
The simplest pumpkin drawing method uses just circles and basic curved lines. Place a stem on the top. Web welcome to scissors and brushes easy drawing tutorial. Web easy pumpkin drawing. Draw two identical curved lines that point in opposite directions like a mirror image.
How to draw halloween stuff step by step The Smart Wander
Use additional short lines to begin enclosing the ribs visible behind the stem. Draw a curved shape on the left. Let’s draw the outline of the pumpkin. Web hi everyone, in this video i show you how to draw a pumpkin step by step 🎃 pumpkin drawing easy. Draw a curved line on the left side of the pumpkin shape.
How to draw easy and cute Halloween pumpkin stepbystep
Follow my step by step drawing tutorial and make your own p. Position the chalk pastel at the top of the oval and proceed to draw a large curve away from the shape and then back to join the bottom. This one can be a bit wider. In this case the pumpkin itself and the stem. Sketch a wide oval.
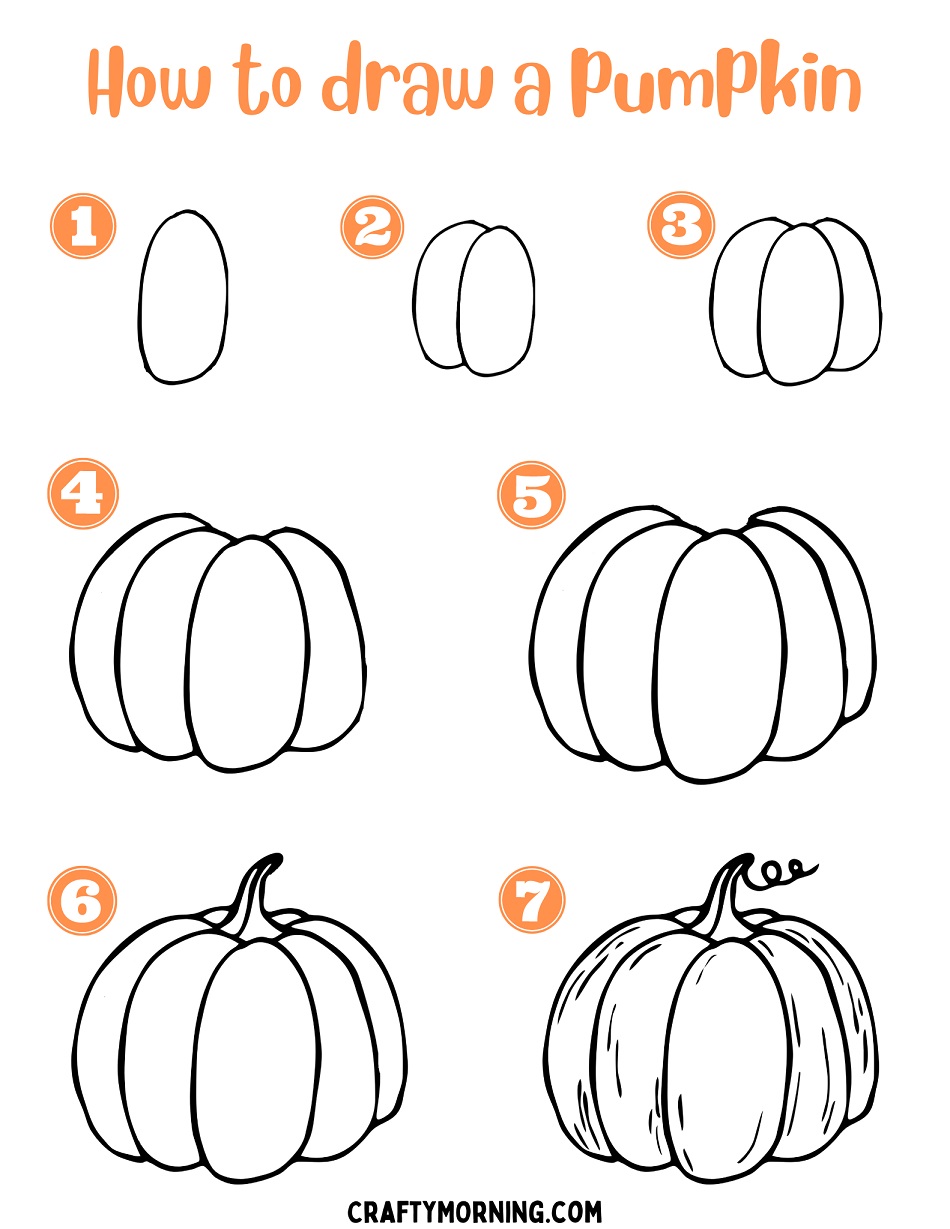
How to Draw a Pumpkin (Easy Step by Step) Crafty Morning
Create a tall narrow rectangle extending out from the opening that you left in the previous step. Then, draw a matching curved line on the right side of the pumpkin to make it round. Follow my step by step drawing tutorial and make your own p. Divide the oval into 5 parts using curved lines. Use a curved line to.
How to Draw a Halloween Pumpkin · Art Projects for Kids
There are all sorts of stems you could draw. 7 steps to make a realistic looking pumpkin. Wipe the pumpkin clean with a soft damp cloth and dry. Draw another curved line across it to give the tip of the stem an oval shape. Next we can sketch in the stem.

How to draw pumpkin step by step The Smart Wander
Simple pumpkin drawing (jack o lantern drawing). Follow my step by step drawing tutorial and make your own p. This completes the first segment of the pumpkin shell. With a variety of animals, magical creatures, vehicles, foods, plants and more your kids will never get bored. Here’s where we’ll start drawing in our ribbed section of the pumpkin skin.
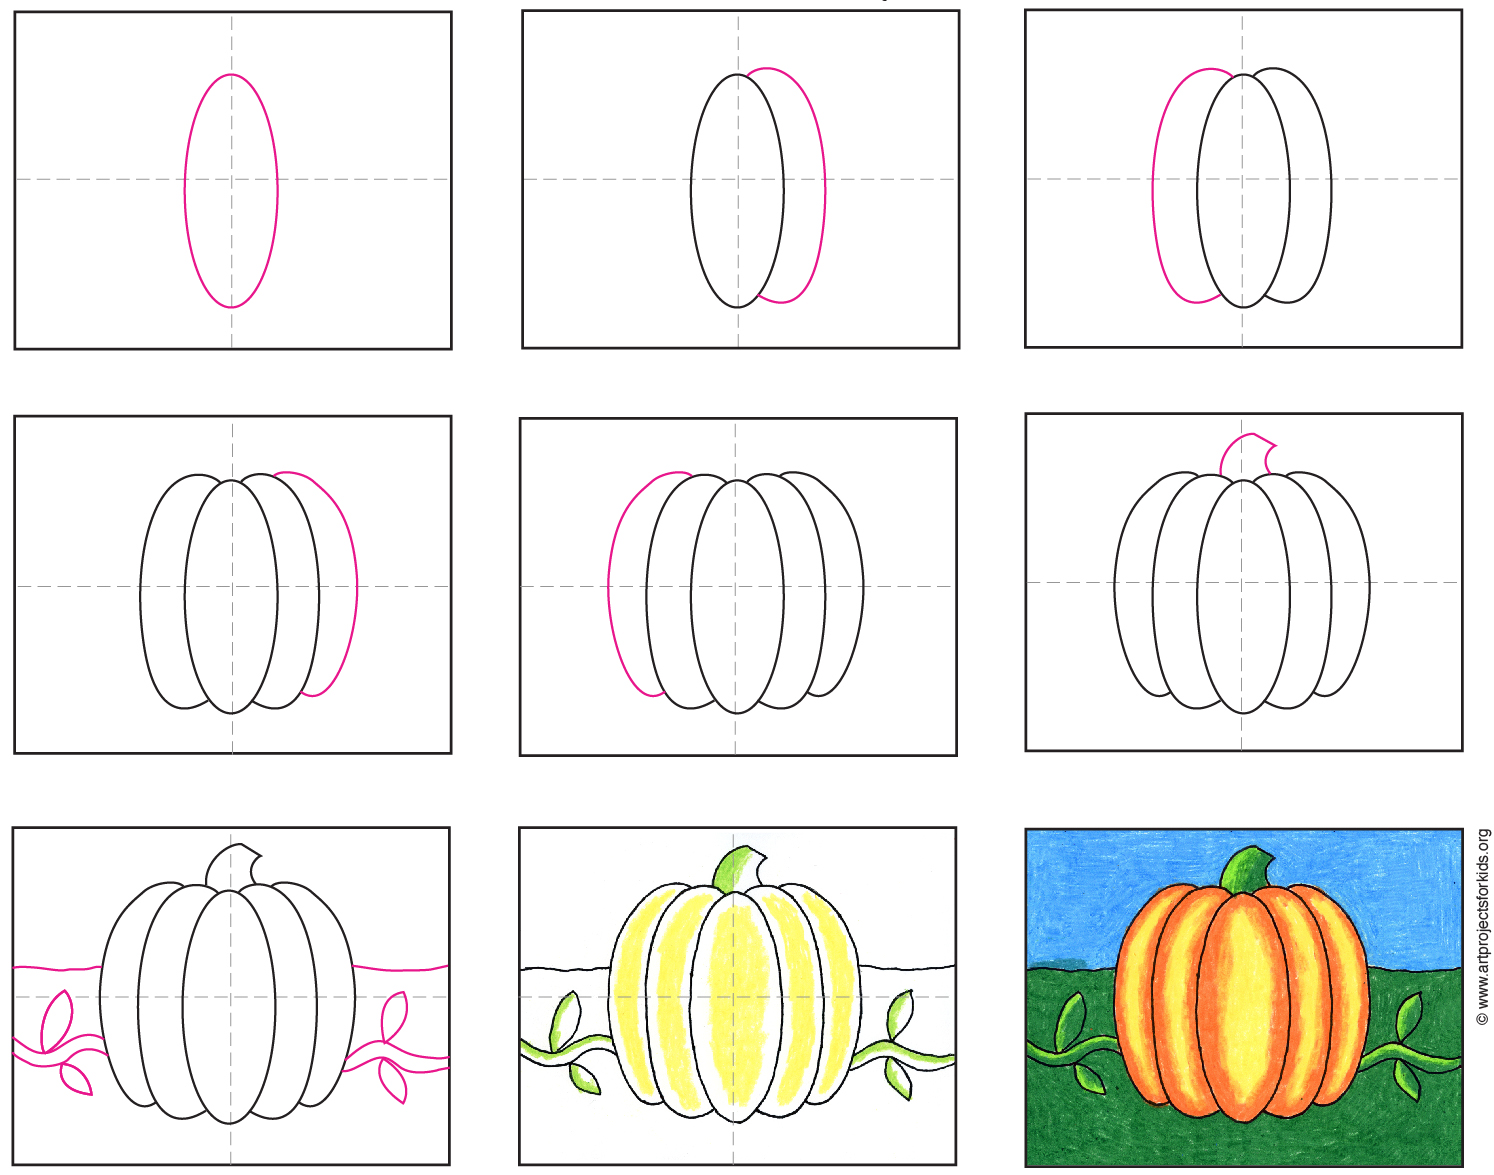
How to Draw an Easy Pumpkin · Art Projects for Kids
Add a curved shape on the right. Web depict an asymmetrical round shape in the center of your piece of paper. Web learn how to draw gojo satoru from jujutsu kaisen | how to draw anime step by step | easy anime drawing | step by step anime drawing with pencilhow to draw g. And then draw your stem coming.

How to draw pumpkin step by step YouTube
Position the chalk pastel at the top of the oval and proceed to draw a large curve away from the shape and then back to join the bottom. Divide the oval into 5 parts using curved lines. Draw two curved lines to make the firs rib of your pumpkin. Draw a curved shape on the left. Now add a couple.
Then, Texture The Stem With Curved Lines.
Draw another curved line across it to give the tip of the stem an oval shape. And then draw your stem coming out of that curved line. Simple pumpkin drawing (jack o lantern drawing). 7 steps to make a realistic looking pumpkin.
Web Pumpkin Drawing Step 1.
Draw an adjoining segment to build the pumpkin shell. Web unicorn horse drawing,how to draw a unicorn step by step,clouds painting #drawing #kidsart #unicorn#coloringpages #preschoollearning #paintingtutorial #kidsa. Use a curved line to enclose the end of the stem. Create a tall narrow rectangle extending out from the opening that you left in the previous step.
These Lines Will Create Sections On Your Pumpkin.
Web add a tail to your pumpkin by drawing a curved shape. Let’s draw the outline of the pumpkin. Web make sure to check out all our easy drawings for kids too! Add a curve beneath the line on the left, then connect both lines with two curves.
Web Hi Everyone, In This Video I Show You How To Draw A Pumpkin Step By Step 🎃 Pumpkin Drawing Easy.
Add a curved shape on the right. Web our how to draw book is here! Begin the pumpkin drawing by first getting it’s major shapes. Web how to draw pumpkin in easy steps for beginners lesson.tutorial of drawing technique.drawing tutorial,art tutorial youtube videoyou can watch the video at.