Elsa Drawing Step By Step
Elsa Drawing Step By Step - Web first draw the top part using a curved line. Web how to draw elsa **new**. Then connect the marks using curved lines. Add guidelines for the girl’s nose, eyes, hair, arm and her dress. Mark off the width and height of the picture. Ensure a natural cascade, portraying its grace and movement. Add two horizontal lines—one for the eye level and the other for the base of the nose. Start with a vertical line for the center of the face, then draw an oval shape around it for the head. Gone are the days of passively watching tutorials. From basic shapes to intricate compositions, our tutorials cover a wide range of drawing techniques and subjects.
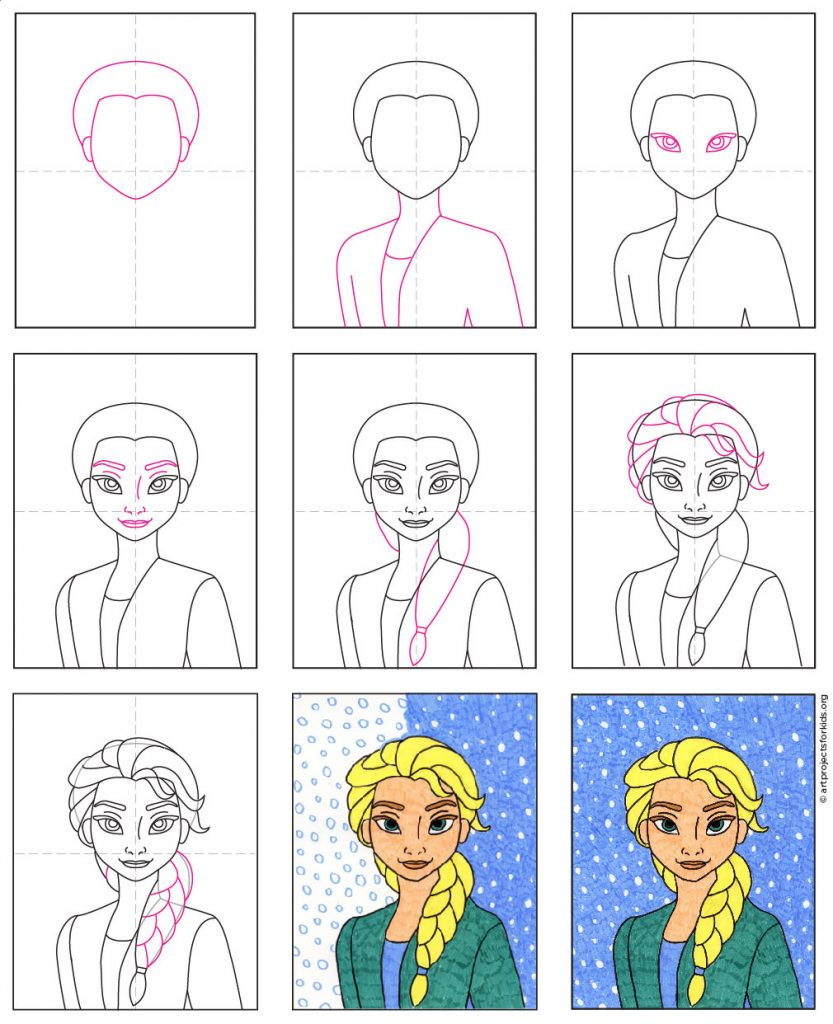
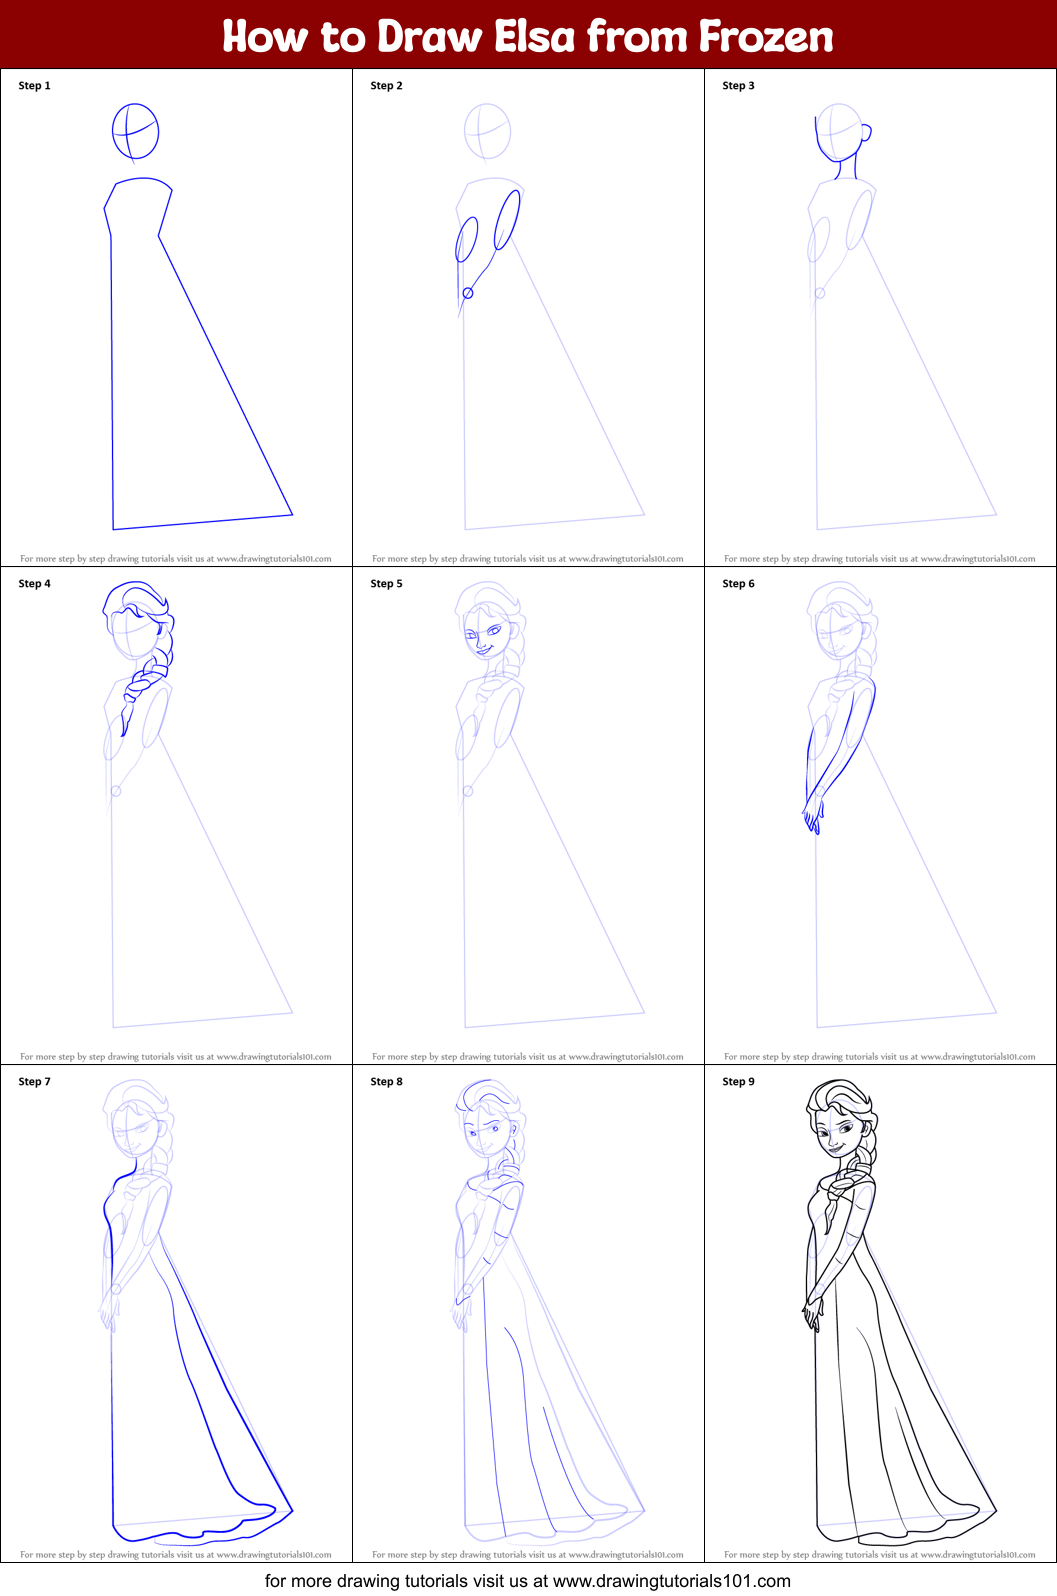
The size of each of the snow queen’s drawn parts will be observed in each step of the tutorial. Add two horizontal lines—one for the eye level and the other for the base of the nose. Start off with a pencil sketch. Then connect the marks using curved lines. The two long lines should start on the left side of the torso and come together at the bottom to form the folded cape. Elsa is the lead deuteragonist of the film and she is the sister of anna who is the protagonist of the series. For sure all the characters that can be found in frozen are nice, but this is the best place to start if you wanted to understand how to draw elsa on your own. Look carefully at the sample and repeat all the lines that shape elsa’s hairstyle. Web fill in the blue sky. Add guidelines for elsa’s body.
Draw a small circle at the top of the page as a guide for elsa's head. She might look poised and reserved but she actually has the power to create ice and snow. Start with a vertical line for the center of the face, then draw an oval shape around it for the head. A new drawing tutorial is uploaded every week, so stay tooned! As a professional artist i will guide you through the process of creating a detailed portrait. Web how to draw elsa **new**. For sure all the characters that can be found in frozen are nice, but this is the best place to start if you wanted to understand how to draw elsa on your own. Next, you draw the hair. Web how to draw princess elsa from frozen step by step tutorial. The two long lines should start on the left side of the torso and come together at the bottom to form the folded cape.
How To Draw Elsa From Frozen 2 Art Hub Whether you're looking to hone
Look carefully at the sample and repeat all the lines that shape elsa’s hairstyle. Add two horizontal lines—one for the eye level and the other for the base of the nose. Draw a small circle at the top of the page as a guide for elsa's head. Elsa is the lead deuteragonist of the film and she is the sister.
How to Draw Elsa from Frozen printable step by step drawing sheet
Add guidelines for the girl’s nose, eyes, hair, arm and her dress. Look carefully at the sample and repeat all the lines that shape elsa’s hairstyle. Stop by and download yours for free. Make sure the line doesn't overlap the braid. Start by drawing her eyes, one at a time.

How to Draw Elsa from Frozen Easy StepbyStep Drawing Guides How
Web learn how to draw elsa as a cute little girl from disney's frozen easy, step by step drawing tutorial. Gradually delve into detailing, adding individual strands and emphasizing her iconic braid. Stop by and download yours for free. Gone are the days of passively watching tutorials. To draw the circle, first make four small marks to determine its height.
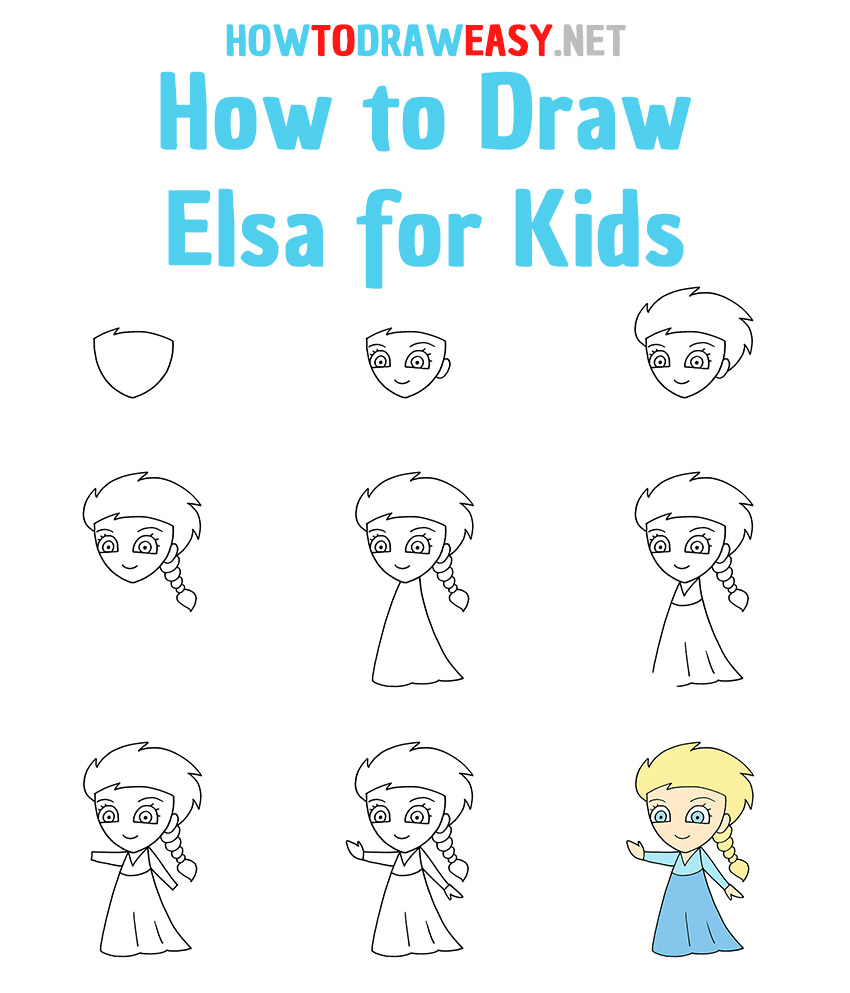
How to Draw Elsa for Kids How to Draw Easy
From basic shapes to intricate compositions, our tutorials cover a wide range of drawing techniques and subjects. Web how to draw elsa from frozen. Draw elsa’s arms and eyes. Add guidelines for elsa’s body. Start by drawing her eyes, one at a time.

How to Draw Elsa Cute and Easy How to Draw Queen Elsa from Frozen
Web how to draw princess elsa from frozen step by step tutorial. Draw elsa’s arms and eyes. Start by drawing her eyes, one at a time. Add a line, which will act as the center of her body and head. Web blending stump (you can use paint brush /makeup brush or cotton.

How To Draw Elsa From Frozen Art for kids hub, How to draw elsa, Draw
Start off with a pencil sketch. Use these guidelines to help place the facial features. The size of each of the snow queen’s drawn parts will be observed in each step of the tutorial. Next, you draw the hair. Ensure a natural cascade, portraying its grace and movement.
How to Draw Queen Elsa Step by Step Easy Drawing Guides Drawing Howtos
A new drawing tutorial is uploaded every week, so stay tooned! Next, you draw the hair. The two long lines should start on the left side of the torso and come together at the bottom to form the folded cape. Web how to draw princess elsa. Mark off the width and height of the picture.

How To Draw Disney Princess Elsa Step By Step Disney Frozen Vrogue
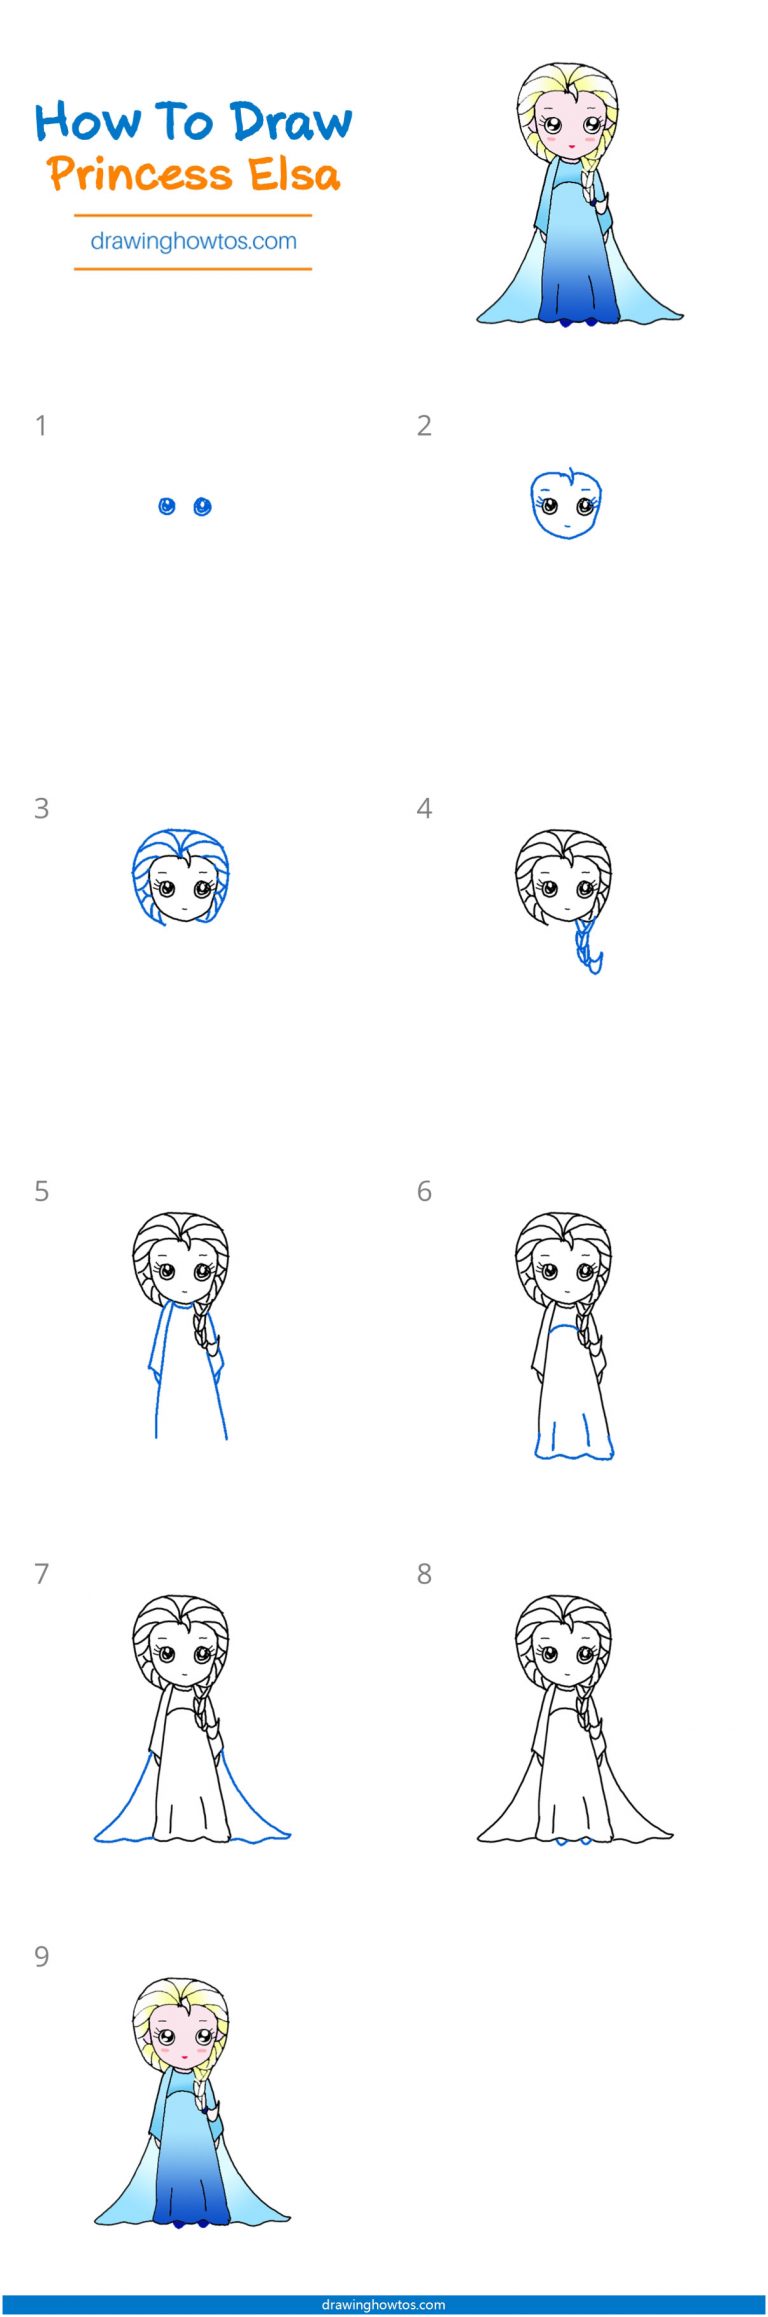
Add guidelines for the girl’s nose, eyes, hair, arm and her dress. Web begin with defining its overall volume using gentle wavy lines. Stop by and download yours for free. In the beginning stages, don’t press down too hard. Gradually delve into detailing, adding individual strands and emphasizing her iconic braid.
How To Draw Elsa Easy Step By Step For Beginners
Use the smooth line with which you will outline the contour of the face and ear. Web enjoy this simple step by step lesson for learning how to draw the popular snow queen from the movie: Draw elsa’s chest and neck. Stop by and download yours for free. Draw two long lines on the left side of the body for.

How to Draw Princess Elsa From Frozen Simple Easy Step by Step Art
Web first draw the top part using a curved line. Draw the shape for her head. Start with a vertical line for the center of the face, then draw an oval shape around it for the head. Stop by and download yours for free. Sketch lightly at first so that it's easy to erase if you make a mistake.
Draw Two Long Lines On The Left Side Of The Body For The Cape.
As a professional artist i will guide you through the process of creating a detailed portrait. Elsa, drawn by samaya, age 5 (!) more fun cartoon characters to draw. Make sure the line doesn't overlap the braid. Add guidelines for elsa’s body.
Gone Are The Days Of Passively Watching Tutorials.
Add a line, which will act as the center of her body and head. The size of each of the snow queen’s drawn parts will be observed in each step of the tutorial. Add guidelines for the girl’s nose, eyes, hair, arm and her dress. All drawing steps are included here which make it.
Don’t Forget To Add The Fluttering Hem.
Web how to draw elsa from frozen. Web how to draw princess elsa from frozen step by step tutorial. Web blending stump (you can use paint brush /makeup brush or cotton. Ensure a natural cascade, portraying its grace and movement.
Web How To Draw Princess Elsa.
We drew her a while back, but i thought it would be fun to her again! Draw elsa’s arms and eyes. This easy elsa frozen tutorial is perfect for young children looking to learn how to draw. Sketch lightly at first so that it's easy to erase if you make a mistake.