How To Draw A Cap
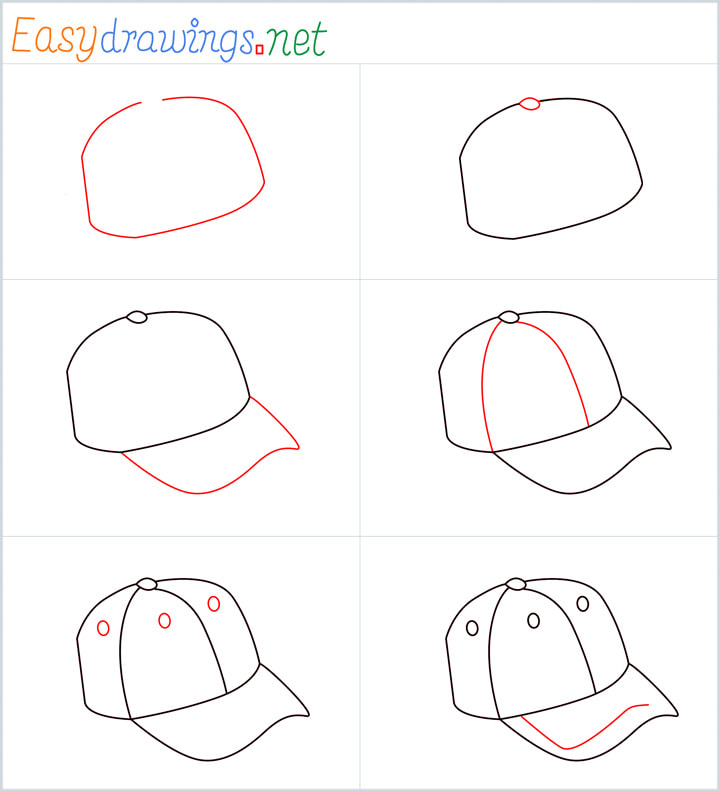
How To Draw A Cap - Draw a smooth transverse line on the cap. Draw this cap by following this drawing lesson. Once you have these lines in place, draw another line on top to create the top edge of. Draw a narrow, horizontal oval so the center of the page lines up with the center of the shape. Draw the side panels of the cap extending from the crown to the brim. This includes the curve of the visors and the division of the base (see image). Begin removing the cap waistband. Start with a slightly curved horizontal line for the brim of the cap. Use two shades of blue. In this cap drawing video tutorial, we used very simple and easy method so that beginners can easily learn too.t.
Start with a slightly curved horizontal line for the brim of the cap. Draw the bottom outline of the visor. In this cap drawing video tutorial, we used very simple and easy method so that beginners can easily learn too.t. Finish drawing your hat with some color. Begin removing the cap waistband. Start in the middle of your paper so you have room to draw the top of the cap later on. These lines should curve slightly to follow the shape of the oval. Connect the lines to form the cap’s brim. These two lines should be. To do this, we will be using a curved line for the base of the cap.
Once you have these lines in place, draw another line on top to create the top edge of. Start with a slightly curved horizontal line for the brim of the cap. Easy cap drawing tutorial for beginners. Web how to draw a cap step by step || easy cap drawing for beginners. Web eni continues exploration and development projects. Finally, there it is, a sweet and stylish cap, that you drew! Eni recently reported first quarter results, with the company focusing on plans to expand and develop current projects. Web finish your hat sketch by drawing a small circle at the center top of the crown with three lines going toward the bottom. 💚 for drawing online videos visit my channel qwe art here: There are five lines in this step.

How To Draw A Cap Step By Step 🧢 Cap Drawing Easy YouTube
These are small holes called eyelets that help with ventilation. Add seams to the crown. Draw two curved lines extending from the top of the triangle to create the sides of the cap. Web how to draw a cap step by step || easy cap drawing for beginners. This includes the curve of the visors and the division of the.

How to Draw a Baseball Cap Really Easy Drawing Tutorial
Happy hat day, every day is hat day to me ;) learn how to draw a baseball hat! The first line is one curved line or arch at the top. Currently, remove some attributes for the lid. Web to make the cap look more realistic, add a few curved lines on the crown. Web draw the inner edge of the.

How to Draw a Cap Step by Step Drawing Lessons Drawing for Kids
Add a curved triangle shape above the line for the front panel of the cap. How to draw a hat step by step for beginnerhow to draw a hat step by step,how to draw a hat for kids,how to draw a hat artic. The first line is one curved line or arch at the top. Web add two horizontal lines.
How To Draw A Cap Step by Step for Beginners 6 Easy phase
To do this, we will be using a curved line for the base of the cap. Draw a small circle on each side of the cap's front panel. Start by drawing lines that connect the bottom of the crown to the horizontal line representing the brim. How to draw a hat step by step for beginnerhow to draw a hat.

How to draw a cap easy cap easy step by step drawing for kids YouTube
Add details such as the cap’s logo or any embellishments. Once you have these lines in place, draw another line on top to create the top edge of. Web how to draw a girl with cap | #shorts #ytshorts #youtubeshorts #drawing #viral #trending #short #art #familylovestory#couplegoals simple drawingeasy drawingh. Start by drawing a slightly curved line from the left side.
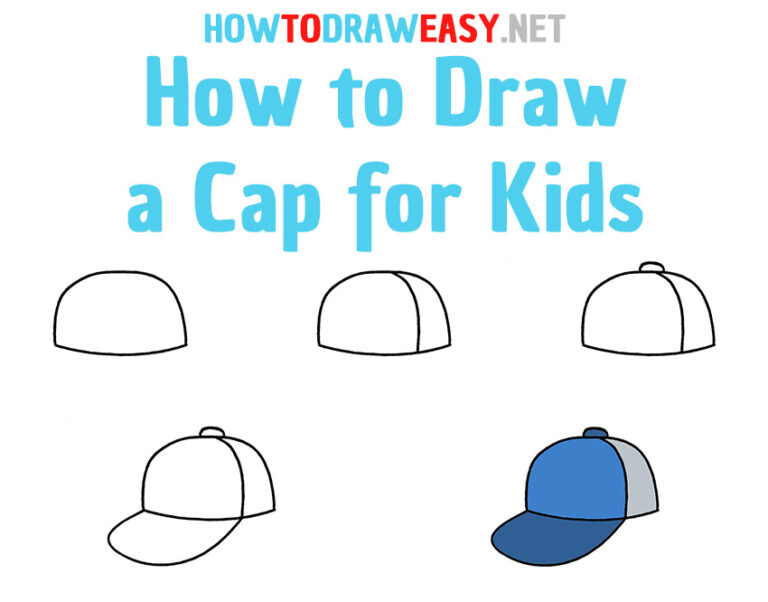
How to Draw a Cap for Kids How to Draw Easy
Following, draw advantage for the lid. Draw this cap by following this drawing lesson. Draw two curved lines extending from the top of the triangle to create the sides of the cap. Sketch out a short, curved line from the brim of the baseball cap’s visor. These two lines should be.

How to Draw a Cap Easy Drawing Tutorial For Kids
Take a step back and admire the job you just did. These two lines should be. These are small holes called eyelets that help with ventilation. Connect the ends of the lines with a curved line to form the back of the cap. Start by drawing lines that connect the bottom of the crown to the horizontal line representing the.

How to Draw a Cap Easy Drawing Art
Draw the side panels of the cap extending from the crown to the brim. Web thanks for watching our channel. Above the brim, draw a curved shape to create the cap’s crown. Web milwaukee blogger dan shafer, posting on his recombobulation area site, notes that the democrats have a candidate lined up in every state senate district this fall. Web.
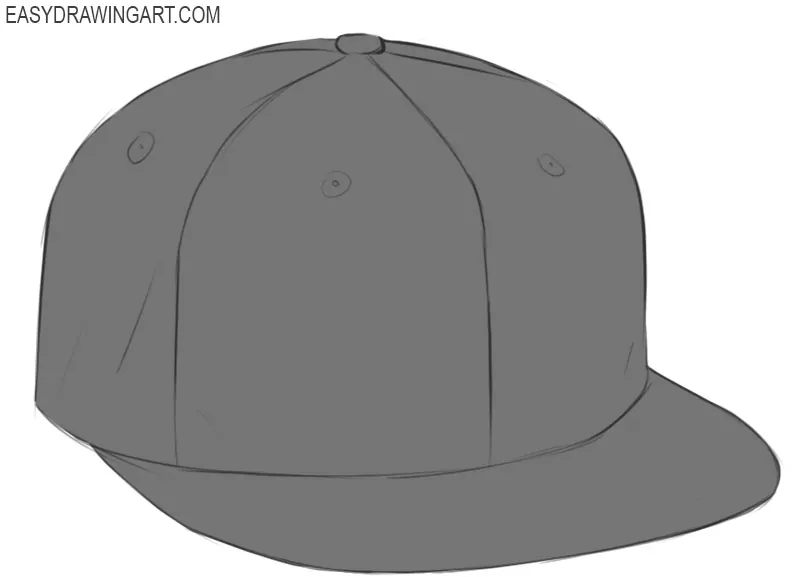
How to Draw a Cap Easy Drawing Art
Happy hat day, every day is hat day to me ;) learn how to draw a baseball hat! The brim of the cap helps give it structure and shape. Cap drawing step by step easy.friends,i am kunal arya, welcome to our you tube channel arya. How to draw a hat step by step for beginnerhow to draw a hat step.
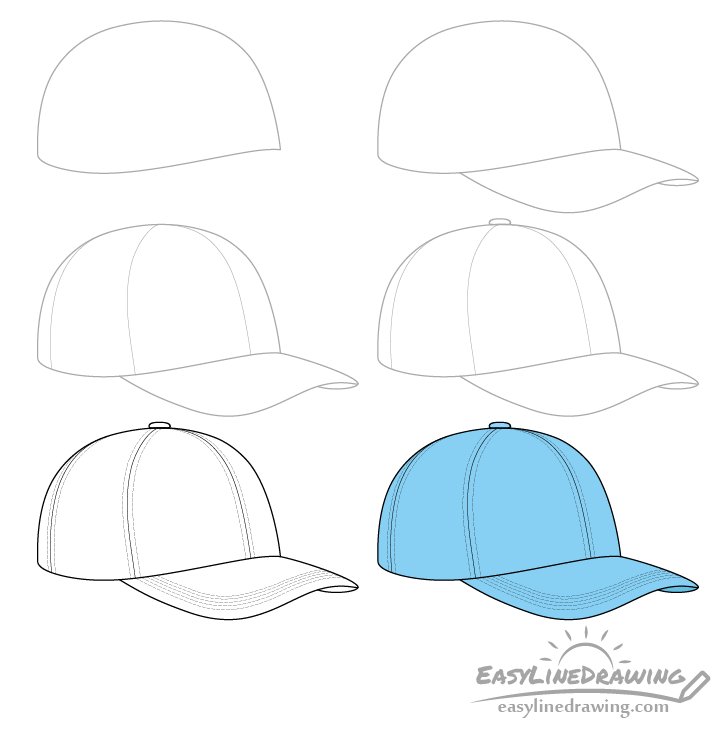
How to Draw a Baseball Cap Step by Step EasyLineDrawing
Use two shades of blue. Web hi everyone, in this video i show you how to draw a cap step by step 🧢. These are small holes called eyelets that help with ventilation. This part of the cap connects the cap wedges together. Depict the rest of the lines to complete the cap.
You Can Complete The Last Elements Of Your Cap Picture.
Then draw two vertical lines from each end of the curved line. Draw two additional broken lines down the center of the crown. Repeat this process on the right side, making sure the lines are parallel and evenly spaced. Web thanks for watching our channel.
This Will Create The Triangular Sections Of A Baseball Cap.
There are five lines in this step. Web hi everyone, in this video i show you how to draw a cap step by step 🧢. Start by drawing a slightly curved line from the left side of the brim to the top of the cap. 💚 for drawing online videos visit my channel qwe art here:
This Part Of The Cap Connects The Cap Wedges Together.
Begin removing the cap waistband. Depict this using curved lines. These lines should curve slightly to follow the shape of the oval. Web learn how to draw cap easy and step by step.
Add A Curved Triangle Shape Above The Line For The Front Panel Of The Cap.
Start by drawing lines that connect the bottom of the crown to the horizontal line representing the brim. Draw a smooth transverse line on the cap. These two lines should be. It may not look like much at the moment.