How To Draw A Mushroom Step By Step
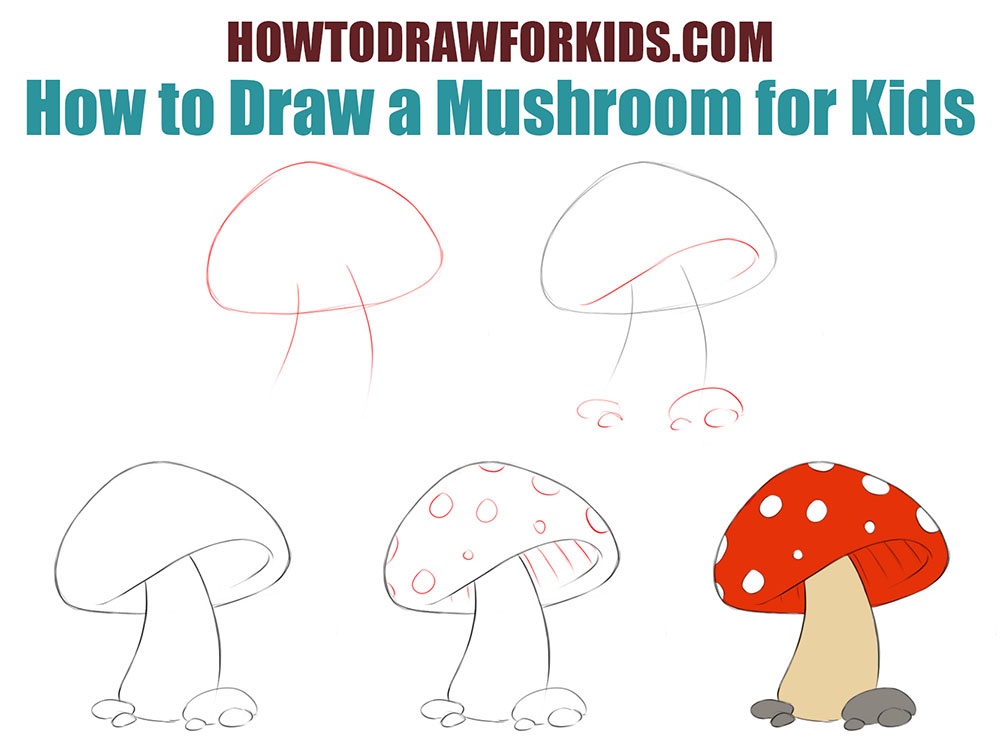
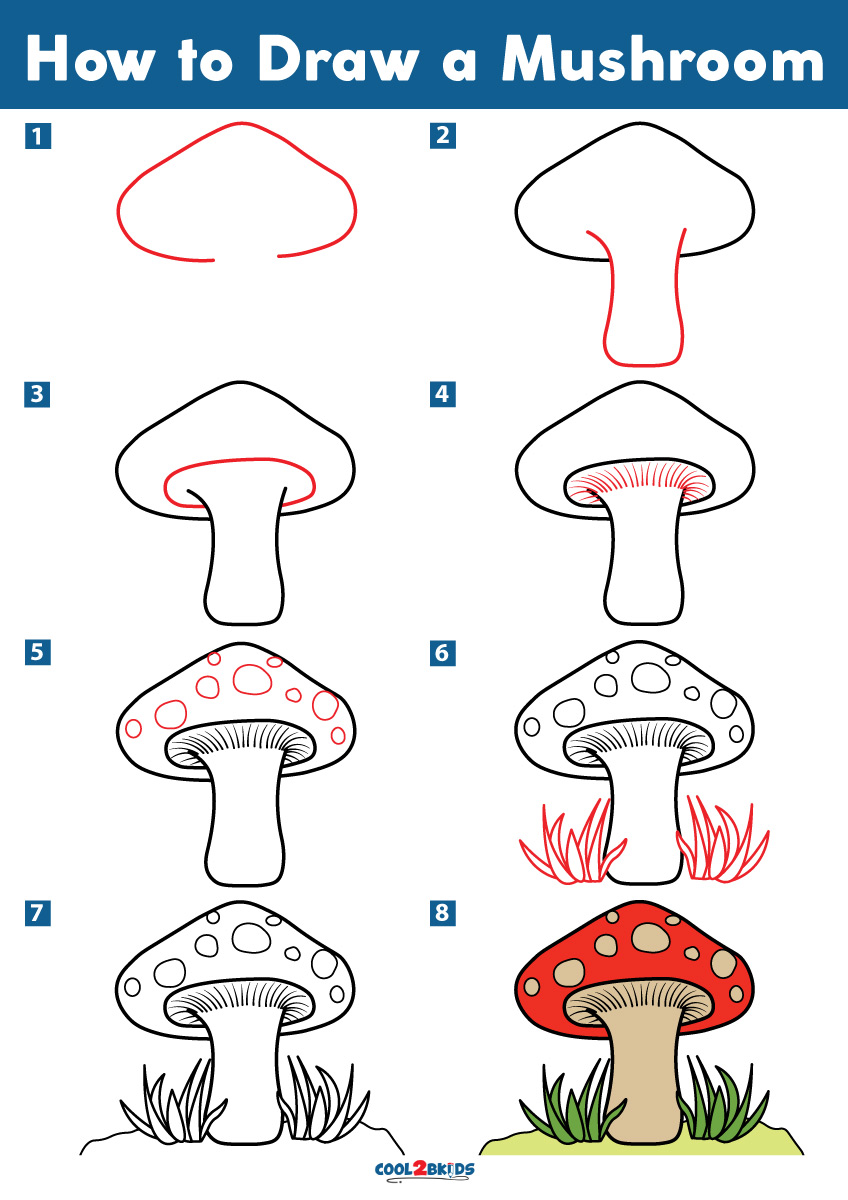
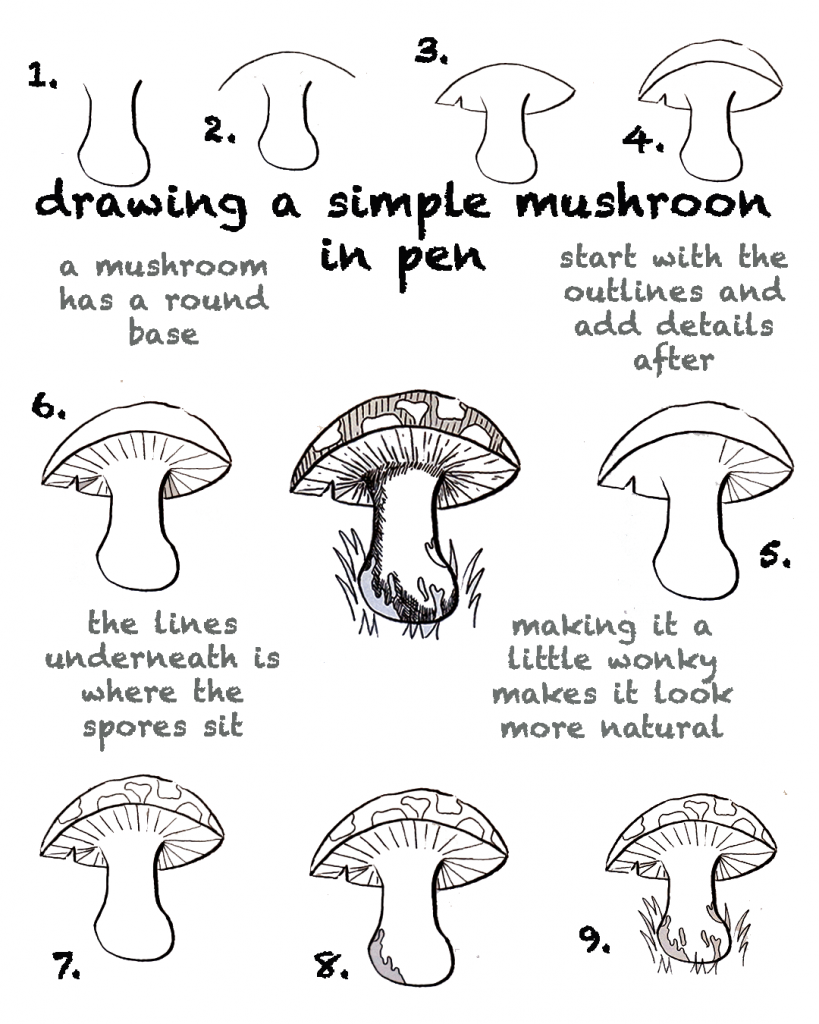
How To Draw A Mushroom Step By Step - Draw the curly mushroom curtain. First, doodle the mushroom’s cap. Add additional details to the cap, such as small dots, patterns, or lines. Web a conventional plm system uses one digital model to represent each variant of a product. Draw three ellipses, one per mushroom. Draw lines upward from the edges of the curves to mimic the folds of a curtain. To complete this step, connect the edges of the previously drawn line with another curved line. Our how to draw book is here! Now it is time to outline the drawing and improve the plain sketch with extra details that will make for a beautiful mushroom drawing. The spots on top are on the curve of the mushroom cap, so they look like partial circles.
Add volume by sketching the thickness of the legs and the caps. Then, use an orange crayon to fill in the ring of the mushroom. Connect the two lines with a wavy line at the bottom. Unlock ad free and printable drawing and coloring tutorials. Draw the top of the mushroom cap. This portion of the mushroom is usually shaped like a dome or an umbrella. This separates the top of the cap from its underside, called the gills. Design and draw a character. Web aesthetic mushroom drawing. Our printable drawing guide (optional) pencil or black marker;
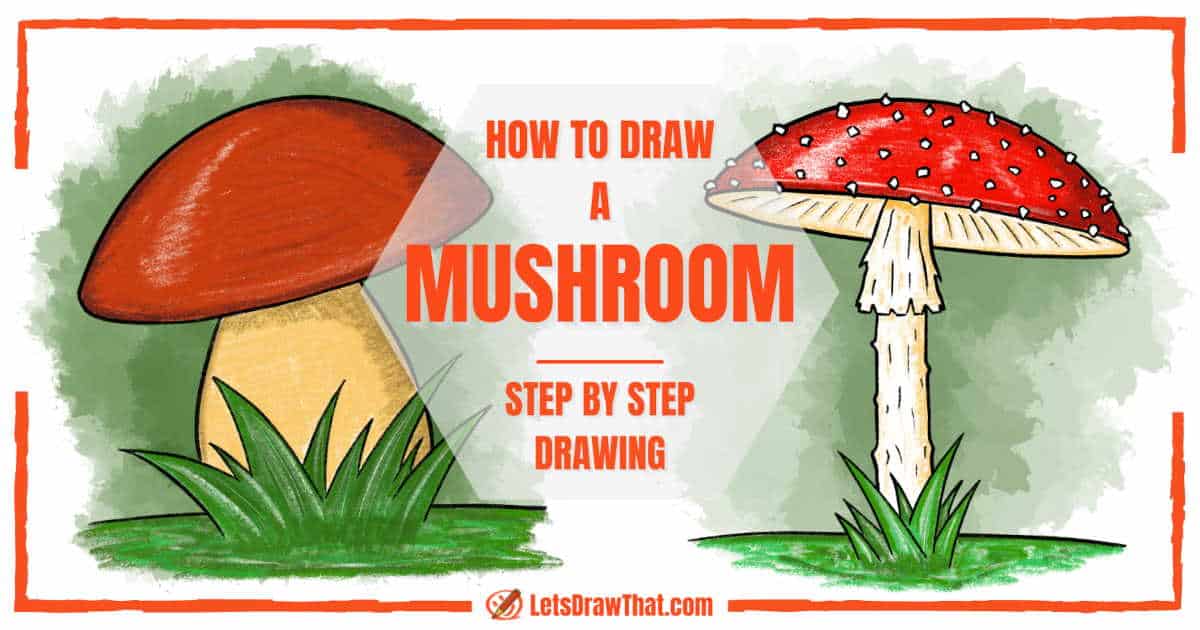
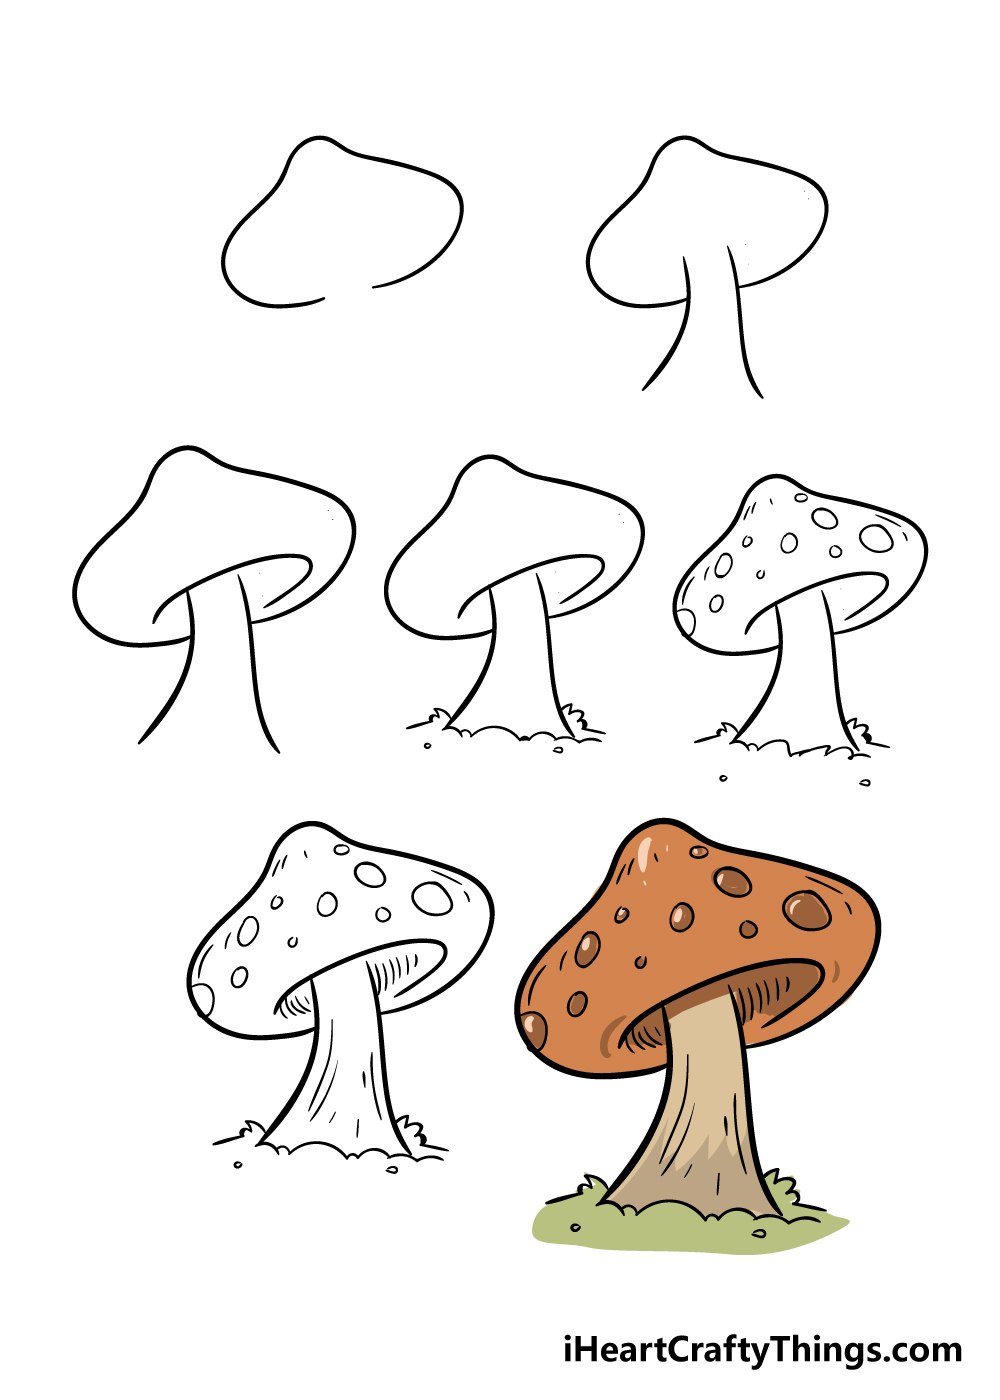
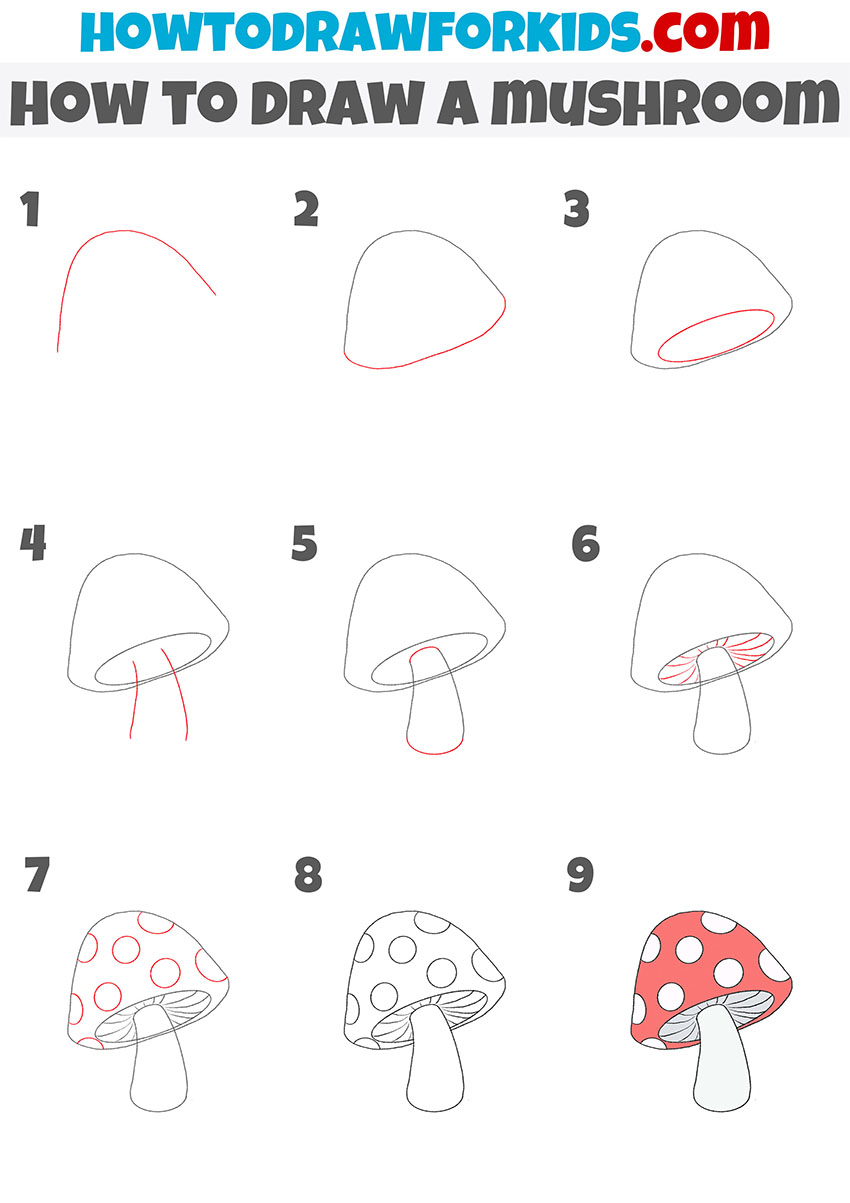
This portion of the mushroom is usually shaped like a dome or an umbrella. Our final image will have four magic mushrooms. Start by outlining the grass blades. Then add a line on each side of the grass for the ground. To do this, draw a curved line over the top of the stalk that is inside the cap of your mushroom. Draw a skirt on the leg of the fungus and lattice patterns on the cap from below. Web method to learn how to draw a realistic mushroom step by step, and learn drawing techniques, with pencil, ink and water. We want to start with a simple sketch of the mushroom, we can do this by sketching the outline of the mushroom at first. A digital twin, by contrast, may have one model for each individual product, which is continually updated using data collected during the product’s life cycle. Experiment with the angle of your lines to create a sense of form and texture on your mushroom.
How to draw a mushroom for kids
Add the bottom part of the mushroom cap. Then, use an orange crayon to fill in the ring of the mushroom. Start by drawing three lines for the fungus locations. Web how to draw flower step by step. Draw it as shown in the example.

Easy How to Draw a Mushroom Tutorial and Mushroom Coloring Page
Unlock ad free and printable drawing and coloring tutorials. Design and draw a character. Add additional details to the cap, such as small dots, patterns, or lines. Draw the grass and the ground. Doing a mushroom sketch practice exercise will make you much more familiar with the shape and proportions of mushrooms.
How to Draw a Mushroom
Drawing the vent lines (gills) under the mushroom cap will be easy. Beneath the cap of the mushroom is the toadstools curtain. Sketch until you run out of time. Get some paper and something to sketch with. Web here’s how you do it:

How to Draw a Mushroom HelloArtsy
Make 15 short, straight lines as shown in. Try to angle the curve of this line in the way that it does in the. Doing a mushroom sketch practice exercise will make you much more familiar with the shape and proportions of mushrooms. The form of the mushroom is quite similar to broccoli, where its stem gets slightly larger as.

How To Draw Mushroom Easy Step By Step Drawing Tutorial
This portion of the mushroom is usually shaped like a dome or an umbrella. Make sure you don’t press too hard on the paper when you draw your pencil lines so that you can correct your mistakes with an eraser as you go through the tutorial. Design and draw a character. Making it precisely symmetrical is not important as slight.
How To Draw A Mushroom 2 Easy Ways (StepByStep Drawing) Let's Draw
Add volume by sketching the thickness of the legs and the caps. The spots on top are on the curve of the mushroom cap, so they look like partial circles. Draw an oval shape to create the base of your first mushroom using a light pencil stroke. Set a timer for three or five minutes. Add the bottom part of.
Mushroom Drawing How To Draw A Mushroom Step By Step
With a variety of animals, magical creatures, vehicles, foods, plants and more your kids will never get bored. Make sure you don’t press too hard on the paper when you draw your pencil lines so that you can correct your mistakes with an eraser as you go through the tutorial. To complete this step, connect the edges of the previously.
6 easy tutorials how to draw a mushroom How To Draw Tutorials
Web hi everyone, in this video i show you how to draw a mushroom step by step 🍄. Let’s complete the mushroom drawing by adding some color. In this video, we will show you how to draw a mushroom easy step by step with easy drawing tutorial step by. Hey there, whether you’re just starting out or already really good.

How to Draw a Mushroom HelloArtsy
Learn a simple method for developing an original character, from mind map to finished drawing. First, doodle the mushroom’s cap. We will start on the interior of your mushroom in this step of our guide on how to draw a mushroom. Web a conventional plm system uses one digital model to represent each variant of a product. Hey there, whether.
How to Draw a Mushroom Step by Step Drawing Tutorial For Kids
Sketch until you run out of time. For more on “eye level” see the following tutorial: Draw three ellipses, one per mushroom. This step is easy enough, you only need to draw one curved line. Web method to learn how to draw a realistic mushroom step by step, and learn drawing techniques, with pencil, ink and water.
To Draw This Shape You Need To Draw Two Sloping Lines From The Base Of The Mushroom Cap.
Draw another curved line across the mushroom cap. The form of the mushroom is quite similar to broccoli, where its stem gets slightly larger as it moves to the cap. Draw the outline of the mushroom’s stem. Making use of a soft brush and a darker green paint color, fill in the bottom area of your grass in this darker shade.
Connect The Two Lines With A Wavy Line At The Bottom.
Follow my step by step drawing tutorial and make your own mushroom drawing easy. This step is easy enough, you only need to draw one curved line. Web here’s how you do it: Add the bottom part of the mushroom cap.
Drawing The Vent Lines (Gills) Under The Mushroom Cap Will Be Easy.
For more on “eye level” see the following tutorial: Connect the lines at the top of the stem using a short, curved line. In this case the “eye” level” will be slightly underneath the cap so it’s bottom will be visible. The spots on top are on the curve of the mushroom cap, so they look like partial circles.
Get Some Paper And Something To Sketch With.
Web a conventional plm system uses one digital model to represent each variant of a product. Draw three ellipses, one per mushroom. Set a timer for three or five minutes. Experiment with the angle of your lines to create a sense of form and texture on your mushroom.