How To Draw A Realistic Turkey Step By Step
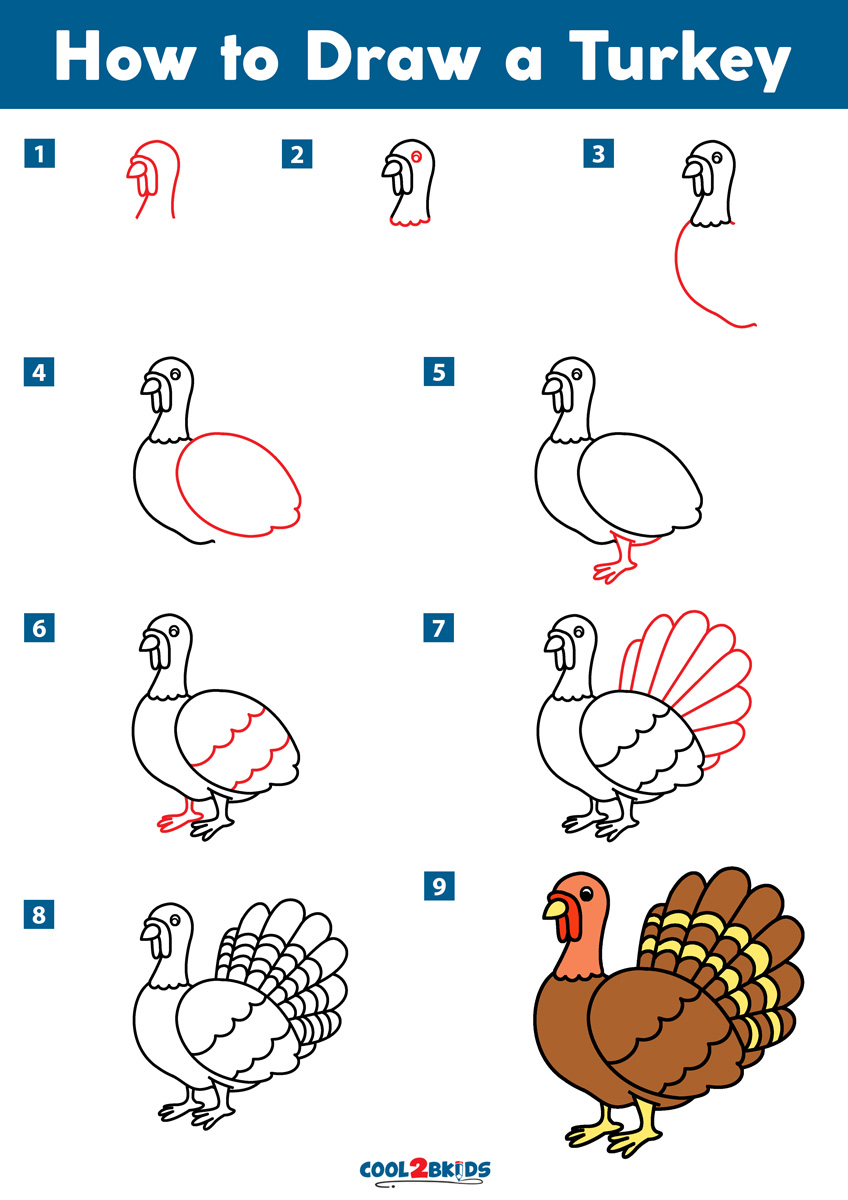
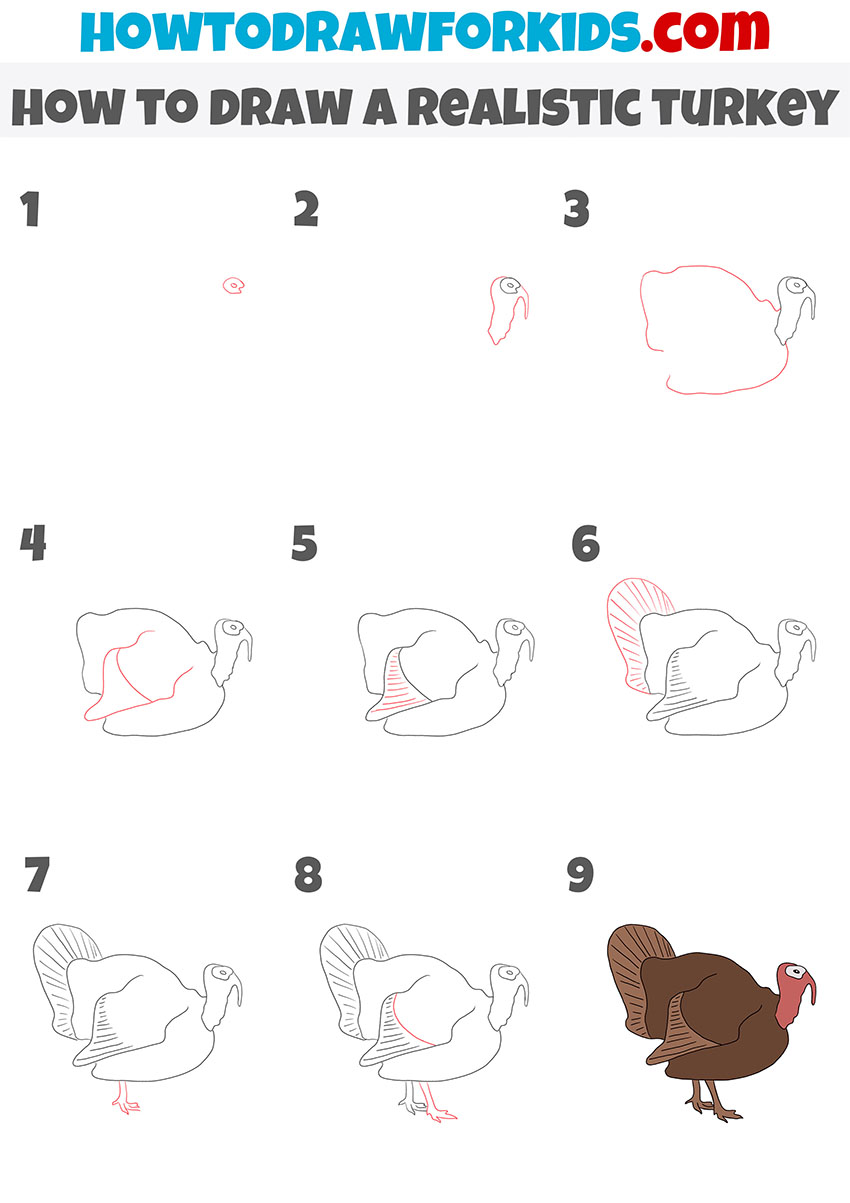
How To Draw A Realistic Turkey Step By Step - Begin by drawing two ovals on your blank sheet. Add a curved line line for the eyebrows. However, an easy way to draw them is by drawing short curved lines and then connecting them with even shorter vertical lines. This step by step lesson progressively builds upon each previous step until you get to the final rendering of the simple turkey. Do so by enclosing irregular shapes using curved lines. At this stage, draw a piece of skin on the head and neck. We’ve drawn a turkey before, we’ve also finger painted a turkey, we’ve even made a turkey cutout, but those were a couple years ago…this new turkey lesson is a little more realistic and 3 dimensional. Sketch out a shape that looks like a large comma. You should be seeing a somewhat nice pear shape. Continue with the round shape under the head, this will make the body of your turkey.
Make the shape slightly irregular. Firstly, draw two small circles to represent the eyes so the turkey can see the marvels around. One eye can be drawn bigger than the other and it’s completely optional. How to draw a turkey. Sketch two lines with an angle attached to the body. Begin towards the front of the main body oval, carving a straight line down and back out of the oval. Draw the outline of the head and neck. Add a guidelines for its tail feathers and wing. Web sketching a curved line above the beak. Draw the beak and eye.
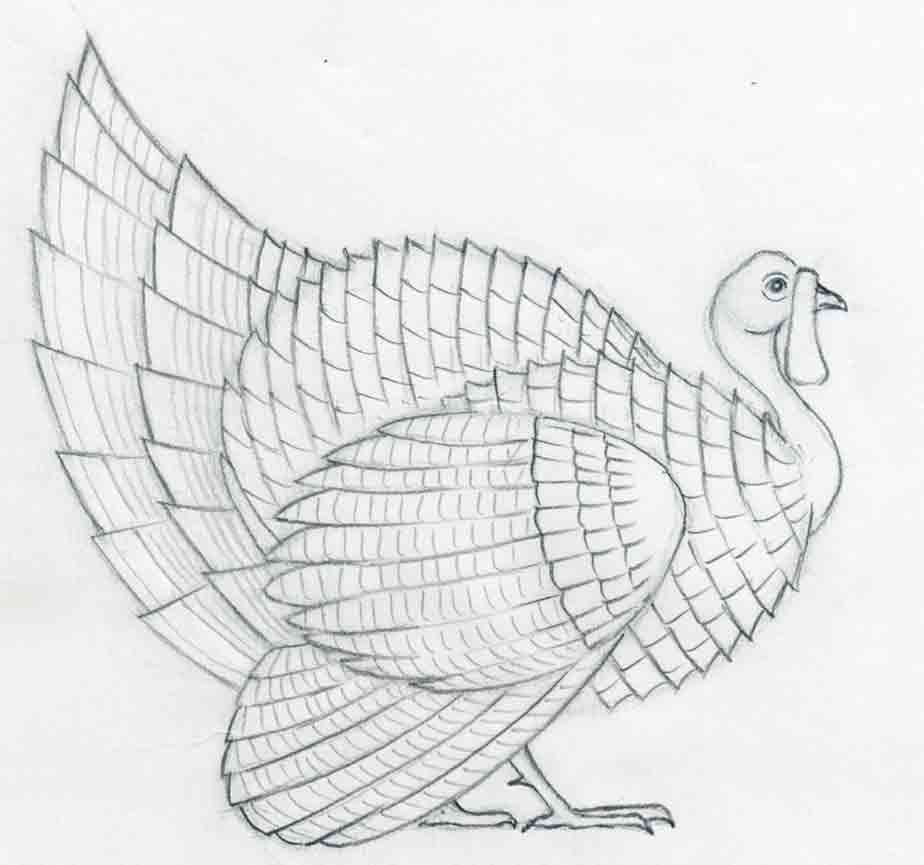
I think it just adds more details and makes the turkey appear even cuter. Turkey’s body feathers are short and numerous. Follow along with us and learn how to draw a turkey.subscribe for regular drawing and art les. Keep in mind that the bottom part of the turkey’s body should be round, as shown in the illustration above. How to draw realistic eye || step by step welcome to my channel! Follow along with the drawing guide below by drawing the red portion of each of the six steps, super. Web thanksgiving is right around the corner, and that means turkey! Begin with the wing that is on the side of the body closest to us. Draw a triangle on the ends of each line for the turkey’s legs. Getting the texture and amount right is not an easy task and will take some time to draw.
Unique How To Draw A Turkey Sketch Sketch Art Drawing
How to draw a turkey. Finally, we provided some tips on how to add realism to your drawing. Web realistic drawing of a turkey: Begin by drawing a small circle and a large oval. On the neck, below the beak draw in the wattle, which will also be an elongated oval of sorts.
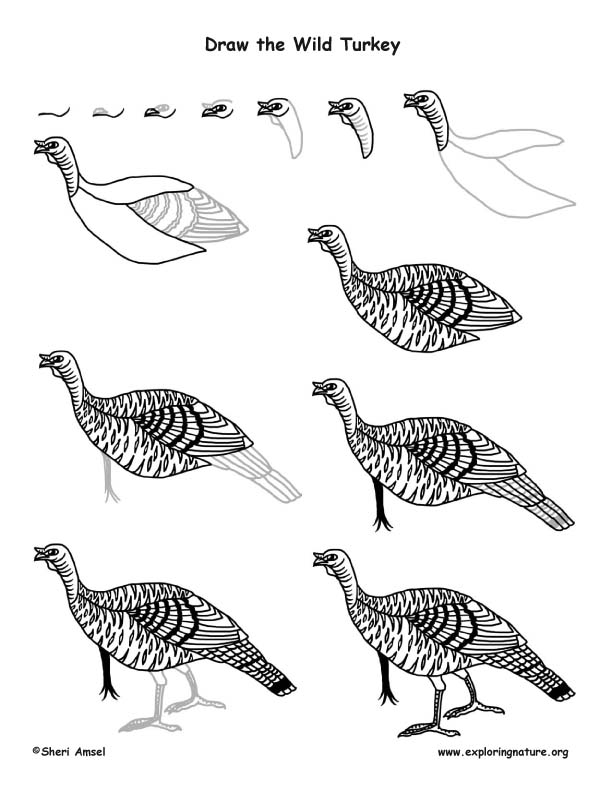
Turkey (Wild) Drawing Lesson
Perfect for artists looking to improve their animal drawing skills! Define places for the legs, feet and beak of the turkey. Sketch the tail and wing with. When drawn correctly, the shape of the body should look. How to draw a turkey?
How to Draw a Turkey Art for Beginners YouTube
Sketch out a shape that looks like a large comma. How to draw a turkey. Begin towards the front of the main body oval, carving a straight line down and back out of the oval. How to draw realistic eye || step by step welcome to my channel! Then, use a series of curved, u shaped lines to enclose the.

How to Draw a Turkey Step by Step! YouTube
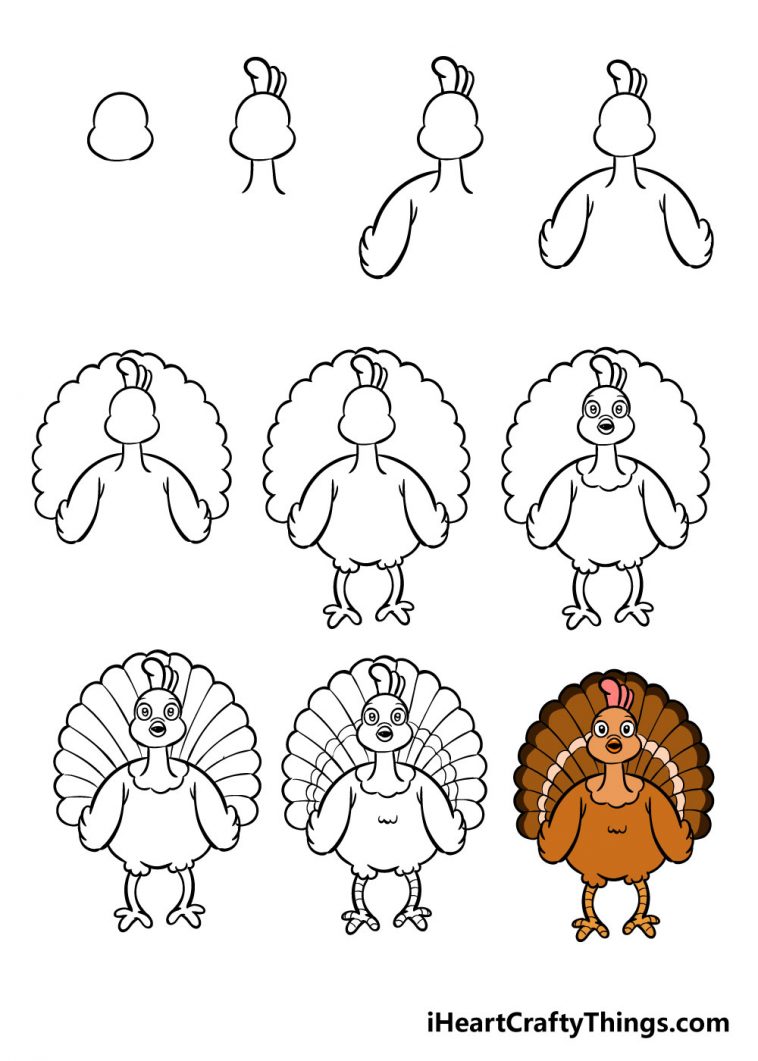
Begin by drawing two ovals on your blank sheet. I think it just adds more details and makes the turkey appear even cuter. Sketch the tail and wing with. Web sketching a curved line above the beak. Initiate the tail with smaller “u” shapes located at the upper left of the turkey’s body.
Turkey Drawing How To Draw A Turkey Step By Step!
Add a curved line line for the eyebrows. At this stage, draw a piece of skin on the head and neck. One large oval will be the body of the turkey, and the other smaller one above it will be the head. We’ve drawn a turkey before, we’ve also finger painted a turkey, we’ve even made a turkey cutout, but.
How To Draw A Turkey in pencil
Mark off the width and height of the turkey. You should be seeing a somewhat nice pear shape. Finally, we provided some tips on how to add realism to your drawing. Sketch out a shape that looks like a large comma. We’ve drawn a turkey before, we’ve also finger painted a turkey, we’ve even made a turkey cutout, but those.
How to Draw a Realistic Turkey Easy Drawing Tutorial For Kids
Sketch out a shape that looks like a large comma. For each foot, extend two curved, parallel lines from the body, forming the legs. Sketch the tail and wing with. Layer the initial tail with bigger “u” shapes for a fuller appearance. Web realistic drawing of a turkey:

How To Draw A Turkey Art For Kids Hub
Web how to draw realistic eyes: When drawn correctly, the shape of the body should look. For each foot, extend two curved, parallel lines from the body, forming the legs. Then add a drooping elongated oval shape below the beak. Add a guidelines for its tail feathers and wing.
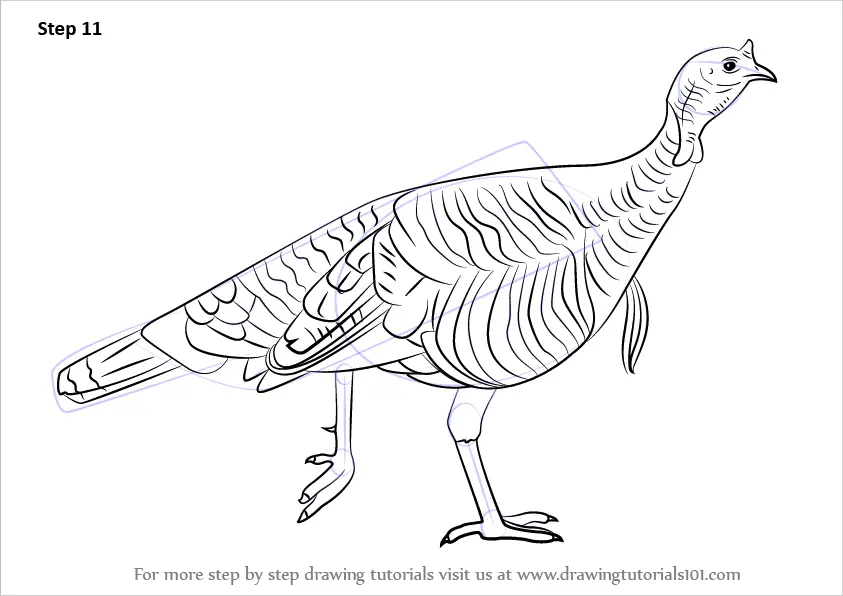
Learn How to Draw a Wild Turkey (Birds) Step by Step Drawing Tutorials
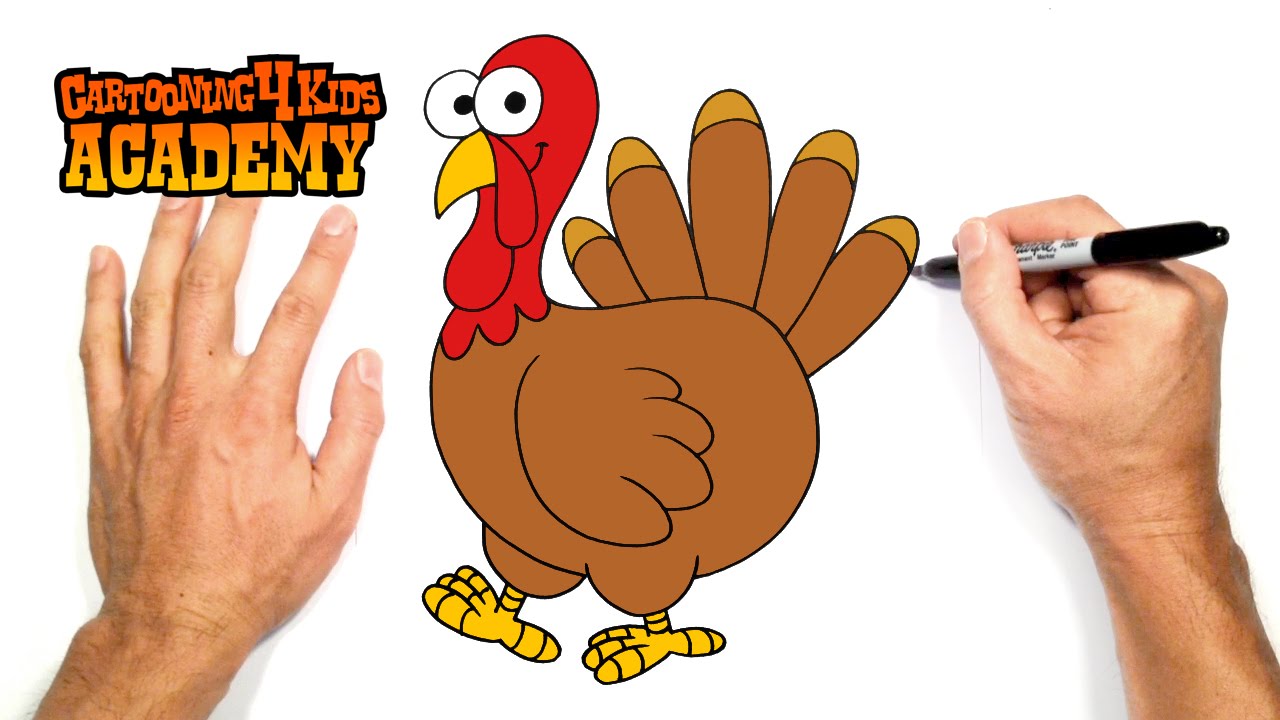
Web by tom maple • march 18, 2024. Sketch out a shape that looks like a large comma. Web today's lesson is how to draw a cartoon thanksgiving day turkey. The circle will form the turkey's head, while the oval will form the wing. One eye can be drawn bigger than the other and it’s completely optional.

How to Draw a Turkey YouTube
Begin towards the front of the main body oval, carving a straight line down and back out of the oval. I think it just adds more details and makes the turkey appear even cuter. Begin by drawing two ovals on your blank sheet. At this stage, draw a piece of skin on the head and neck. Web grab a marker.
Draw The Beak And Eye.
Layer the initial tail with bigger “u” shapes for a fuller appearance. Make the shape slightly irregular. How to draw realistic eye || step by step welcome to my channel! Web sketching a curved line above the beak.
Replicate The Wing Shape On The Turkey’s Opposite Side To Maintain Balance.
Web realistic drawing of a turkey: We hope that this guide has been helpful and that you are now able to draw a realistic turkey. Sketch the tail and wing with. This step by step lesson progressively builds upon each previous step until you get to the final rendering of the simple turkey.
Web How To Draw Realistic Eyes:
Initiate the tail with smaller “u” shapes located at the upper left of the turkey’s body. Then, use a series of curved, u shaped lines to enclose the toes. Begin by drawing two ovals on your blank sheet. Draw the turkey's wattle, the fleshy adornment around its beak.
Continue With The Round Shape Under The Head, This Will Make The Body Of Your Turkey.
Begin with the wing that is on the side of the body closest to us. 🎨 from tiktok challenges to instagr. I think it just adds more details and makes the turkey appear even cuter. One large oval will be the body of the turkey, and the other smaller one above it will be the head.