How To Draw Bear Step By Step
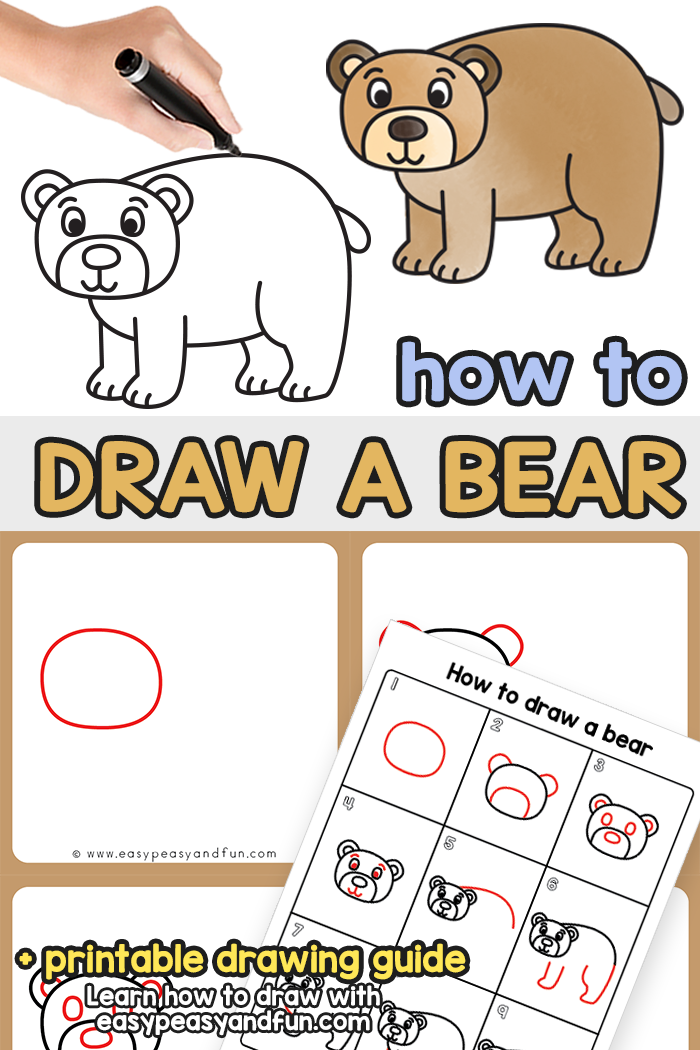
How To Draw Bear Step By Step - Continue the line from the front leg to the hind one to complete the belly. Well done, now that you’ve completed how to draw a bear, considering adding some shading or coloring to make your bear look realistic! Web learn how to draw a realistic grizzly bear in this step by step tutorial. Our how to draw a bear tutorial starts with the usual simple sketch. Connect the head with the body using a long curved line on the top of the ovals. Next, draw one more half circle at the bottom middle of the first two half circles. Darken the lines you want to keep and erase unnecessary sketch. Sketch the bear's head and front legs. Draw a circle in front of each paw. All of these animals have the same basic body plan.
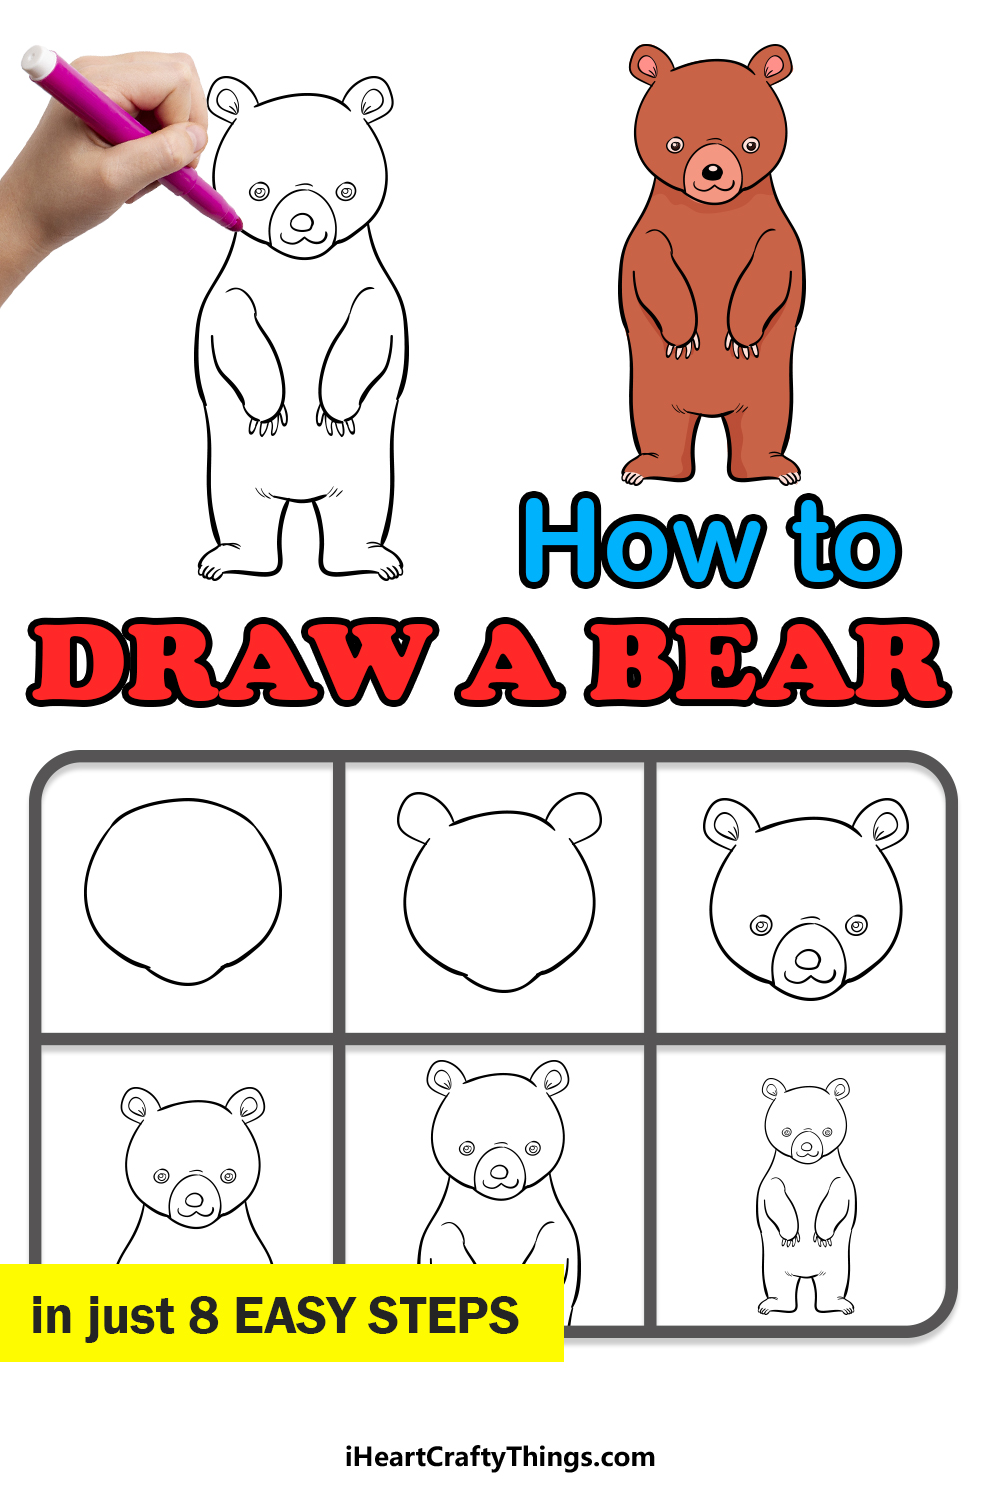
Web click here for animal drawing: Add the facial details and claws to each paw and you’re finished. Web how to draw taddy ️ drawing easy🧸beautiful teddy bear cute couple drawing🧸easy step by step ️#shortshow to draw taddy drawing easy 🧸 beautiful teddy bear. This leg will once again be shaped quite similarly to the other ones, and it will fill in the space near the front of the bear. Web gathering your bear drawing supplies. The second will encompass the hindlegs of. At this stage we're just finding the shapes of. Color the eyes and muzzle. Draw the bear’s mouth slightly above the muzzle base. You could also change the facial details a bit if you want to give your bear.
Ensure that the line is slightly curved in the middle to achieve a more natural look. Next, we are going to draw the bear’s upper back. At this stage we're just finding the shapes of. Add the facial details and claws to each paw and you’re finished. Web how to draw a cute teddy bear | mother’s day drawing and colouring | mother’s day drawing idea#drawing #cutedrawings #cutelittledrawings #artforkids #creativ. Bears (depending on their stance) have a sort of bump on their back, which is due to their shoulder blades being more pronounced. Continue the line from the front leg to the hind one to complete the belly. Start with two small circles, add the eyelids, and then some fur around. Begin with a light sketch. Well done, now that you’ve completed how to draw a bear, considering adding some shading or coloring to make your bear look realistic!
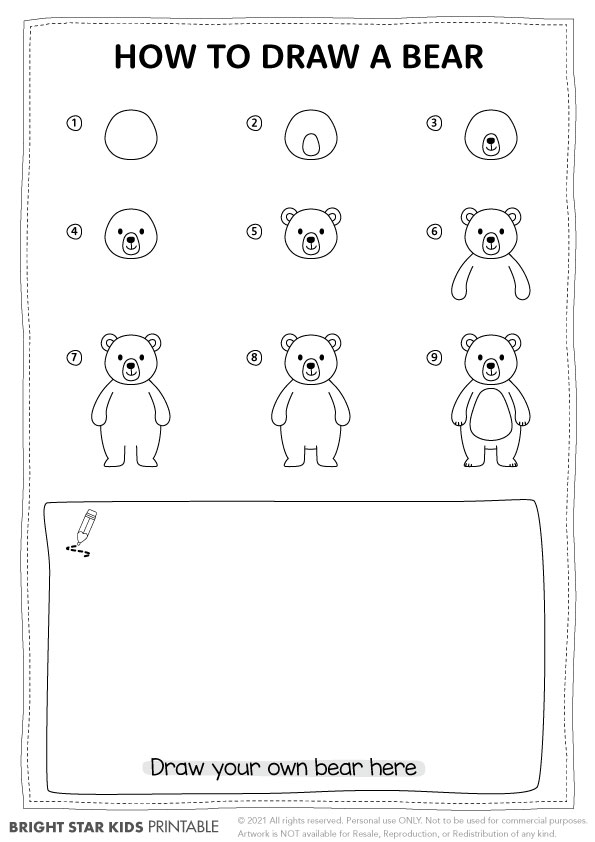
How To Draw A Bear Cute Bear Drawing For Kids Bright Star Kids
Draw a flat oval for the bear’s head. Erase the remaining guidelines and draw the eyes of your bear. Draw the bear’s mouth slightly above the muzzle base. Draw the fur on the head. Web how to draw a cute teddy bear | mother’s day drawing and colouring | mother’s day drawing idea#drawing #cutedrawings #cutelittledrawings #artforkids #creativ.
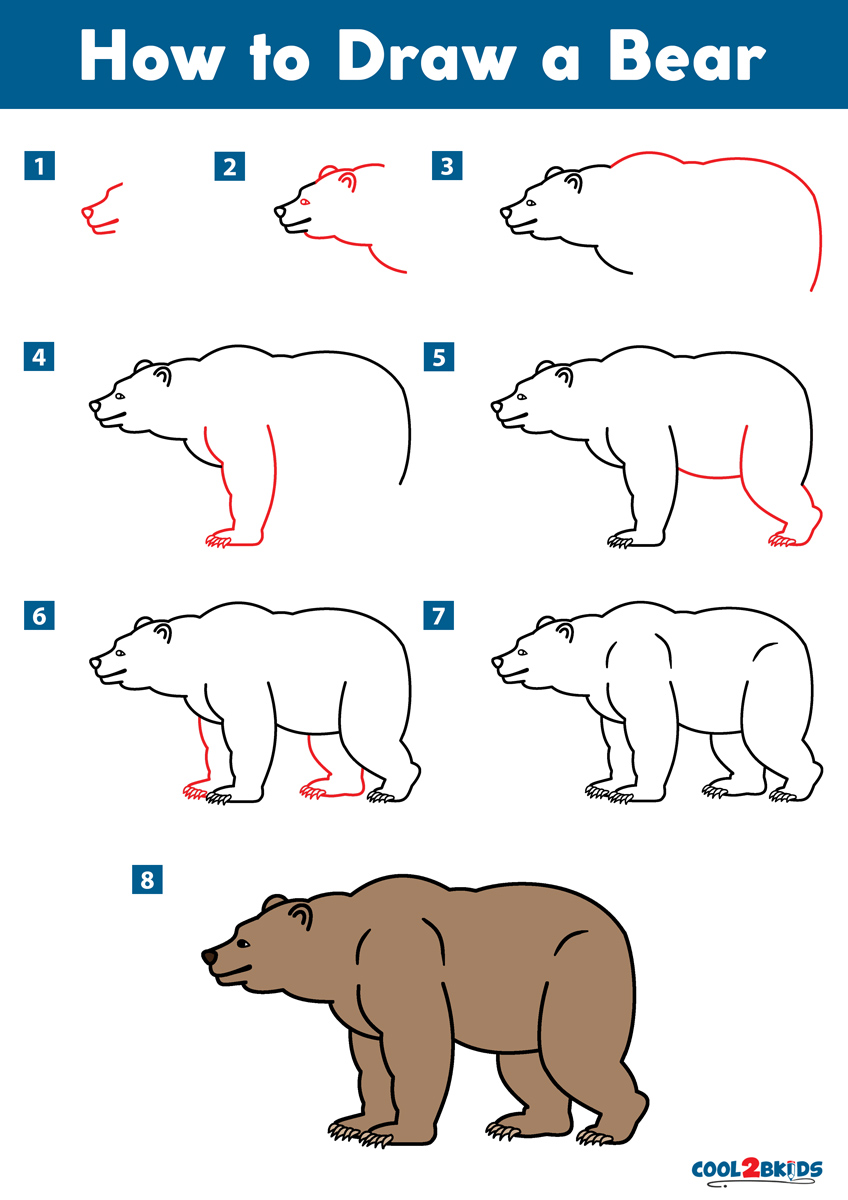
How to Draw a Bear Cool2bKids
They have large heads with long snouts and. Web finish the polar bear drawing. Use a darker pencil stroke. Start with a rounded triangle for the nose. Color the eyes and muzzle.

How To Draw A Black Bear Step By Step How to Draw a Bear / Notice the
Web how to draw a cute teddy bear | mother’s day drawing and colouring | mother’s day drawing idea#drawing #cutedrawings #cutelittledrawings #artforkids #creativ. Color the eyes and muzzle. This final step adds small details to the polar bear and provides a scenic background for the image. We don't want to make any solid marks or bold lines yet; They usually.
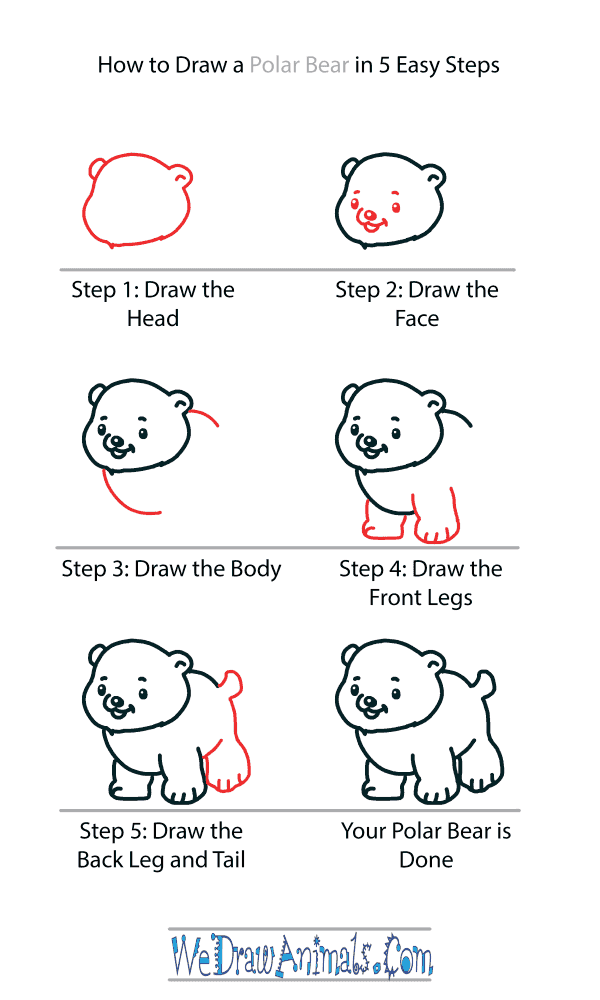
How to Draw a Cute Polar Bear
Well done, now that you’ve completed how to draw a bear, considering adding some shading or coloring to make your bear look realistic! The first will be the chest, so place it near the head. This makes them very easy to draw. Now that the head of your bear drawing is complete, you can start to draw in some facial.

How to Draw an Easy Bear Face Step by Step Oshea Cousemen
Web so, get your best pencils at the ready as we reveal how to draw a bear in five simple steps. This makes them very easy to draw. Draw a circle in front of each paw. Web learn how to draw gojo satoru from jujutsu kaisen | how to draw anime step by step | easy anime drawing | step.
Bear Drawing How To Draw A Bear Step By Step!
Draw two more circles slightly behind the former ones. This final step adds small details to the polar bear and provides a scenic background for the image. Web learn how to draw a grizzly bear with us! All of these animals have the same basic body plan. Afterward, we're going to start building the body of the polar bear using.
How to Draw a Bear Step by Step Drawing Tutorial Phần mềm Portable
The second will encompass the hindlegs of. Web gathering your bear drawing supplies. Web thanks for watching our channel. Web how to draw taddy ️ drawing easy🧸beautiful teddy bear cute couple drawing🧸easy step by step ️#shortshow to draw taddy drawing easy 🧸 beautiful teddy bear. Continue the line from the front leg to the hind one to complete the belly.
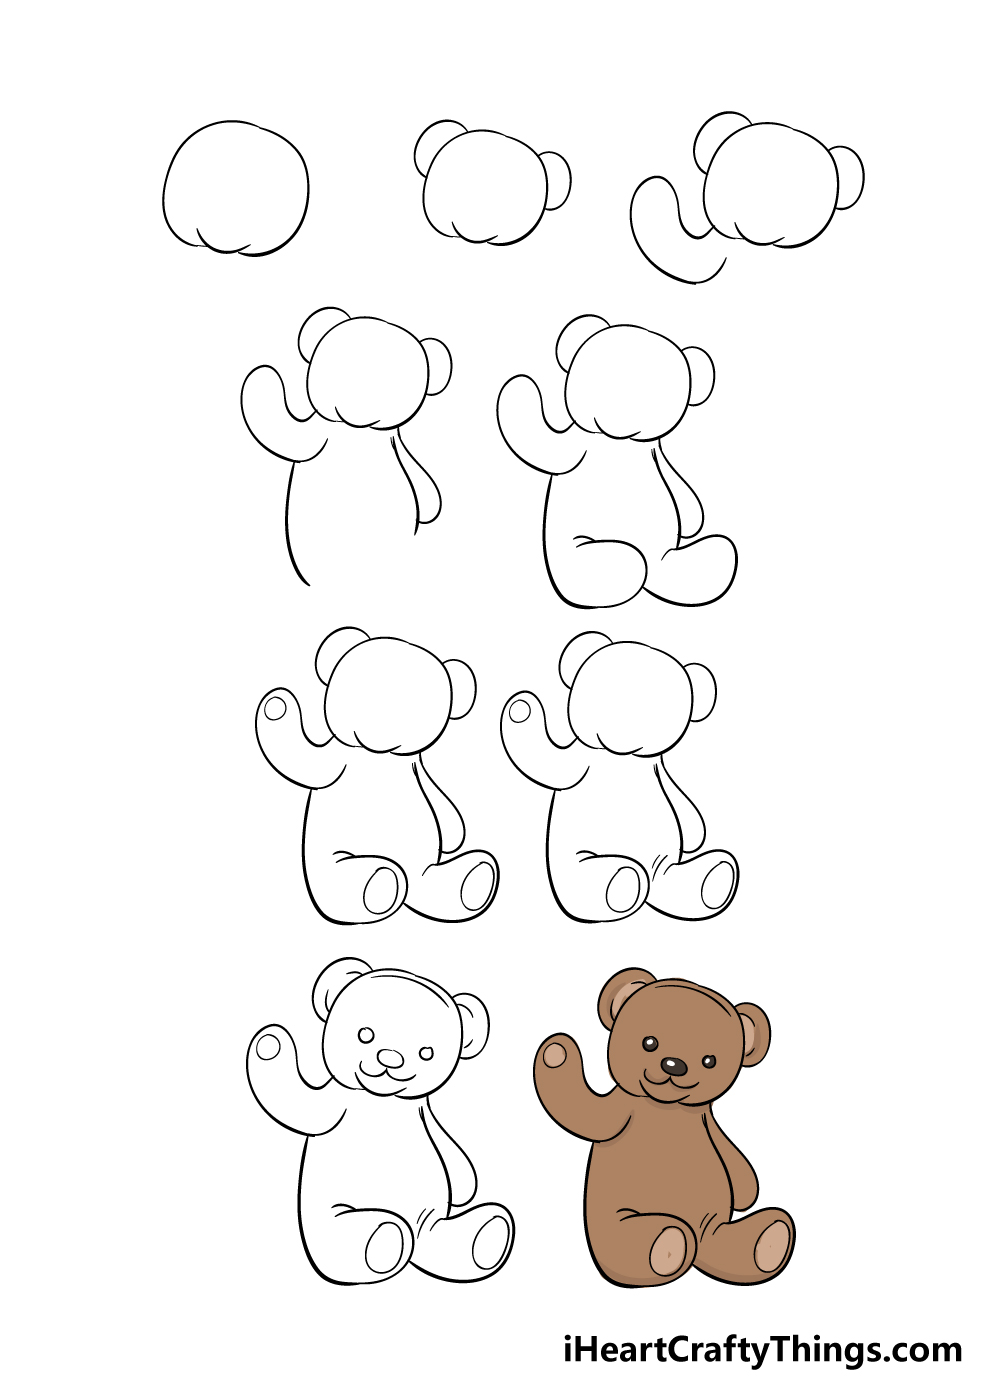
How to Draw A Teddy Bear A Step by Step Guide AnhVu Food
Draw a circle in front of each paw. Continue the line from the front leg to the hind one to complete the belly. Begin the cartoon bear outline by drawing its face. Web learn how to draw a grizzly bear with us! Next, draw one more half circle at the bottom middle of the first two half circles.

How To Draw Bear Pictures Bear Step by Step Drawing Lessons
Darken the lines you want to keep and erase unnecessary sketch. Enclose a partial oval on top of each cheek to form the eyes. The second will encompass the hindlegs of. Start with two small circles, add the eyelids, and then some fur around. Begin with a light sketch.
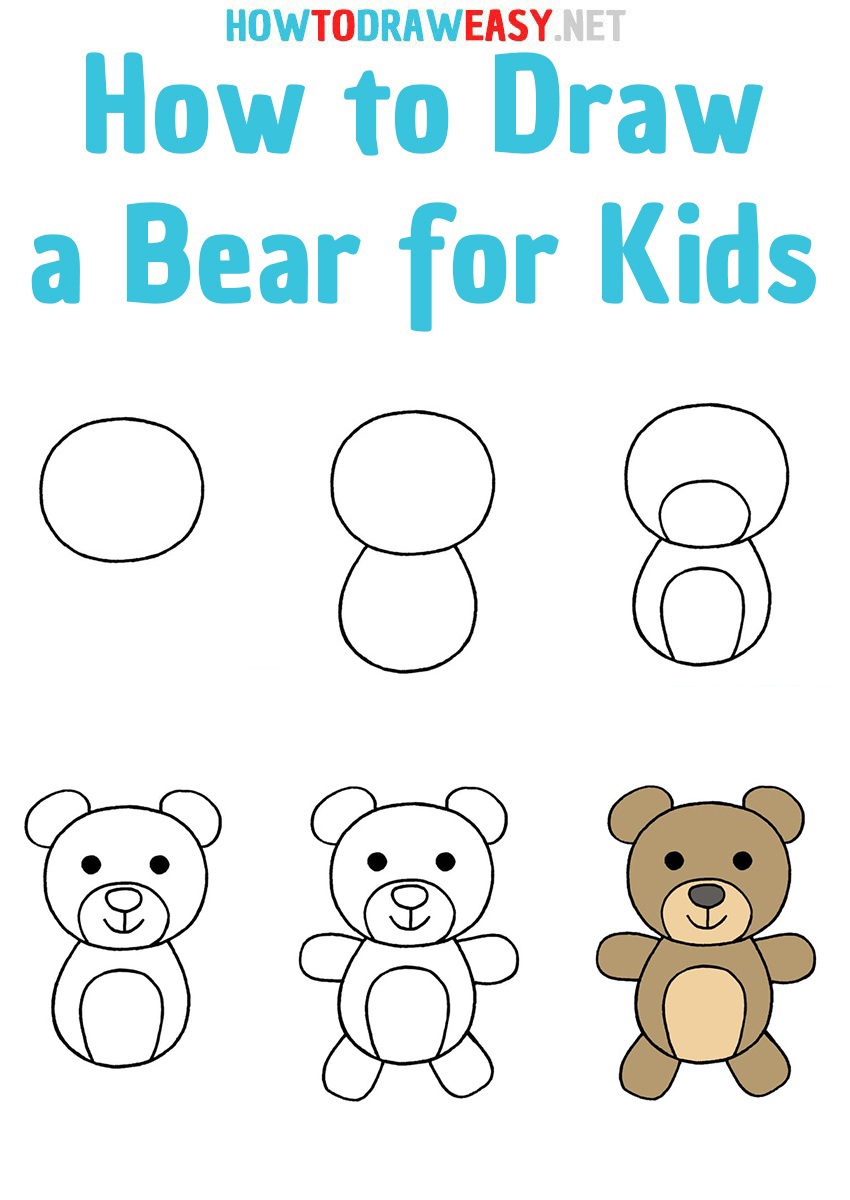
How to Draw a Bear for Kids How to Draw Easy
Draw the fur on the head. How to draw a bear step by step for beginner simple and easyhow to draw a bear face,how to draw a bear art for kids hub,how. The open part of the circle should face upwards. Web learn how to draw a realistic grizzly bear in this step by step tutorial. Start with a rounded.
Next, We Are Going To Draw The Bear’s Upper Back.
Web finish the polar bear drawing. Begin with a light sketch. Web so, get your best pencils at the ready as we reveal how to draw a bear in five simple steps. Web learn how to draw a bear with the help of our drawing lessons!
This Leg Will Once Again Be Shaped Quite Similarly To The Other Ones, And It Will Fill In The Space Near The Front Of The Bear.
Begin the cartoon bear outline by drawing the bear's face. Enclose a partial oval on top of each cheek to form the eyes. Then, you can use some smoother curved lines for the mouth and muzzle of the. Well done, now that you’ve completed how to draw a bear, considering adding some shading or coloring to make your bear look realistic!
Bears (Depending On Their Stance) Have A Sort Of Bump On Their Back, Which Is Due To Their Shoulder Blades Being More Pronounced.
Web learn how to draw a realistic grizzly bear in this step by step tutorial. The second will encompass the hindlegs of. Web click here for animal drawing: Draw two more circles slightly behind the former ones.
Web Follow The Diagram Below To Draw The Bear’s Nose.
Web learn how to draw a bear step by step, realtime, narrated drawing tutorial. Draw the fur on the head. This final step adds small details to the polar bear and provides a scenic background for the image. The open part of the circle should face upwards.