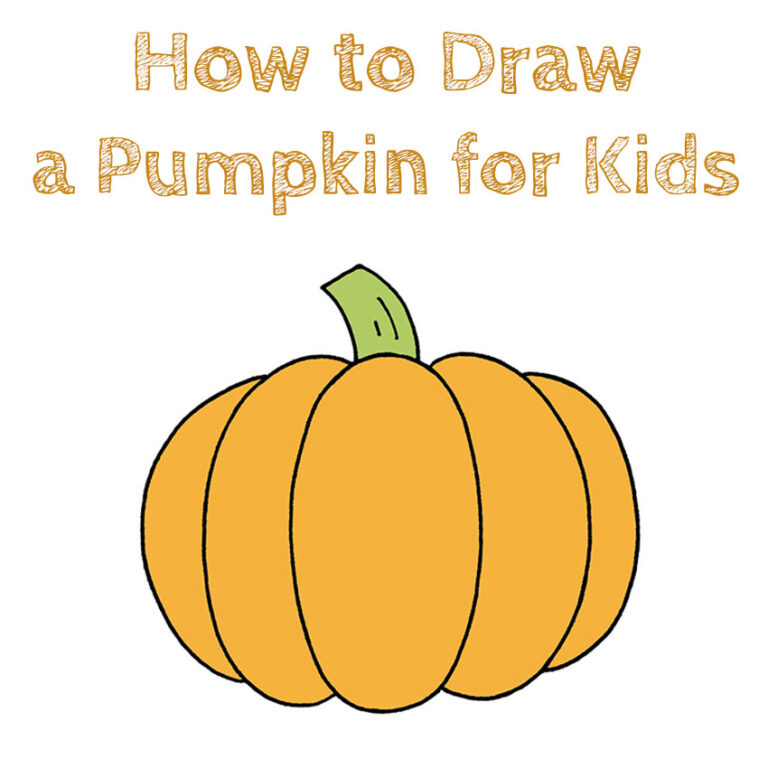
How To Draw Pumpkin Easy
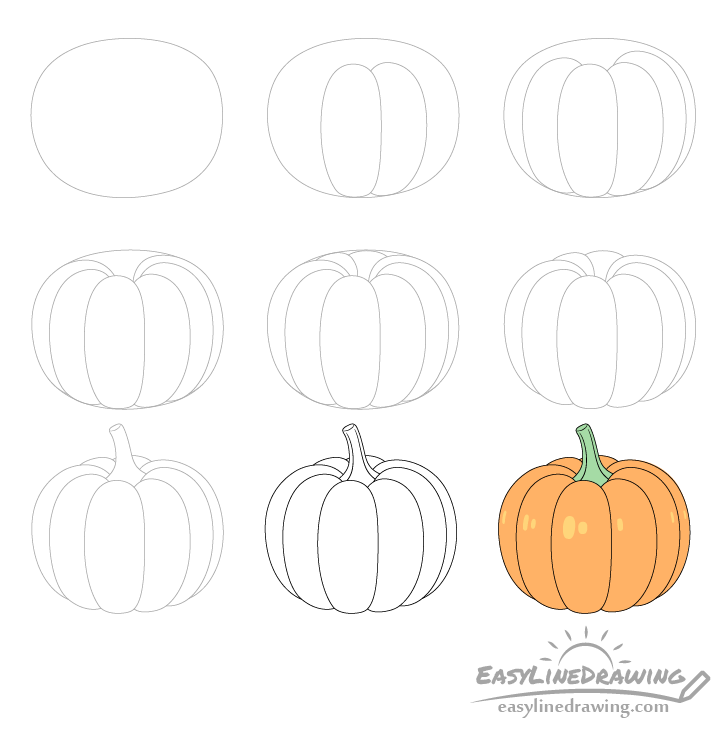
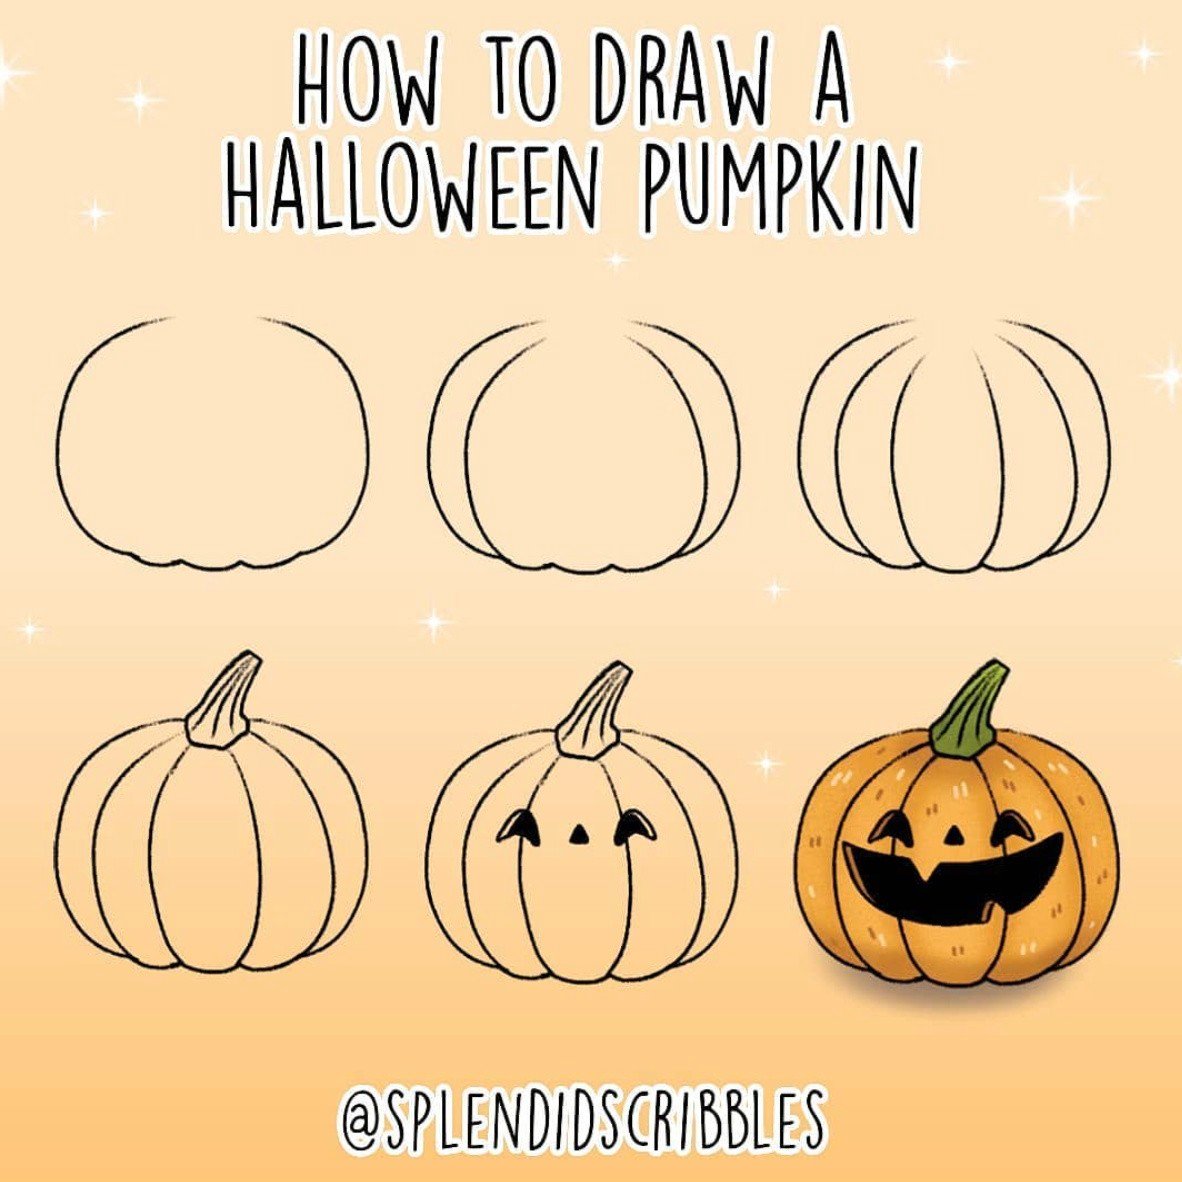
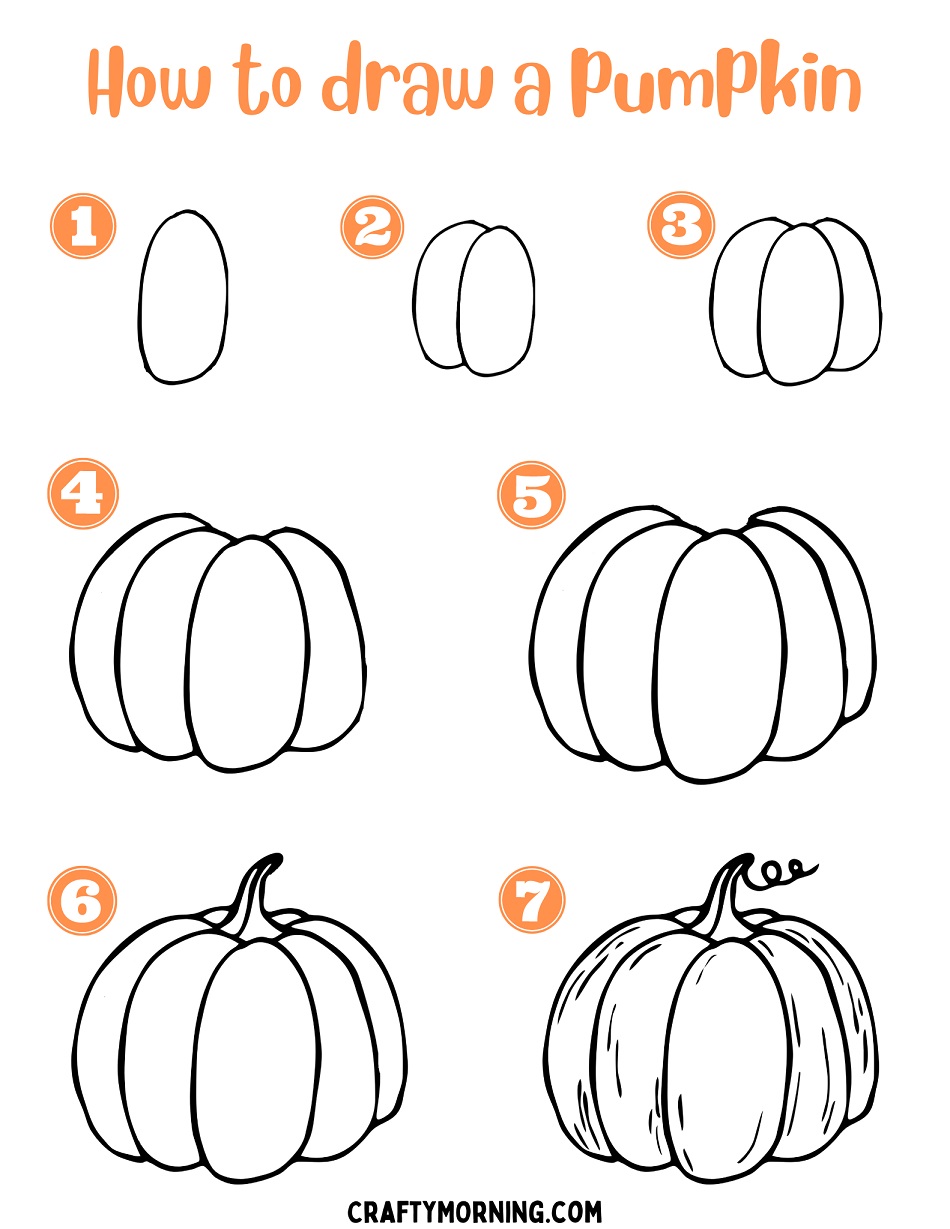
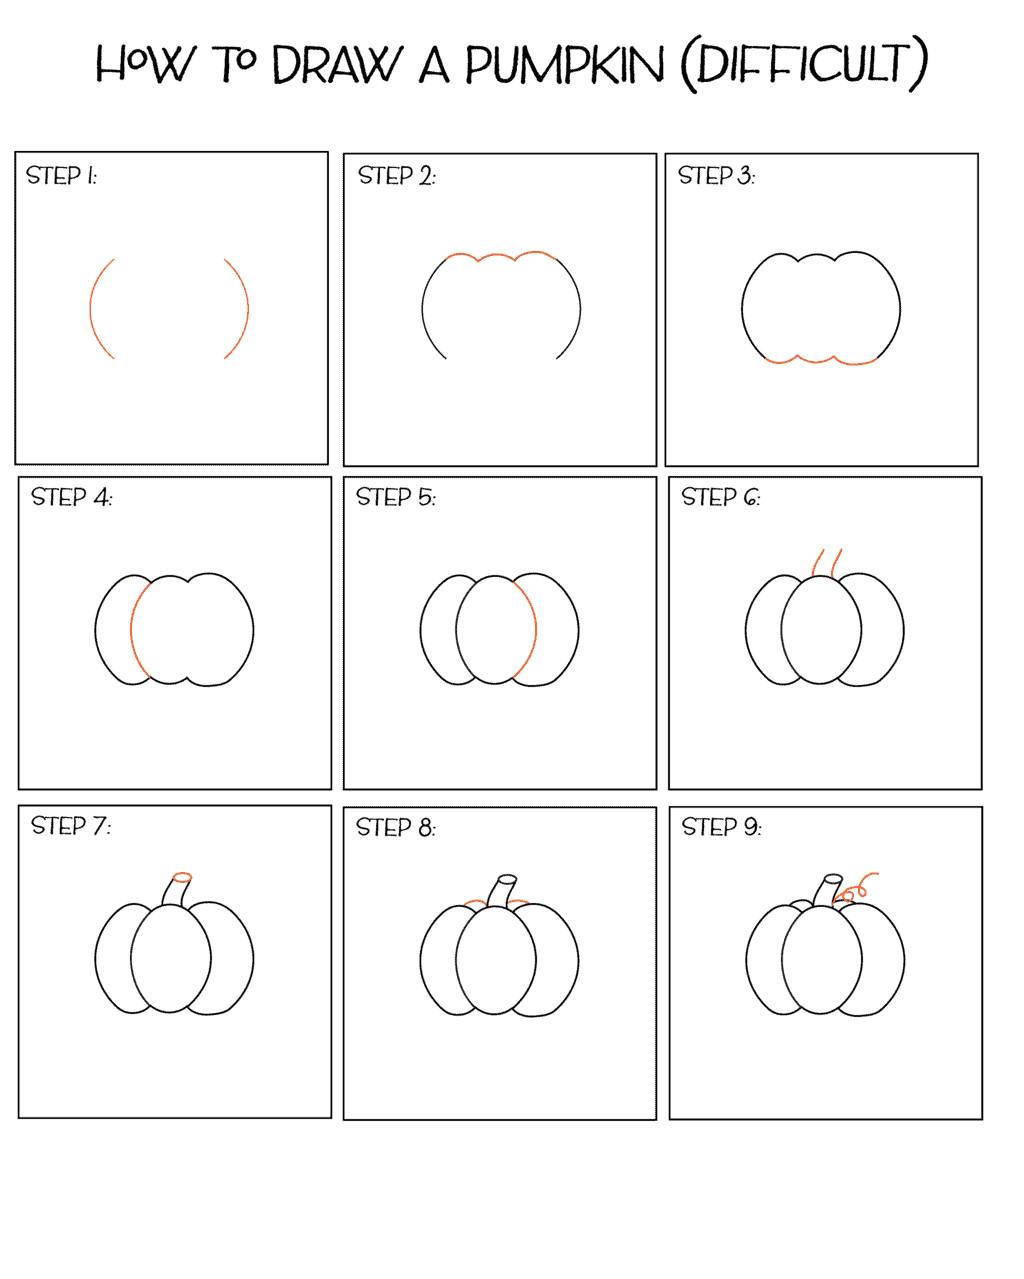
How To Draw Pumpkin Easy - The first step is to draw one larger circle in the middle and two others overlapping the middle one on either side. The more arches you draw, the more sections your pumpkin will have. Draw a curved line on the left side of the pumpkin shape. Start small at the top and make it bigger as you go down. Draw a smooth, rounded line on each side, and bring it inward to meet the smaller circle at the top. Then, draw a matching curved line on the right side of the pumpkin to make it round. Draw a circle at the top of the pumpkin to represent where the stem will go. We drew 3 arches in our tutorial between the endpoints (3 on top and 3 on the bottom). The next step is to draw small stems on the top of the pumpkin. Then, texture the stem with curved lines.
Draw a smooth, rounded line on each side, and bring it inward to meet the smaller circle at the top. Now repeat the technique on the right hand side: Use a curved line to enclose the end of the stem. Web how to draw pumpkin in easy steps for beginners lesson.tutorial of drawing technique.drawing tutorial,art tutorial youtube videoyou can watch the video at. Then, texture the stem with curved lines. Use additional short lines to begin enclosing the ribs visible behind the stem. Start at our “stem base”, only just touch our pumpkin body at the bottom and finish on the previous rib. The more arches you draw, the more sections your pumpkin will have. Draw a curved line on the left side of the pumpkin shape. Again, draw three ribs out to the righ outline of the pumpkin body.
Use a curved line to enclose the end of the stem. Sketch the remaining front ribs. Web 7 steps to make a realistic looking pumpkin. Start by drawing the overall shape of your pumpkin with a two curved lines. The next step is to draw small stems on the top of the pumpkin. Draw the same number of arches at the top and bottom. We drew 3 arches in our tutorial between the endpoints (3 on top and 3 on the bottom). Sketch the remaining front ribs. Then, texture the stem with curved lines. Use additional short lines to begin enclosing the ribs visible behind the stem.
How to Draw a Pumpkin Step by Step EasyLineDrawing
Start small at the top and make it bigger as you go down. The next step is to draw small stems on the top of the pumpkin. Web how to draw pumpkin in easy steps for beginners lesson.tutorial of drawing technique.drawing tutorial,art tutorial youtube videoyou can watch the video at. Use additional short lines to begin enclosing the ribs visible.

How to Draw a Pumpkin Easy halloween drawings, Pumpkin drawing
Web 7 steps to make a realistic looking pumpkin. Then, texture the stem with curved lines. Draw another curved line across it to give the tip of the stem an oval shape. Web be it a fall or halloween drawing lesson, this how to draw a pumpkin step by step drawing tutorial will make the task easy peasy.get template here:.

How To Draw A Pumpkin Easy For Beginners AESTHETIC DRAWING
We drew 3 arches in our tutorial between the endpoints (3 on top and 3 on the bottom). Web be it a fall or halloween drawing lesson, this how to draw a pumpkin step by step drawing tutorial will make the task easy peasy.get template here: Use additional short lines to begin enclosing the ribs visible behind the stem. Start.
How to draw halloween stuff step by step The Smart Wander
Use a curved line to enclose the end of the stem. Start small at the top and make it bigger as you go down. Draw a curved line on the left side of the pumpkin shape. Sketch the remaining front ribs. Then, draw a matching curved line on the right side of the pumpkin to make it round.
How to Draw a Pumpkin (Easy Step by Step) Crafty Morning
The first step is to draw one larger circle in the middle and two others overlapping the middle one on either side. Start small at the top and make it bigger as you go down. We drew 3 arches in our tutorial between the endpoints (3 on top and 3 on the bottom). Draw the same number of arches at.
How To Draw A Pumpkin StepByStep & Free Printables So Festive!
Draw a smooth, rounded line on each side, and bring it inward to meet the smaller circle at the top. Start small at the top and make it bigger as you go down. Use additional short lines to begin enclosing the ribs visible behind the stem. Web how to draw pumpkin in easy steps for beginners lesson.tutorial of drawing technique.drawing.
How to Draw a Pumpkin for Kids How to Draw Easy
Again, draw three ribs out to the righ outline of the pumpkin body. Start small at the top and make it bigger as you go down. Web 7 steps to make a realistic looking pumpkin. The first step is to draw one larger circle in the middle and two others overlapping the middle one on either side. Then, add a.

How to draw pumpkin step by step The Smart Wander
Draw a smooth, rounded line on each side, and bring it inward to meet the smaller circle at the top. Web easy pumpkin drawing. Web 7 steps to make a realistic looking pumpkin. Then, draw a matching curved line on the right side of the pumpkin to make it round. Web be it a fall or halloween drawing lesson, this.
Easy How to Draw a Pumpkin Tutorial Video and Coloring Page
Start by drawing the overall shape of your pumpkin with a two curved lines. Use additional short lines to begin enclosing the ribs visible behind the stem. The more arches you draw, the more sections your pumpkin will have. The first step is to draw one larger circle in the middle and two others overlapping the middle one on either.

How to draw pumpkin step by step YouTube
The first step is to draw one larger circle in the middle and two others overlapping the middle one on either side. Web 7 steps to make a realistic looking pumpkin. Sketch the remaining front ribs. Draw a smooth, rounded line on each side, and bring it inward to meet the smaller circle at the top. The base shape of.
Draw Another Curved Line Across It To Give The Tip Of The Stem An Oval Shape.
Again, draw three ribs out to the righ outline of the pumpkin body. Then, texture the stem with curved lines. Web 7 steps to make a realistic looking pumpkin. Use a curved line to enclose the end of the stem.
Web Be It A Fall Or Halloween Drawing Lesson, This How To Draw A Pumpkin Step By Step Drawing Tutorial Will Make The Task Easy Peasy.get Template Here:
Web easy step by step tutorial on how to draw a pumpkin, pause the video at every step to follow the steps carefully. The base shape of a circle. Start by drawing the overall shape of your pumpkin with a two curved lines. Use additional short lines to begin enclosing the ribs visible behind the stem.
Draw The Same Number Of Arches At The Top And Bottom.
We drew 3 arches in our tutorial between the endpoints (3 on top and 3 on the bottom). Web how to draw pumpkin in easy steps for beginners lesson.tutorial of drawing technique.drawing tutorial,art tutorial youtube videoyou can watch the video at. Then, add a curved line down the middle of the circle for the stem. Draw a circle at the top of the pumpkin to represent where the stem will go.
Web Easy Pumpkin Drawing.
Draw a curved line on the left side of the pumpkin shape. The first step is to draw one larger circle in the middle and two others overlapping the middle one on either side. Then, draw a matching curved line on the right side of the pumpkin to make it round. The next step is to draw small stems on the top of the pumpkin.