Olaf Drawing Step By Step
Olaf Drawing Step By Step - Web start by drawing two small circles. Above the carrot, enclose two circles to form the eyes. Last but not least, draw a couple of long stick arms from his torso, touching his feet! Learn a simple method for developing an original character, from mind map to finished drawing. Erase guidelines (the guidelines in this tutorial were blue). Start by drawing a small circle near the top of the page. Very carefully go over your details with a pen. Black marker , colour pencils , blender ,pencil (4b) =====about this videotitle: Draw a few connecting curved lines to the top of the circle and oval smoothing out the top of olaf’s head. Finally, please color to make the picture more complete.
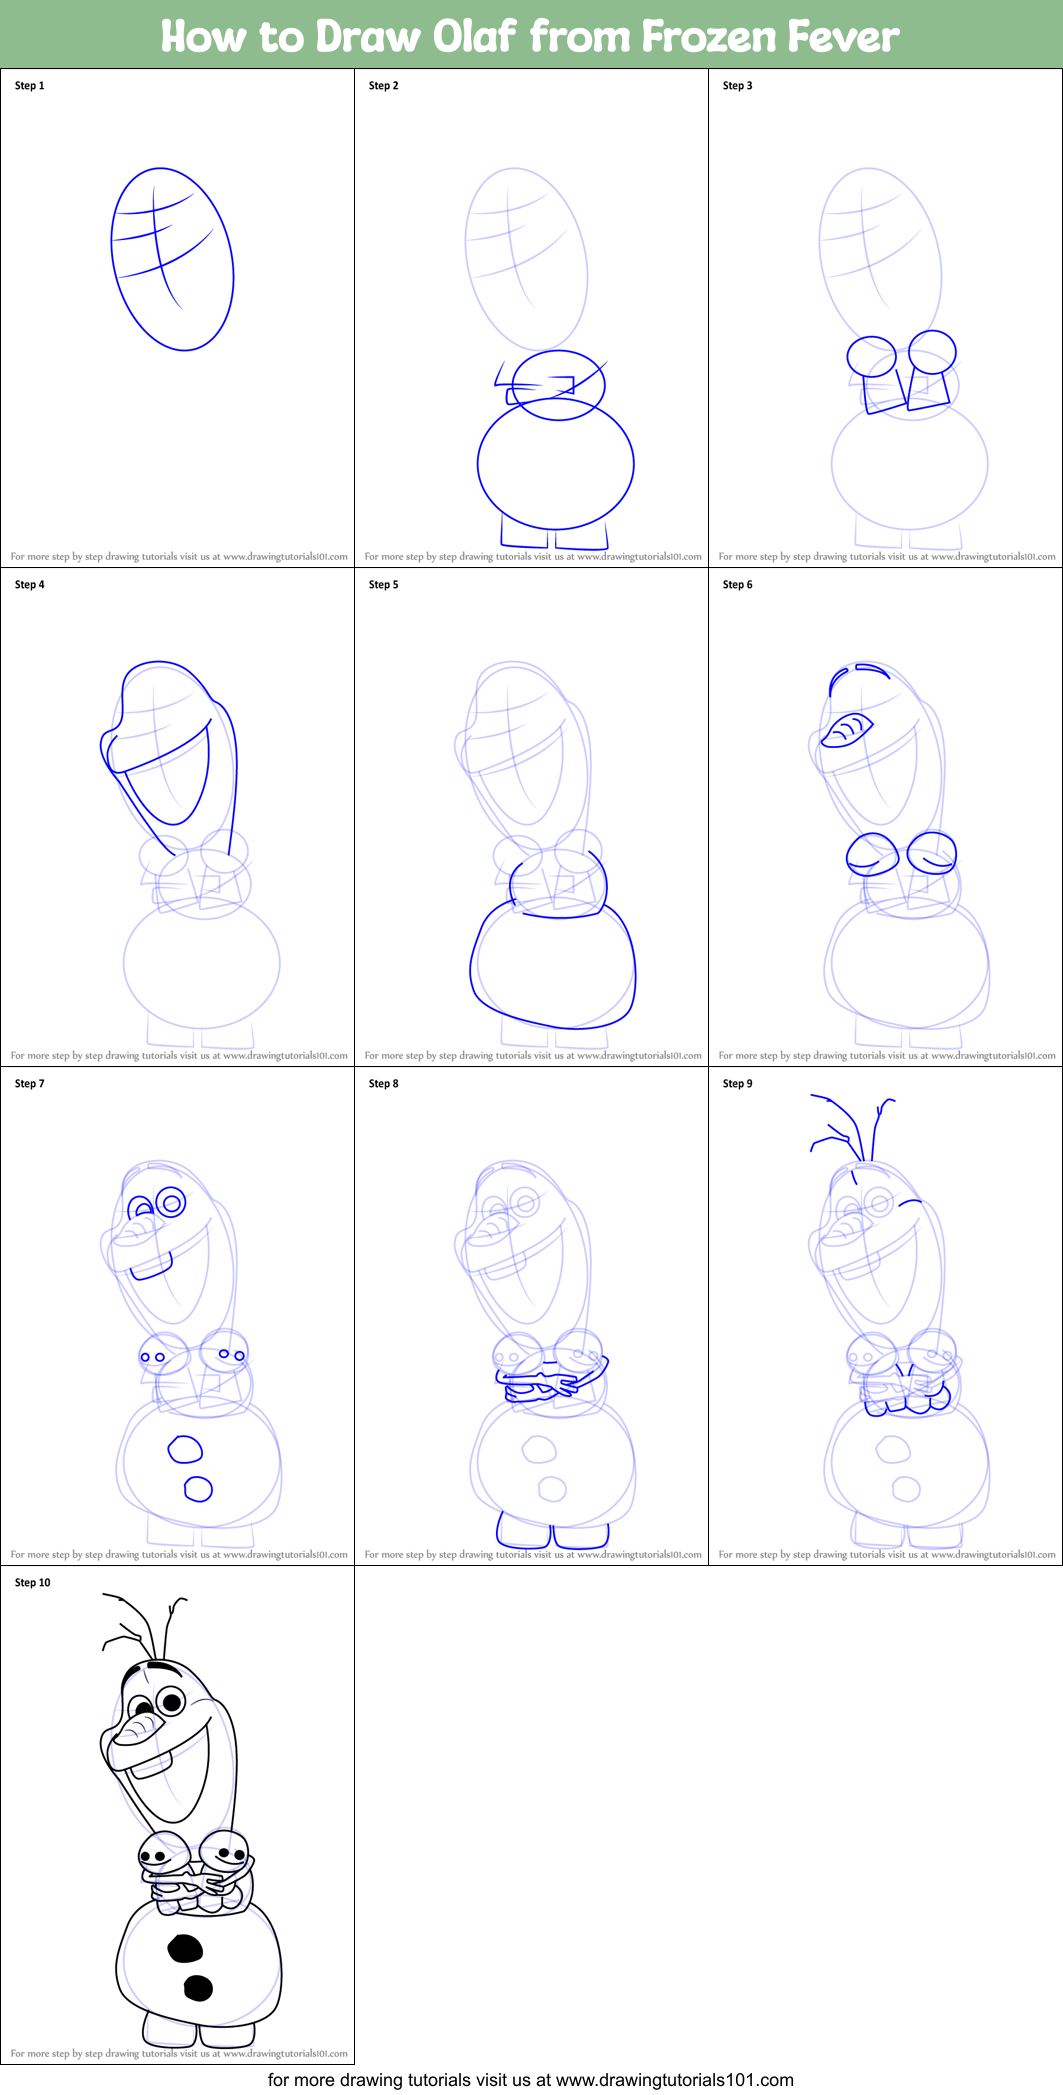
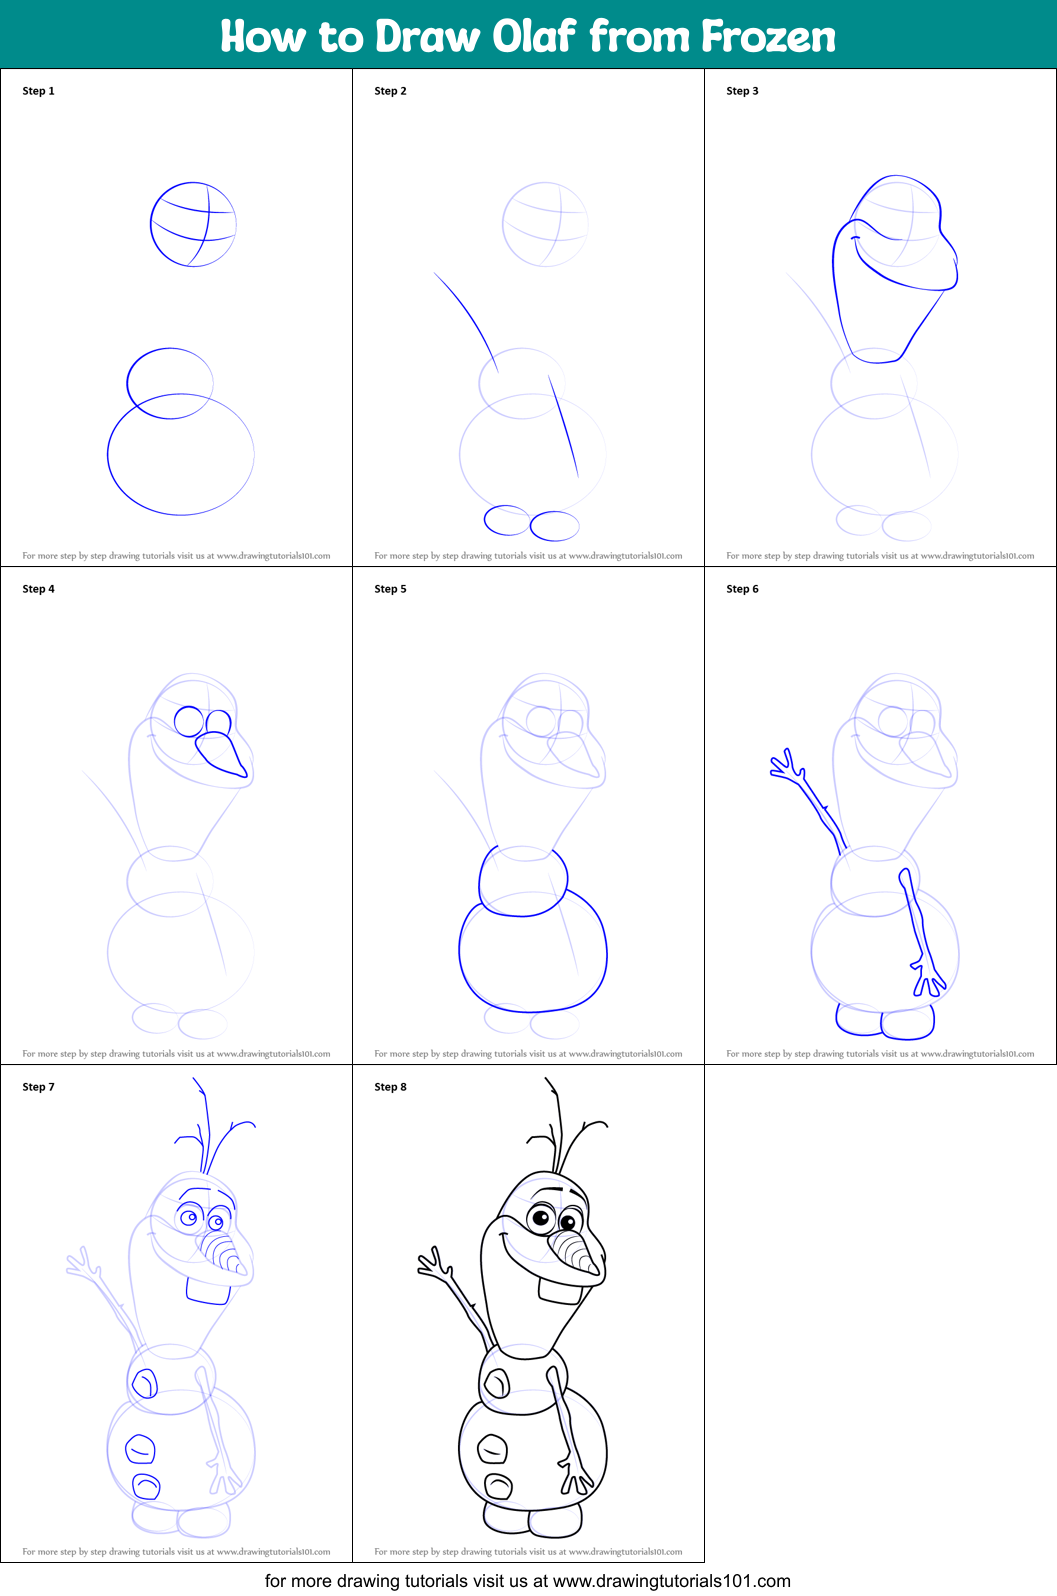
Today, we're drawing a cute cartoon version of olaf. Add the arms and details to your olaf drawing. Start by drawing a simple circle. Enjoy the process of bringing this friendly snowman to life, one easy step at a time. I will show you how to draw all the figures in this picture by using simple geometric shapes, letters, and numbers. Draw it under the original circle on the lower part of the head. Web how to draw olaf from frozen, learn drawing by this tutorial for kids and adults. Start by drawing a small circle near the top of the page. Drawing olaf catching his head adds a playful twist. Leave enough room at the bottom to draw his body later on.
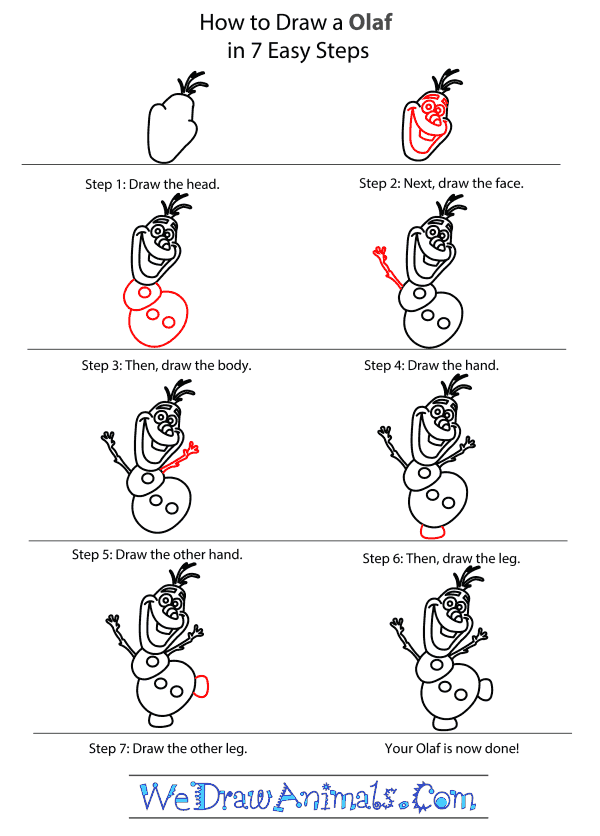
Draw the two ovals for the feet and lines for hands. Web time to add some color to our drawing of olaf from frozen! First, you draw the carrot nose. How to draw olaf step 1. One of the twigs is just a curved line. Draw it under the original circle on the lower part of the head. Then, add a tiny circle in each eye for olaf’s pupils. Web how to draw olaf from frozen, learn drawing by this tutorial for kids and adults. Draw the nose and eyes. Draw two sticks on either side of the snowman’s smaller snowball to represent olaf’s arms, then draw several small circles down the front of olaf’s body to represent his black rock buttons.
How to Draw Olaf From Frozen Made with HAPPY
This circle should be a bit smaller than the circle you drew step one. Finally, please color to make the picture more complete. Black marker , colour pencils , blender ,pencil (4b) =====about this videotitle: Draw a big shape similar to a sideways letter d as a guide for olaf's open mouth. Web used things are:
How to Draw Olaf From Frozen
Above the carrot, enclose two circles to form the eyes. Then, add a tiny circle in each eye for olaf’s pupils. I will show you how to draw all the figures in this picture by using simple geometric shapes, letters, and numbers. Draw a few connecting curved lines to the top of the circle and oval smoothing out the top.
How to Draw Olaf (Step by Step Pictures) Cool2bKids
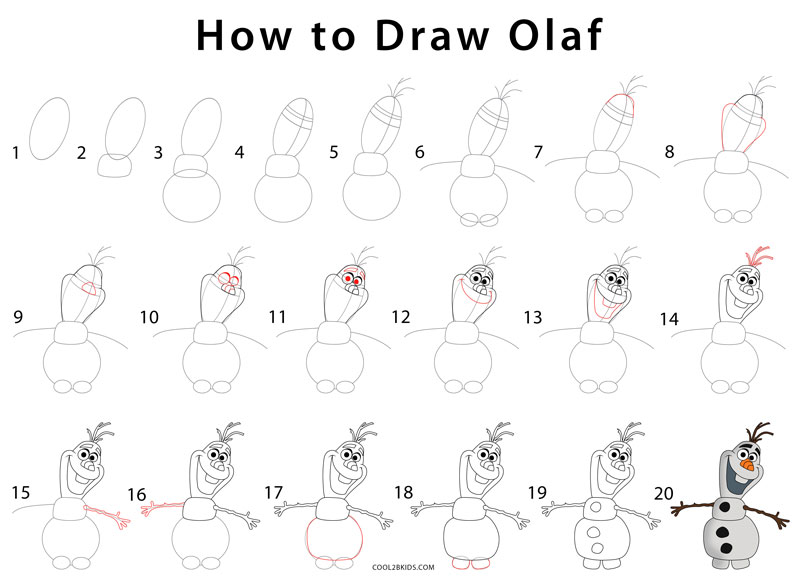
We hope you're going to follow along with us. Depict one small oval below, add the second oval on the side. I share tips and tricks on how to improve your drawing skil. It’s just a guide for the top part of olaf's head. Draw and enhance the overall body.

How to draw Olaf ️from Frozen ️ Olaf drawing tutorial for kids YouTube
Draw the two ovals for the feet and lines for hands. Very carefully go over your details with a pen. Web use light, smooth strokes for sketching. Web draw a large snowball at the bottom. Shade his nose with an orange crayon, and his tooth with a white crayon.

How to Draw Olaf from Frozen Really Easy Drawing Tutorial
Finding an easy way to draw olaf means breaking his figure into simple shapes. The next step of drawing olaf is to add details to the snowman’s body. Shade his nose with an orange crayon, and his tooth with a white crayon. Drawing olaf catching his head adds a playful twist. Web how to draw olaf from frozen, learn drawing.
How to Draw Olaf from Frozen Fever (Frozen Fever) Step by Step
One of the twigs is just a curved line. Draw the front of the muzzle. Web easy way to draw olaf. I share tips and tricks on how to improve your drawing skil. Follow along with our narrated step by step drawing lessons.

How To Draw Olaf From Frozen Draw Central
Watch our video previews and then draw. How to draw olaf step 1. Draw two sticks on either side of the snowman’s smaller snowball to represent olaf’s arms, then draw several small circles down the front of olaf’s body to represent his black rock buttons. One of the twigs is just a curved line. First, color the eyes with black.
How to Draw Olaf from Frozen printable step by step drawing sheet
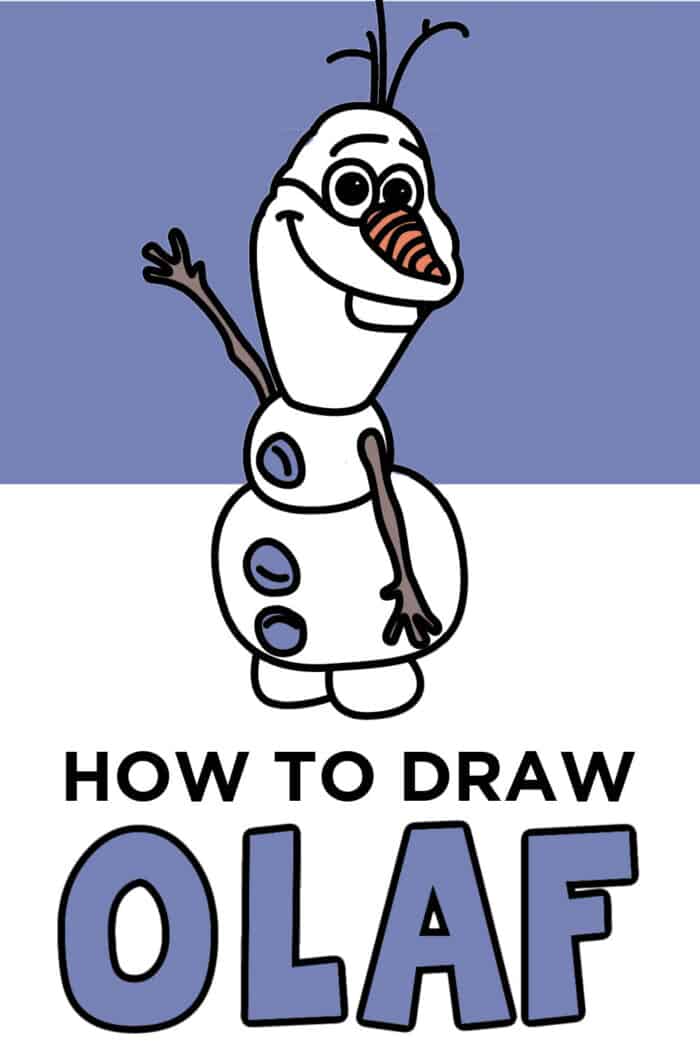
Draw two thin arms that are pointing in opposite directions. Let’s draw hands and feet together. Two of them look like letter ‘y’ shapes. Web time to add some color to our drawing of olaf from frozen! Finally, please color to make the picture more complete.

How To Draw Olaf From Frozen Art For Kids Hub Olaf drawing, Art
It doesn’t have to be perfect. How to draw olaf step 1. Web learn how to draw olaf! Finding an easy way to draw olaf means breaking his figure into simple shapes. Here they are playing so happily as young children.

How to Draw Olaf from Disney Frozen 2 Step by Step Slowly Disney
How to draw olaf step 1. Start by drawing a small triangle under the eyes. Wait a couple of minutes for the pen's. Draw and enhance the overall body. We hope you're going to follow along with us.
Very Carefully Go Over Your Details With A Pen.
Two of them look like letter ‘y’ shapes. Web used things are: Web if you love disney's frozen as much as i do, then you are going to be excited to draw this picture of princess anna and ella building a snowman (future olaf). Then, add two lines on either side of the triangle to create olaf’s nostrils.
Draw Two Sticks On Either Side Of The Snowman’s Smaller Snowball To Represent Olaf’s Arms, Then Draw Several Small Circles Down The Front Of Olaf’s Body To Represent His Black Rock Buttons.
It’s just a guide for the top part of olaf's head. Draw the nose and eyes. Start by drawing a small circle near the top of the page. Draw two thin arms that are pointing in opposite directions.
Shade His Nose With An Orange Crayon, And His Tooth With A White Crayon.
How to draw olaf step 1. Above the carrot, enclose two circles to form the eyes. Today, we're drawing a cute cartoon version of olaf. Enjoy the process of bringing this friendly snowman to life, one easy step at a time.
Web How To Draw Olaf From Frozen, Learn Drawing By This Tutorial For Kids And Adults.
Web how to draw for kids, olaf from frozen, how to draw cartoons all you need is a pencil, eraser and a little bit of paper! Erase guidelines (the guidelines in this tutorial were blue). Let’s draw hands and feet together. Web draw a large snowball at the bottom.