Pumpkin Drawing Step By Step
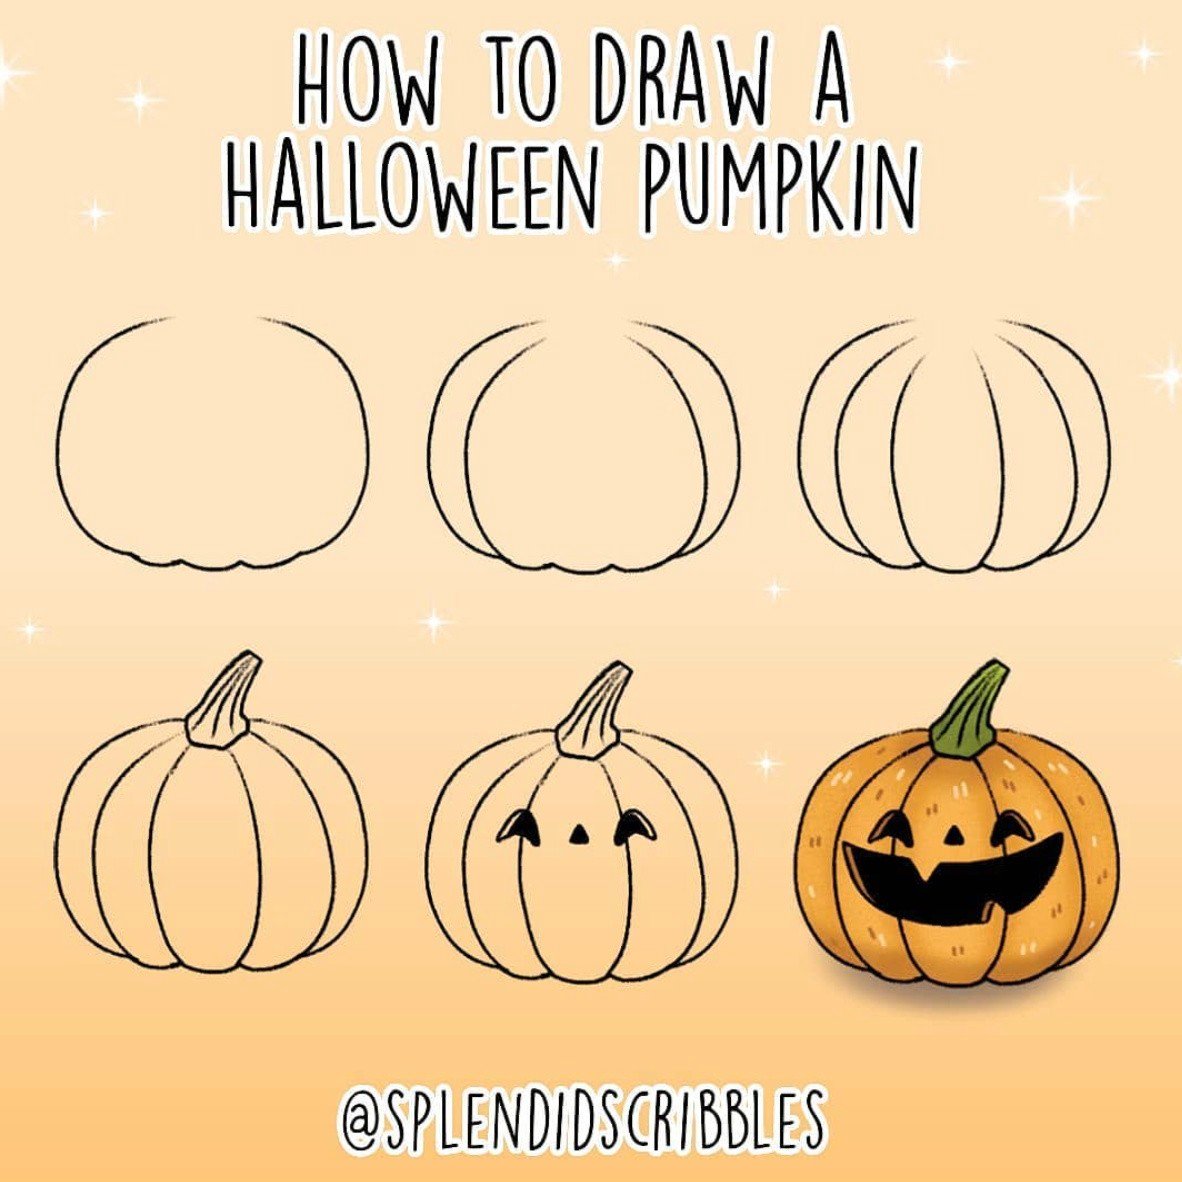
Pumpkin Drawing Step By Step - Use curved lines to highlight the gourd. Sketch a face in the middle of the oval. Drawing tutorial,art tutorial youtube video you can watch the video at slow. Use a white pastel to draw a large central oval. How to draw a pumpkin in perspective. Draw an oval with a tapered tail on top. Don’t worry if your circle is not perfect. Sketch a face in the middle of the oval. Web easy step by step tutorial on how to draw a pumpkin, pause the video at every step to follow the steps carefully. Add a smiling mouth below.
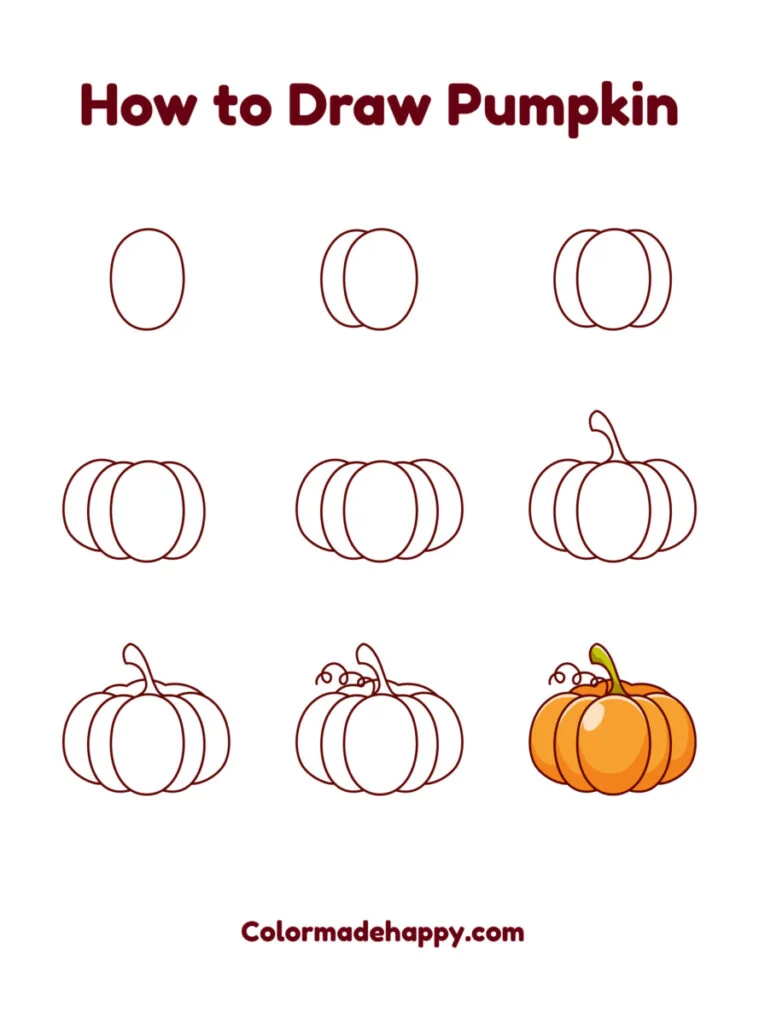
Next we can sketch in the stem. How to draw a pumpkin from imagination: Let’s start by drawing the bumpy shape of a pumpkin. Connect the dots 3 times. Draw the vine with a squiggly line. How to light your pumpkin. Here's a picture to demonstrate each step of the pumpkin easy drawing: Next, attach the shape of the pumpkin’s stem sticking out on top. Start by drawing the overall shape of your pumpkin with a two curved lines. Sketch a face in the middle of the oval.
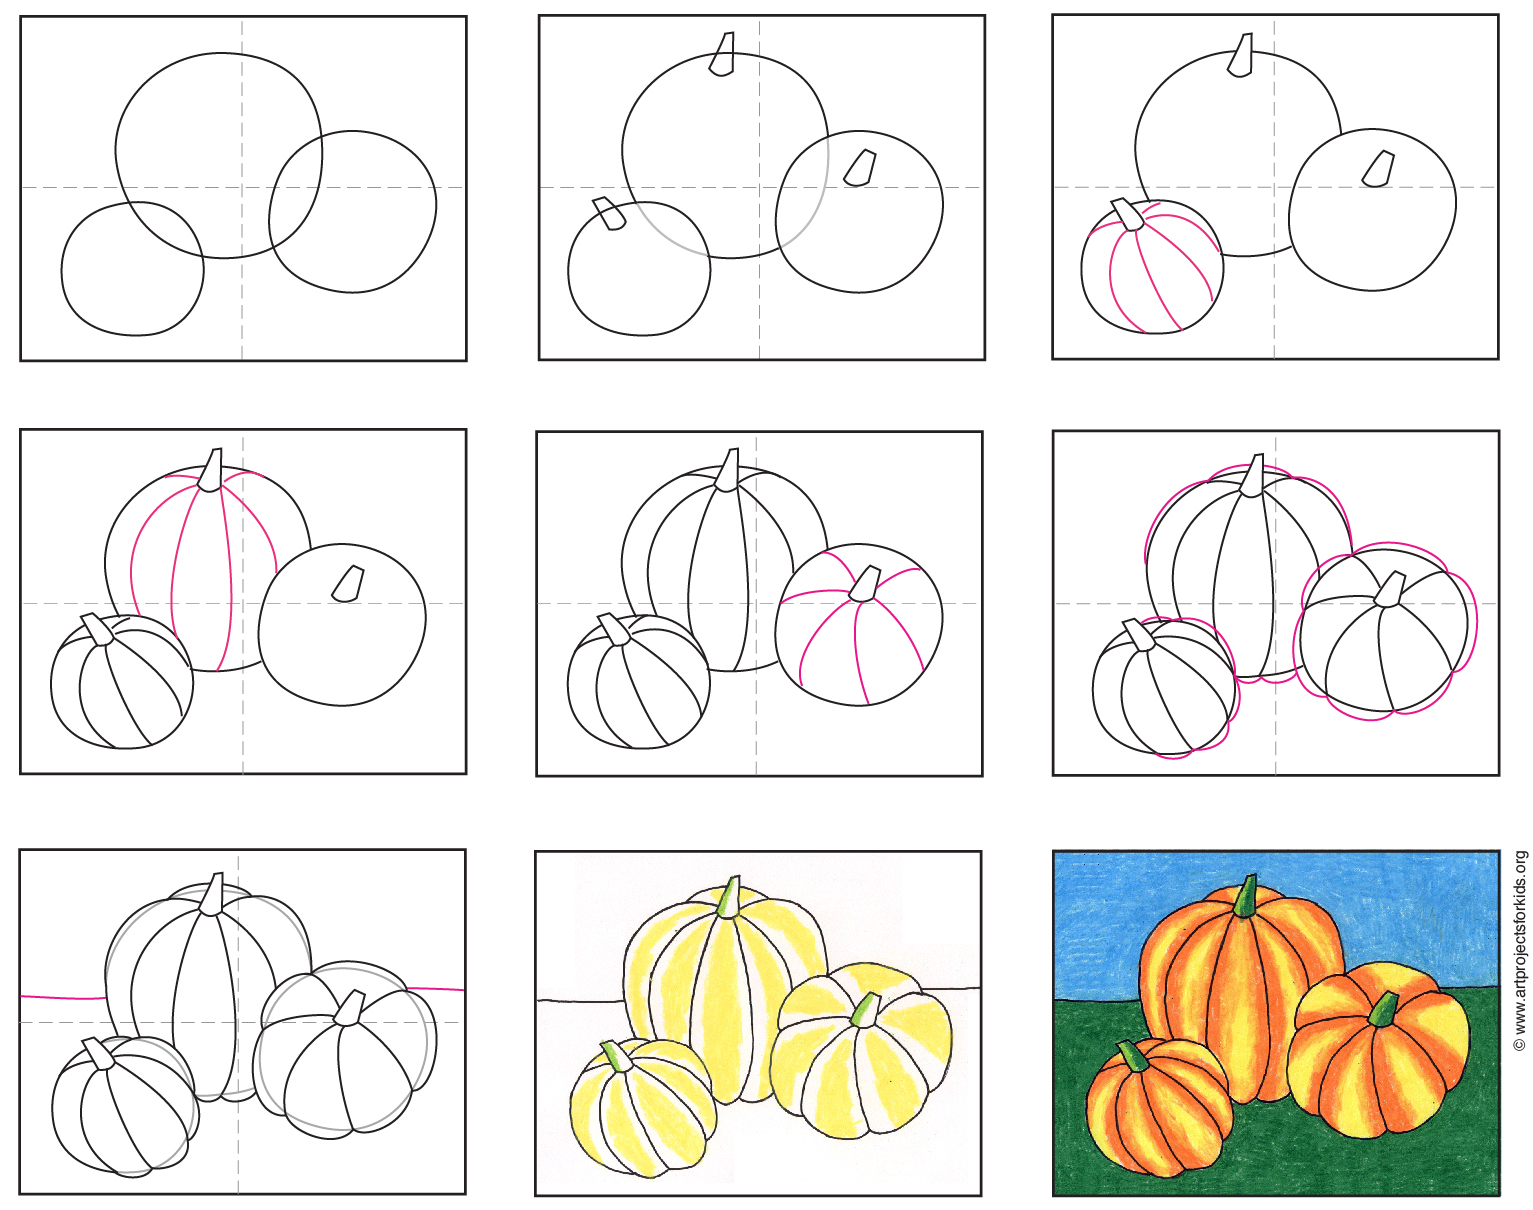
Use a reference photo of a pumpkin. Pumpkins are not round, so don’t try to make this perfect. On the oval shape of the pumpkin, draw three vertical lines dividing the pumpkin into wedges. After all, pumpkins are not always perfect. Web pumpkin drawing step 1. Add a curve beneath the line on the left, then connect both lines with two curves. When you water into it, the water will be contained and will percolate straight down to the roots without washing away across the surface. We’re using a pencil for now, as this will be a guide for drawing in the rest of the pumpkin and you’ll be erasing the pencil a bit later. On the oval shape of the pumpkin, draw three vertical lines dividing the pumpkin into wedges. Web tuck the mulch back in around the plant, then water well.
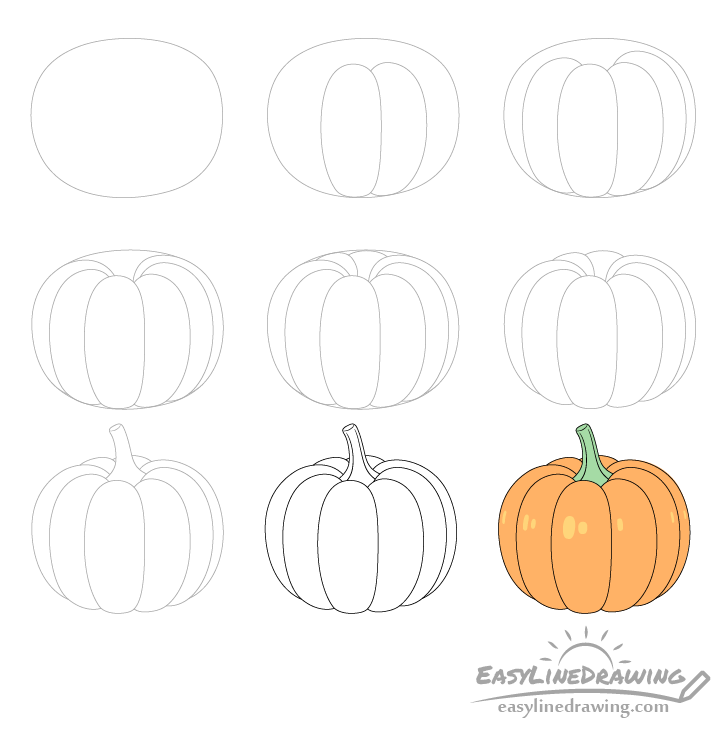
How to Draw a Pumpkin Step by Step EasyLineDrawing
Next, attach the shape of the pumpkin’s stem sticking out on top. Start by drawing an oval in the center of your paper. Pumpkins are not round, so don’t try to make this perfect. Draw two large, round eyes near the top of the pumpkin. Web tuck the mulch back in around the plant, then water well.
Pumpkin Drawing · Art Projects for Kids
Draw a circle connecting the two lines. Let’s start by drawing the bumpy shape of a pumpkin. How to draw pumpkin in easy steps for beginners lesson.tutorial of drawing technique. This will be the base of the pumpkin and its stem. Web 864k views 6 years ago.
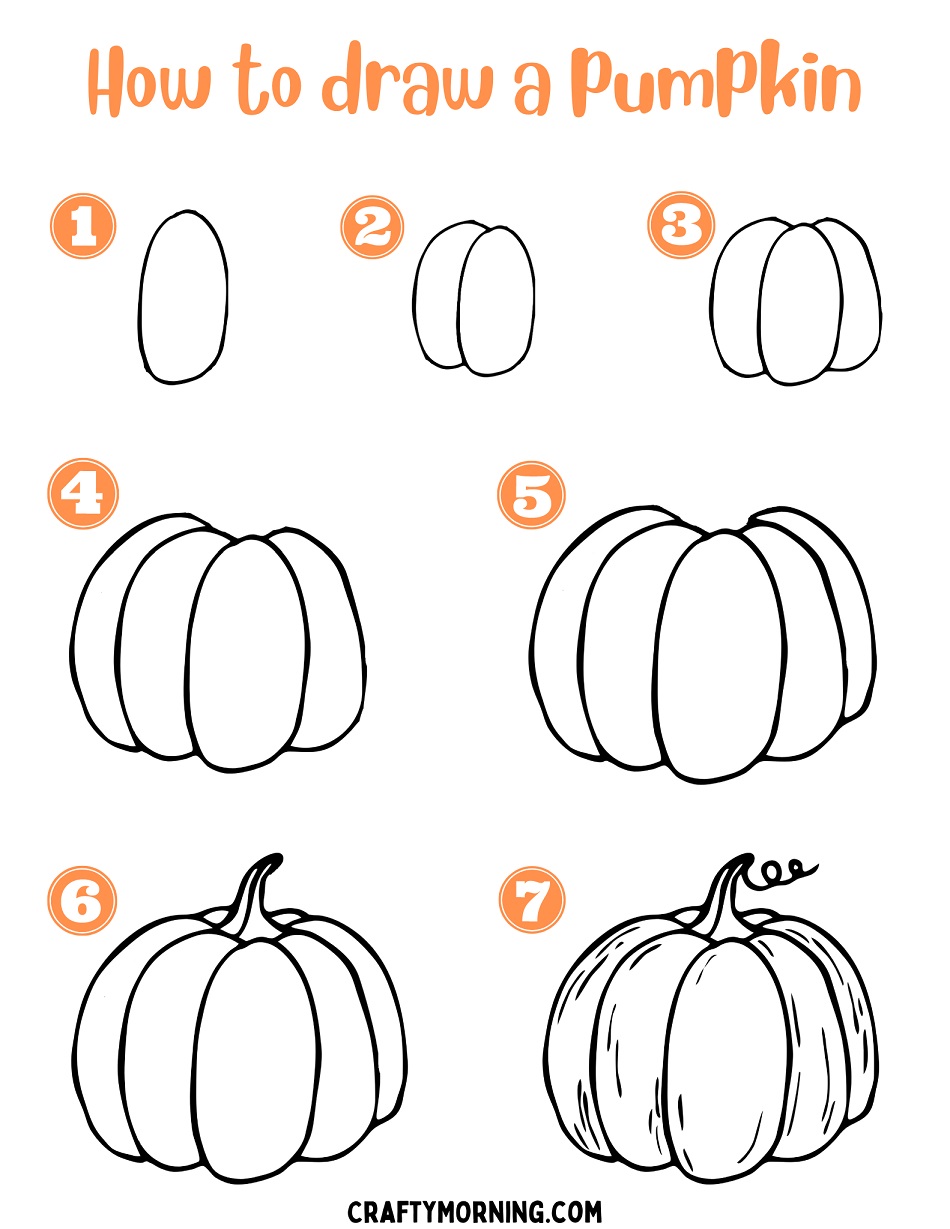
How to Draw a Pumpkin (Easy Step by Step) Crafty Morning
This will be the base of the pumpkin and its stem. Web pumpkin drawing step 1. Position the chalk pastel at the top of the oval and proceed to draw a large curve away from the shape and then back to join the bottom. Add a smiling mouth below. How to draw a pumpkin from imagination.

How to draw pumpkin step by step YouTube
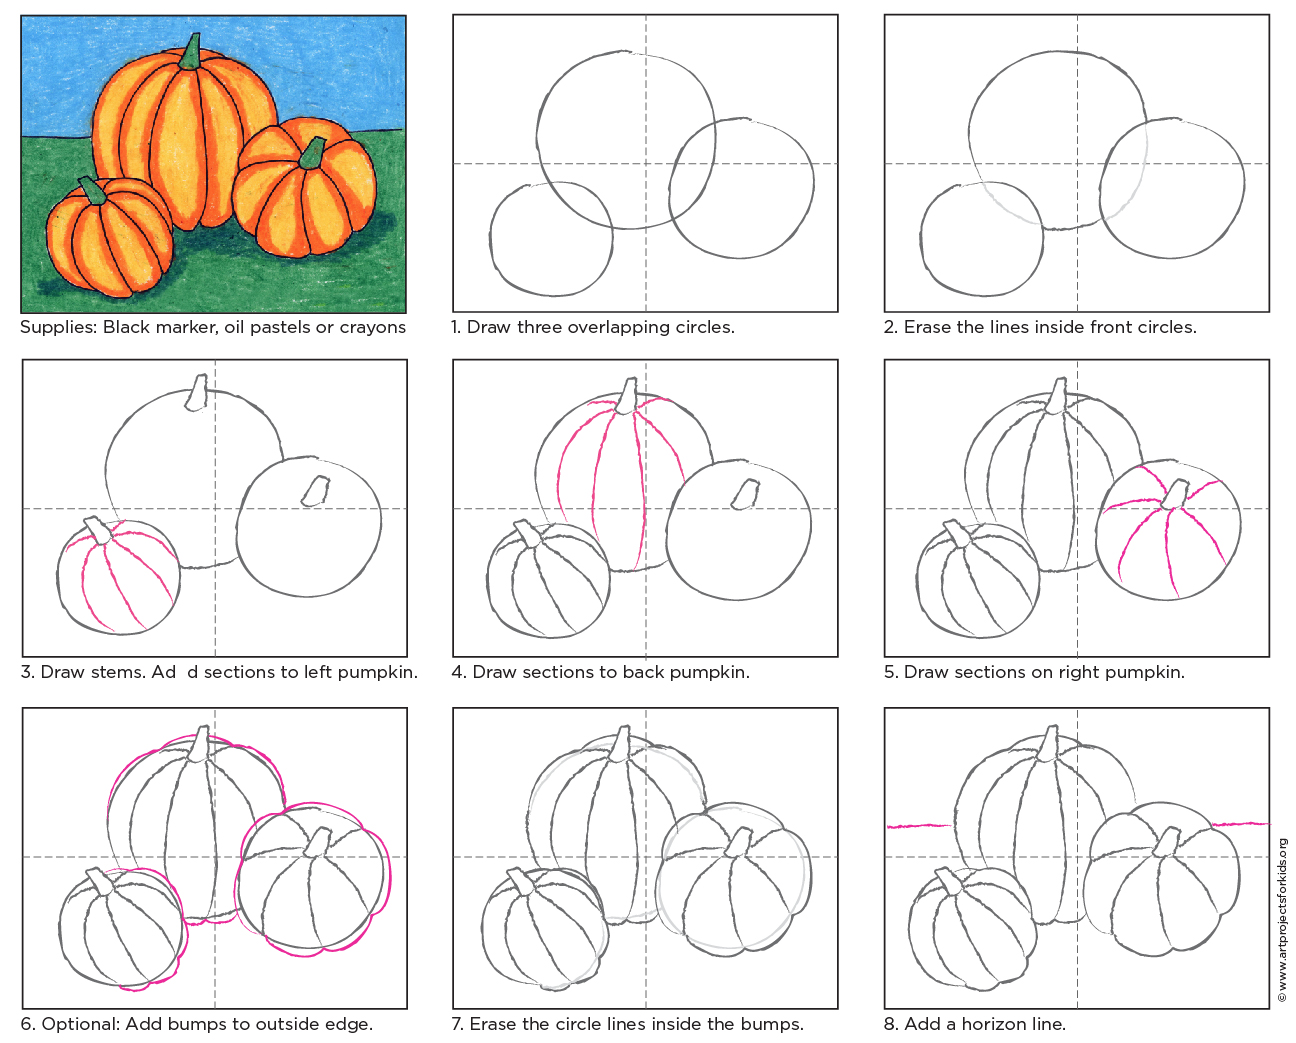
Sketch a wide oval with some indentations at the bottom. On the left and right sides of the rectangular, draw two curved lines to form the pumpkin’s ridges. When you water into it, the water will be contained and will percolate straight down to the roots without washing away across the surface. Repeat the shape over and over until a.
How to draw halloween stuff step by step The Smart Wander
How to draw a pumpkin video tutorial. How to draw a pumpkin in perspective. Draw an oval with a tapered tail on top. Web tuck the mulch back in around the plant, then water well. No views 1 minute ago #pumpkinart #drawingtutorial #drawing.
How to Draw a Pumpkin Step by Step Guide
Shade the first two sections of the pumpkin. Drawing tutorial,art tutorial youtube video you can watch the video at slow. How to light your pumpkin. Draw an oval with a tapered tail on top. 🎃 dive into autumn vibes with this speedy pumpkin drawing using sharpies and colour pencils!

How to draw easy and cute Halloween pumpkin stepbystep
When you water into it, the water will be contained and will percolate straight down to the roots without washing away across the surface. Pumpkins are not round, so don’t try to make this perfect. With halloween fast approaching we'll be posting more how to draw halloween themed lessons for beginners. How to draw a pumpkin from imagination. Repeat the.
How to Draw Pumpkins · Art Projects for Kids
Create a tall narrow rectangle extending out from the opening that you left in the previous step. Next, attach the shape of the pumpkin’s stem sticking out on top. Add a tail to your pumpkin by drawing a curved shape. Draw an oval with a tapered tail on top. Use a reference photo of a pumpkin.

How To Draw A Pumpkin StepByStep & Free Printables So Festive!
Draw two identical curved lines that point in opposite directions like a mirror image. Plant a pumpkin patch and you could be enjoying. Create a tall narrow rectangle extending out from the opening that you left in the previous step. Draw a curved line on the left side of the pumpkin shape. After all, pumpkins are not always perfect.

How to draw pumpkin step by step The Smart Wander
Sketch a face in the middle of the oval. Draw the vine with a squiggly line. On the left and right sides of the rectangular, draw two curved lines to form the pumpkin’s ridges. Here's a picture to demonstrate each step of the pumpkin easy drawing: Leave a little opening at the top for the stem.
After All, Pumpkins Are Not Always Perfect.
Let’s draw the outline of the pumpkin. With halloween fast approaching we'll be posting more how to draw halloween themed lessons for beginners. Position the chalk pastel at the top of the oval and proceed to draw a large curve away from the shape and then back to join the bottom. Draw an oval with a tapered tail on top.
How To Draw A Pumpkin (Easy) Begin By Drawing A Circle That Is Roughly The Size You Want Your Pumpkin To Be.
Draw a large vertical rectangular shape. Sketch a face in the middle of the oval. Draw the vine with a squiggly line. On the left and right sides of the rectangular, draw two curved lines to form the pumpkin’s ridges.
Here's A Picture To Demonstrate Each Step Of The Pumpkin Easy Drawing:
Use curved lines to highlight the gourd. Materials used for this drawing. When you water into it, the water will be contained and will percolate straight down to the roots without washing away across the surface. Join the email list so you don't miss exclusive 2d animation courses:.
On The Oval Shape Of The Pumpkin, Draw Three Vertical Lines Dividing The Pumpkin Into Wedges.
Plant a pumpkin patch and you could be enjoying. Form the visible ribs on the back part of the pumpkin by drawing curved lines. The more imperfect your circle is, the better. Their pumpkin shape makes them the perfect subject matter for so many different fall (and halloween) projects!