Step By Step Draw Owl
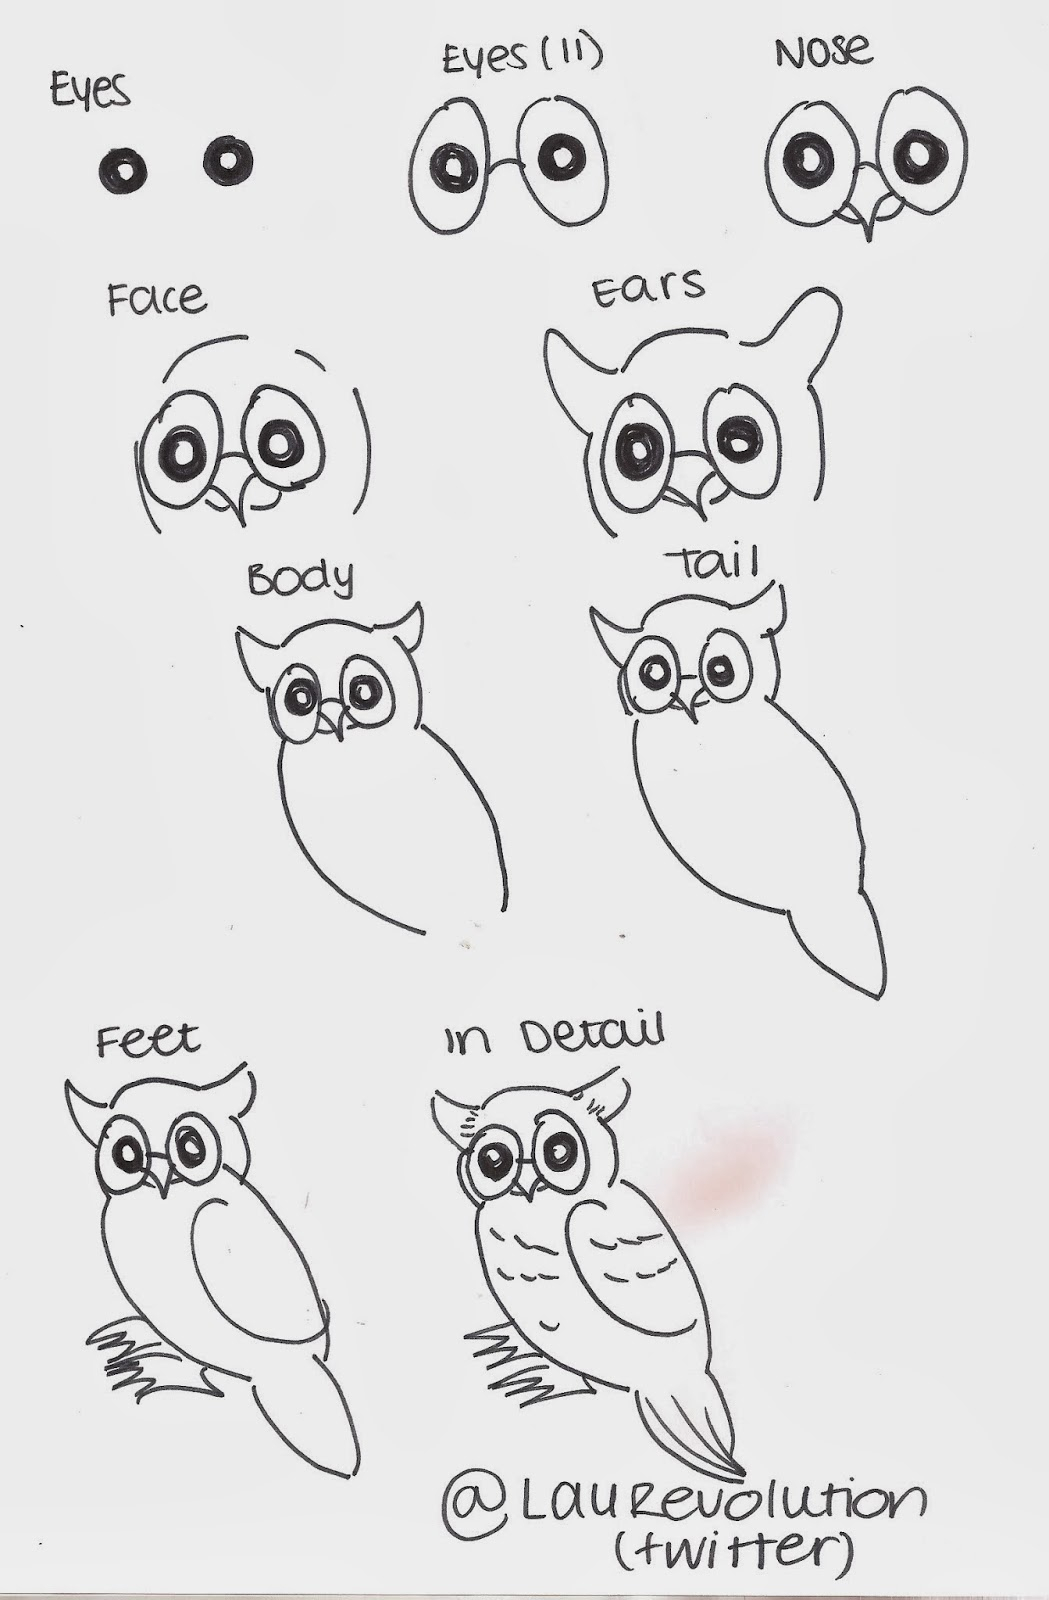
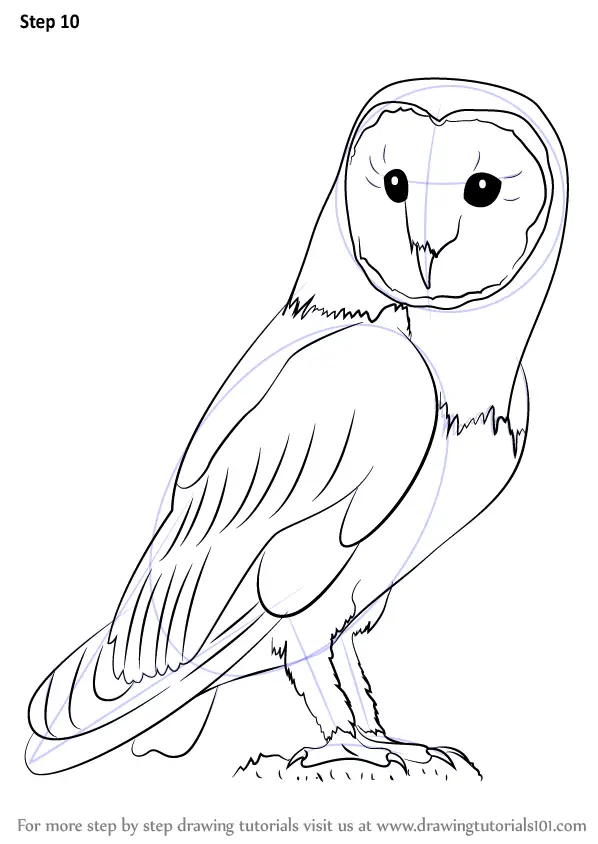
Step By Step Draw Owl - The feathers and some detail as shown. Step 4 now we have a complete structure of the owl. Owl drawing step by step (3 ways)! Reviewed in the united states on november 4, 2023. Draw two lines on the owl’s legs to give the. Find your owl reference photo and draw an outline of the body of the owl. Continue with curved lines to shape the owl’s body. You can use whatever you feel comfortable drawing with. Next add the “horns” on the top of the head (really these are just feathers) with a bump like curve between them. Make the top section of the leg thicker by following the path of the longest line.
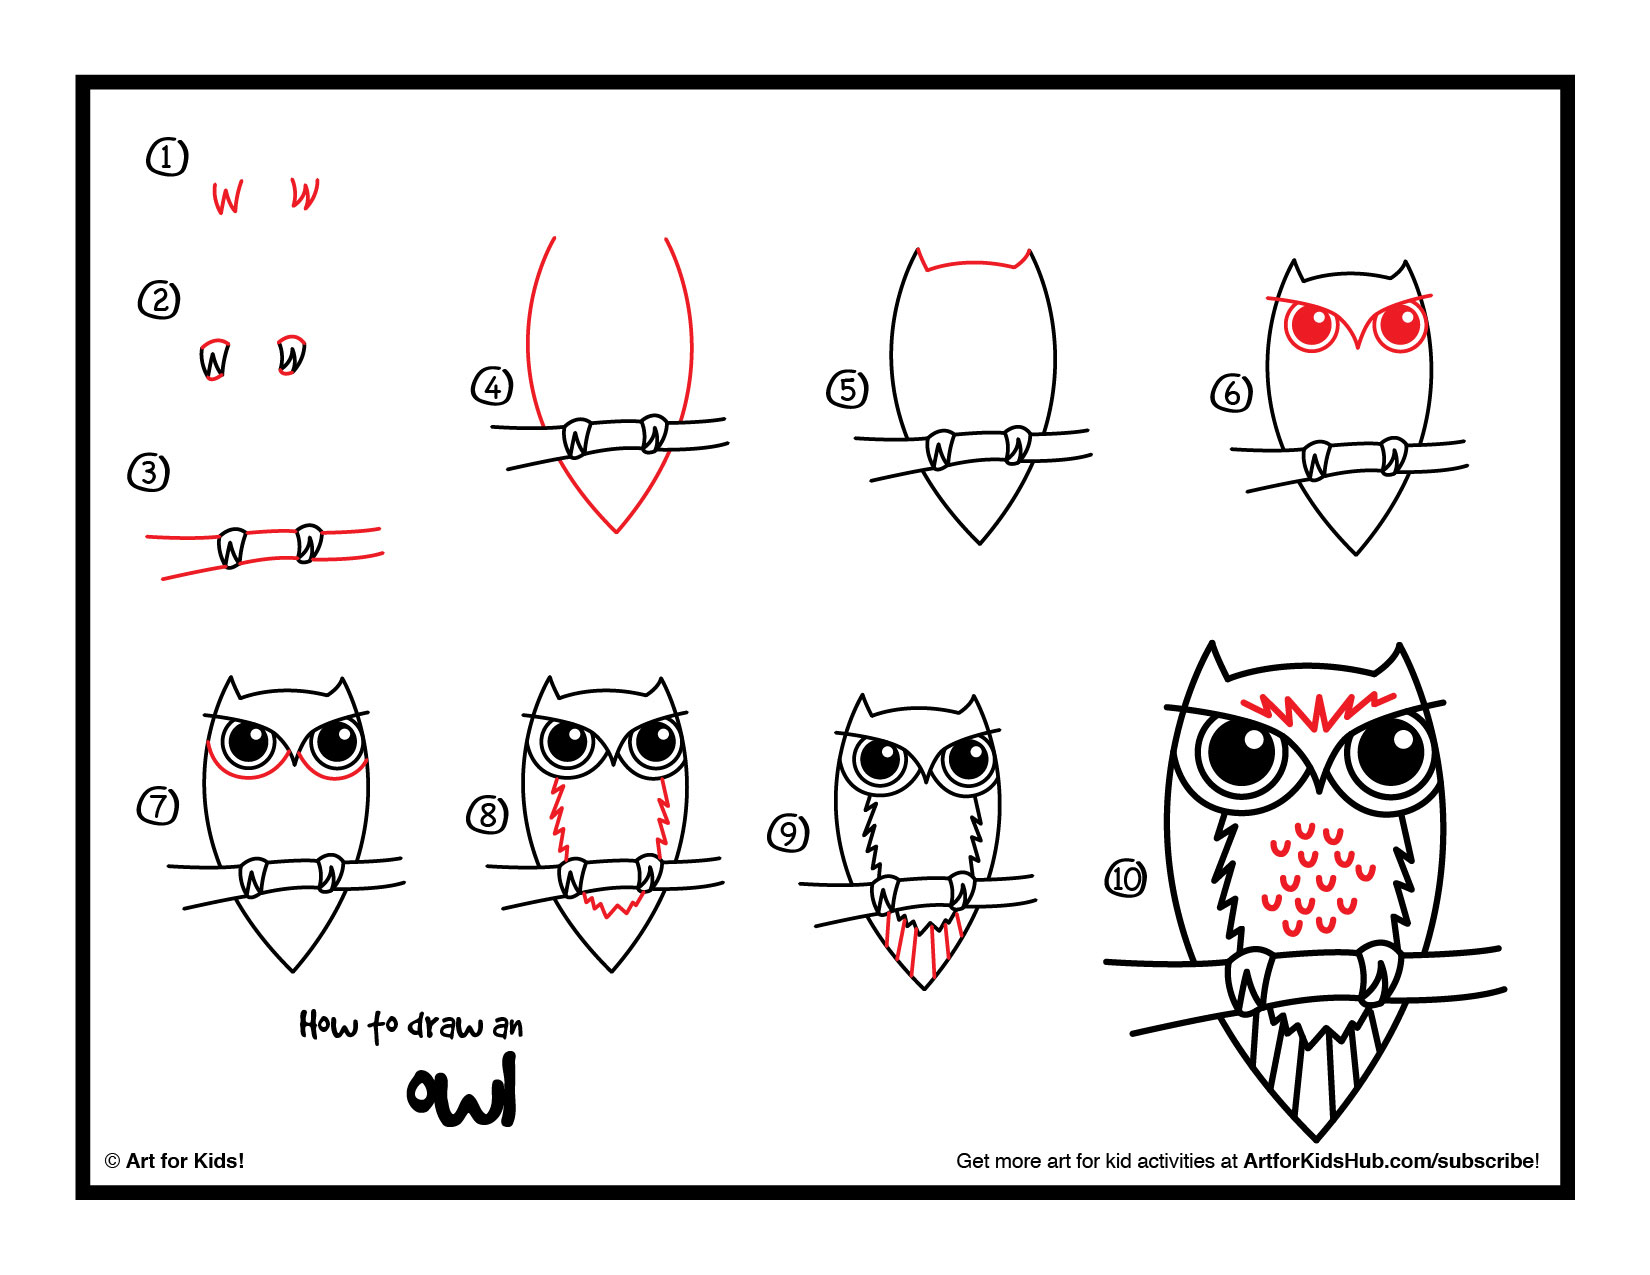
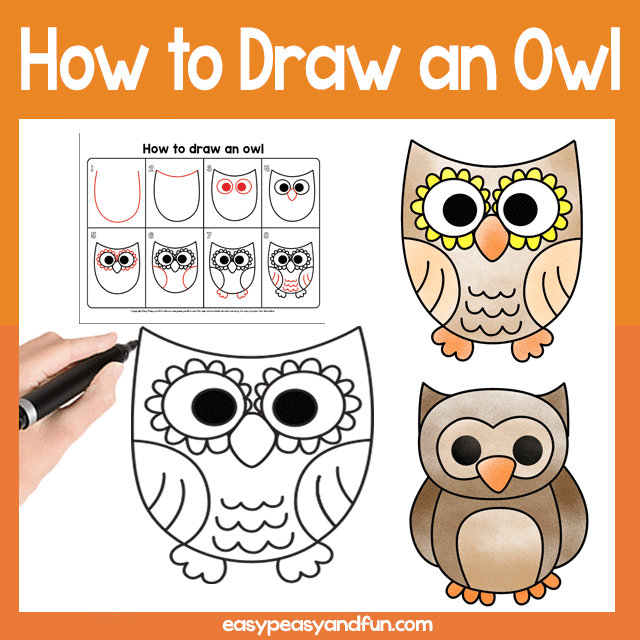
If you are painting the owl, you might want to wait to do this step until the very end. Make the top section of the leg thicker by following the path of the longest line. The feathers and some detail as shown. At the end of my research i was ready to create this whimsical owl art. Web let's draw an owl step by step. As with all our drawing tutorials, we will always guide you with the use of construction lines and shapes. Web you can draw your owls on any type of paper, such as drawing paper, printer paper, cardstock, colored paper, etc. Web this time we are not only showing you one, but two easy how to draw an owl step by step tutorials. Use the lines at the bottom as a guide. Learn how to draw an owl with this free printable drawing lesson activity page.
Sketch the details of the owl’s head. There are 3 different style owls on the page. You can also add a yellow tint to the owl’s belly. Make it rounded on the sides with an upwards curve at the bottom/middle. 5.0 out of 5 stars detailed and logical drawing steps. Draw two lines on the owl’s legs to give the. These must be drawn using a 4h to 6h pencil, because they need to be light and easily erased. Use quick, short strokes for the feathers. Draw two curved lines that start at the beak and extend past the top of the head. Let’s start outlining the owl by drawing its face.
How To Draw An Owl Better world by better software
Both owl guided drawing instructions are really simple, with the first one you will be drawing a more cartoon like owl, while the second one will guide you to drawing a more realistic looking owl (but still an insanely easy one). To complete the owl drawing, color the tree starting with light colors and ending with dark ones. As with.

How to Draw An Owl DIY Crafts
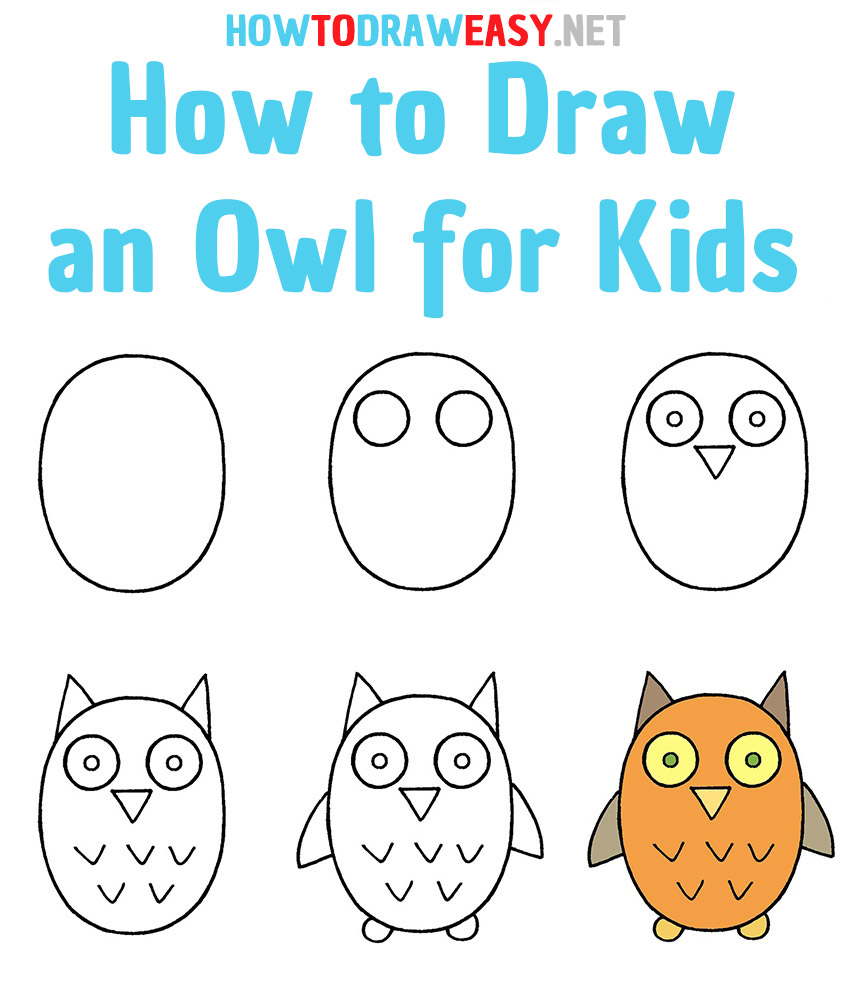
Erase the construction lines, fill in the dark areas of the eyes (leave the highlights white) and add some small hints of the various patters of the feathers. You can also add a yellow tint to the owl’s belly. Draw an upside down triangle that starts at the middle of the circle, and ends at the bottom of the head.
How To Draw An Owl Easy Tutorial Toons Mag
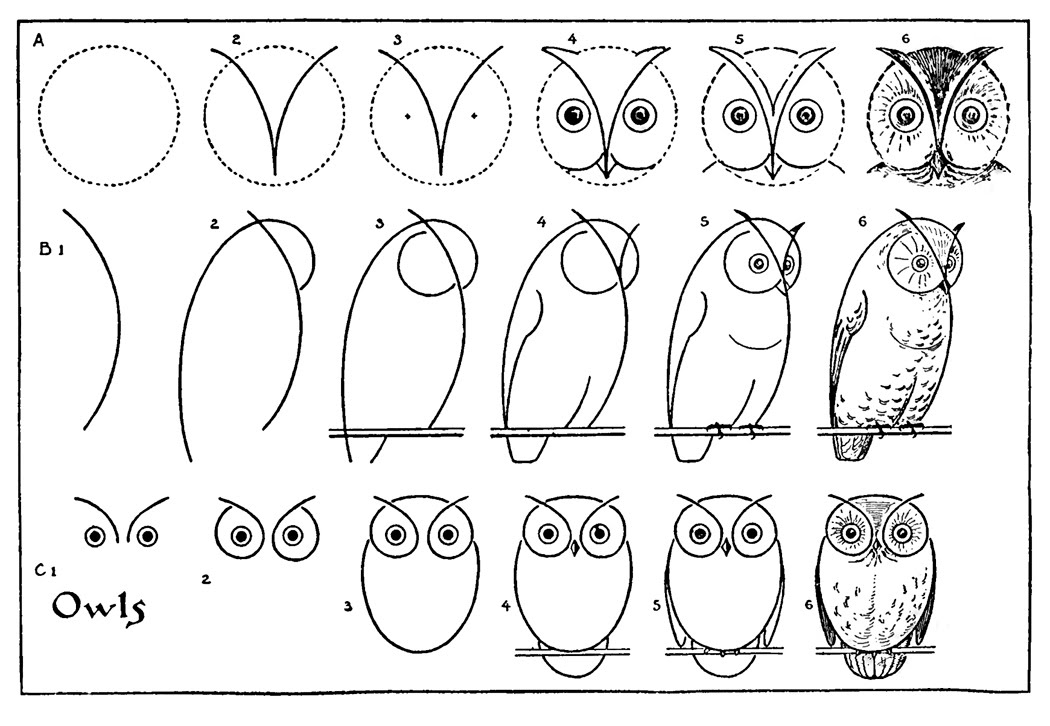
Color the body of the owl in detail, adding darker shades closer to the contour of the owl, and lighter shades more towards the center. Web step 1 first draw a circle for the head and a tilted egg for the body. Web let's draw an owl step by step. You can use whatever you feel comfortable drawing with. You.
Video How to Draw an Owl, For Kids Local Santa Cruz
The body’s construction is a very simple step. Draw the chin, beak, eyes, and ears. Reviewed in the united states on november 4, 2023. Step 2 by following the shapes in step 1, we draw the outline of the owl i.e. Step 3 we draw more outlines which includes the eyes and the beak of the owl as shown.
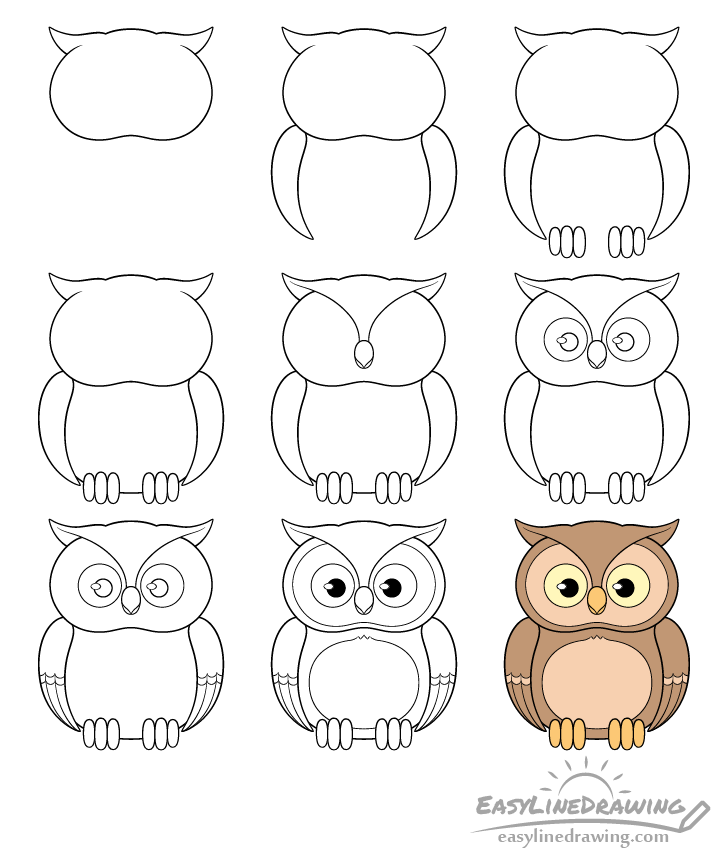
How to Draw an Owl Step by Step EasyLineDrawing
I looked at a lot of owls for this project. Begin shading by adding strokes that go along the shape of the owl’s head/face. Draw two lines on the owl’s legs to give the. Draw the main body of your owl. How to draw an owl step 1.

How To Draw An Owl A StepByStep Guide IHSANPEDIA
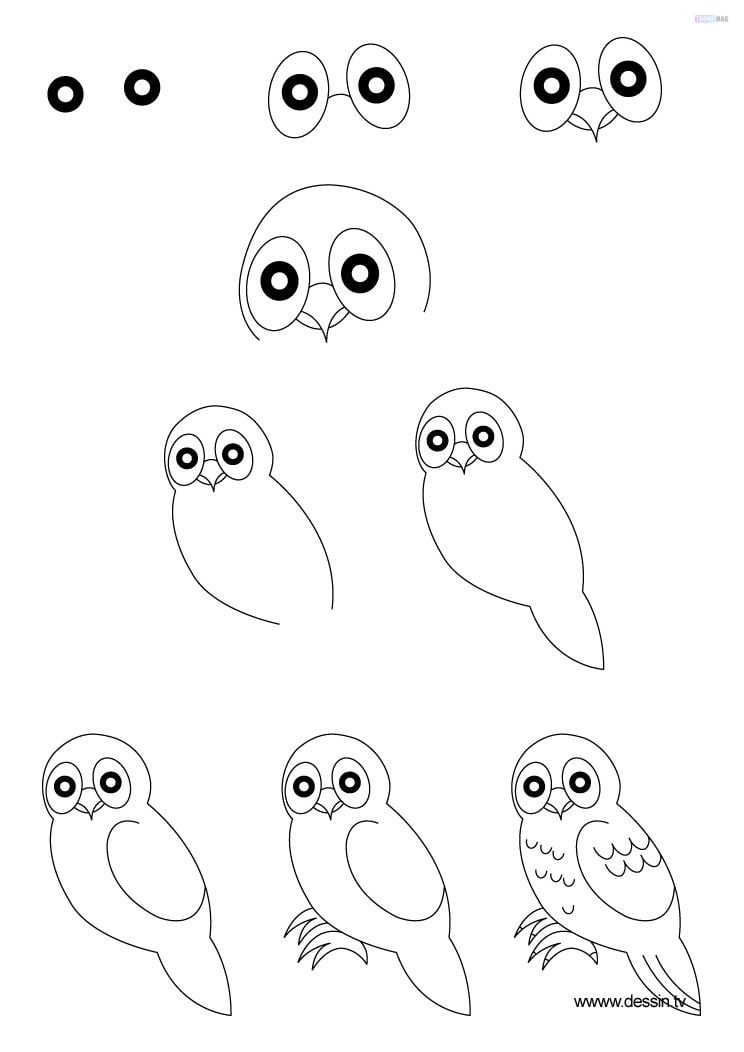
Constructing the owl’s talons (claws) 2.7 step 6: Sketch short jagged lines for texture along the outline of the owl’s body as “guiding lines”, and draw two talons for each foot. Erase the construction lines, fill in the dark areas of the eyes (leave the highlights white) and add some small hints of the various patters of the feathers. Web.
Easy Owl Drawing Step By Step at Explore
Add more details to the owl’s head. Reviewed in the united states on november 4, 2023. For the sixth step of this guide on how to draw an owl, you can add in some feet for your owl. Use the lines at the bottom as a guide. Owl drawing step by step (3 ways)!
How to Draw an Owl for Kids How to Draw Easy
The body’s construction is a very simple step. I looked at a lot of owls for this project. Sketch the details of the owl’s head. To complete the owl drawing, color the tree starting with light colors and ending with dark ones. Next add the “horns” on the top of the head (really these are just feathers) with a bump.
How to Draw an Owl Step by Step Instructions Easy Peasy and Fun
In this lesson, we're using markers and colored pencils. Owl drawing step by step (3 ways)! Step 2 by following the shapes in step 1, we draw the outline of the owl i.e. At the top of your paper, draw a gently curving line that goes from left to right. Use quick, short strokes for the feathers.
Learn How to Draw an Owl (Owls) Step by Step Drawing Tutorials
Step 4 now we have a complete structure of the owl. Draw three lines on the owl’s head to make the ear tufts and beak of the owl. Step 3 we draw more outlines which includes the eyes and the beak of the owl as shown. Draw the main body of your owl. Continue with curved lines to shape the.
Step 4 Now We Have A Complete Structure Of The Owl.
If you are painting the owl, you might want to wait to do this step until the very end. Continue with curved lines to shape the owl’s body. These details can be added over the color that you paint the larger shape of the owl’s belly. I looked at reference photos and a wide variety of owl art, both prints and owl statues.
The Feathers And Some Detail As Shown.
Color the body of the owl in detail, adding darker shades closer to the contour of the owl, and lighter shades more towards the center. Web step 9 (optional) draw tiny “u” shapes for the feathers on the owl’s belly. Constructing the owl’s talons (claws) 2.7 step 6: Step 3 we draw more outlines which includes the eyes and the beak of the owl as shown.
To Make The Toes, Thicken All Remaining Lines At The Bottom.
Make it rounded on the sides with an upwards curve at the bottom/middle. For the sixth step of this guide on how to draw an owl, you can add in some feet for your owl. Owl drawing step by step (3 ways)! 5.0 out of 5 stars detailed and logical drawing steps.
Use The Lines At The Bottom As A Guide.
Find your owl reference photo and draw an outline of the body of the owl. You can use whatever you feel comfortable drawing with. 5.0 out of 5 stars pretty good. To complete the owl drawing, color the tree starting with light colors and ending with dark ones.