Step By Step Drawing Rabbit
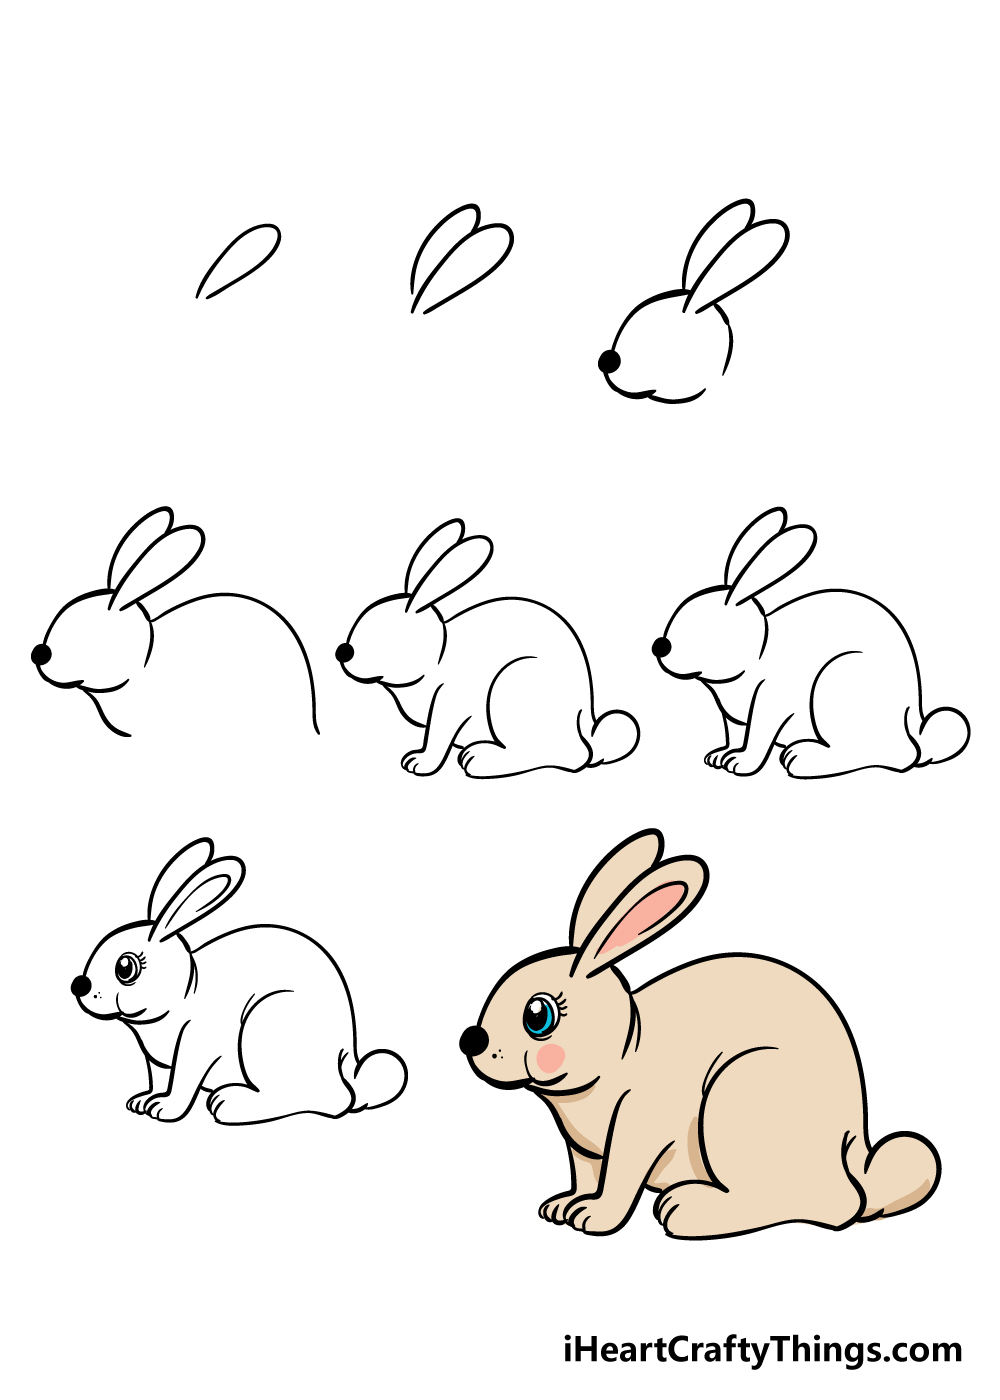
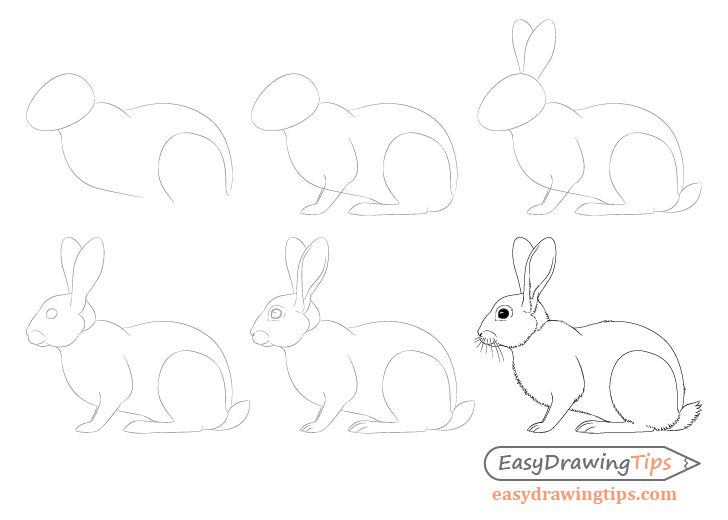
Step By Step Drawing Rabbit - Sketch your bunny step by step. Draw an oval at an angle, we want the angle to be facing downwards as this will be guiding where we place the details of the head. Web sketch a rough outline for the hands and feet. Draw the ear of the cartoon rabbit using a pair of curved lines that meet at a gentle point. Web start by drawing a curved line, a little fuzzy, under your rabbit’s head to create his neck. Enclose a small round shape to form the nose, and extend a short line beneath it. The last step is entirely up for your creativity. I start with a rough shape of the rabbit’s head, using the hb graphite pencil. We shall start to draw a body for your rabbit drawing in this fourth step. Draw the head as a sort of “egg” shape.
Draw the ear of the cartoon rabbit using a pair of curved lines that meet at a gentle point. Sketch your bunny step by step. Draw the head as a sort of “egg” shape. Web start by drawing a curved line, a little fuzzy, under your rabbit’s head to create his neck. Draw the side of the bunny's face. Either way, start with the basic shapes of the rabbit. Web the final steps are all about adding in the quirks that will leave you satisfied with your work. Web thanks for watching!#drawing #art #simpledrawing #kids Enclose a small round shape to form the nose, and extend a short line beneath it. As you can see in the final images, the rabbit will.
Even subtle changes can create a new facial expression or a different personality. Web draw the initial lines lightly so that you can easily erase them later. 🐇💚 for drawing online videos visit my channel qwe. The last step is entirely up for your creativity. Draw the side of the bunny's face. Add shape for bunny nose, mouth, and jaw. Draw the head as a sort of “egg” shape. Draw another bean shape for the lower leg, and tilt it slightly to make it look. Draw a small circle for the little nose. Web start by drawing a curved line, a little fuzzy, under your rabbit’s head to create his neck.

How to Draw a Bunny in a Few Easy Steps Easy Drawing Guides
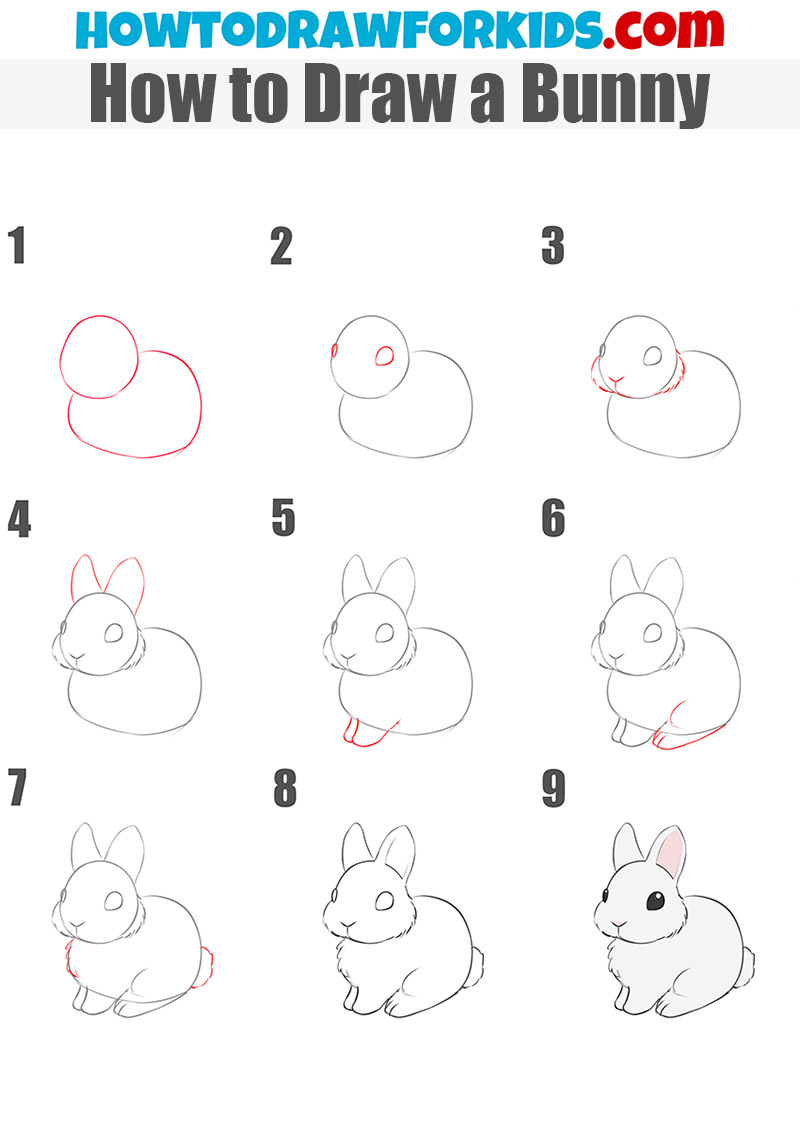
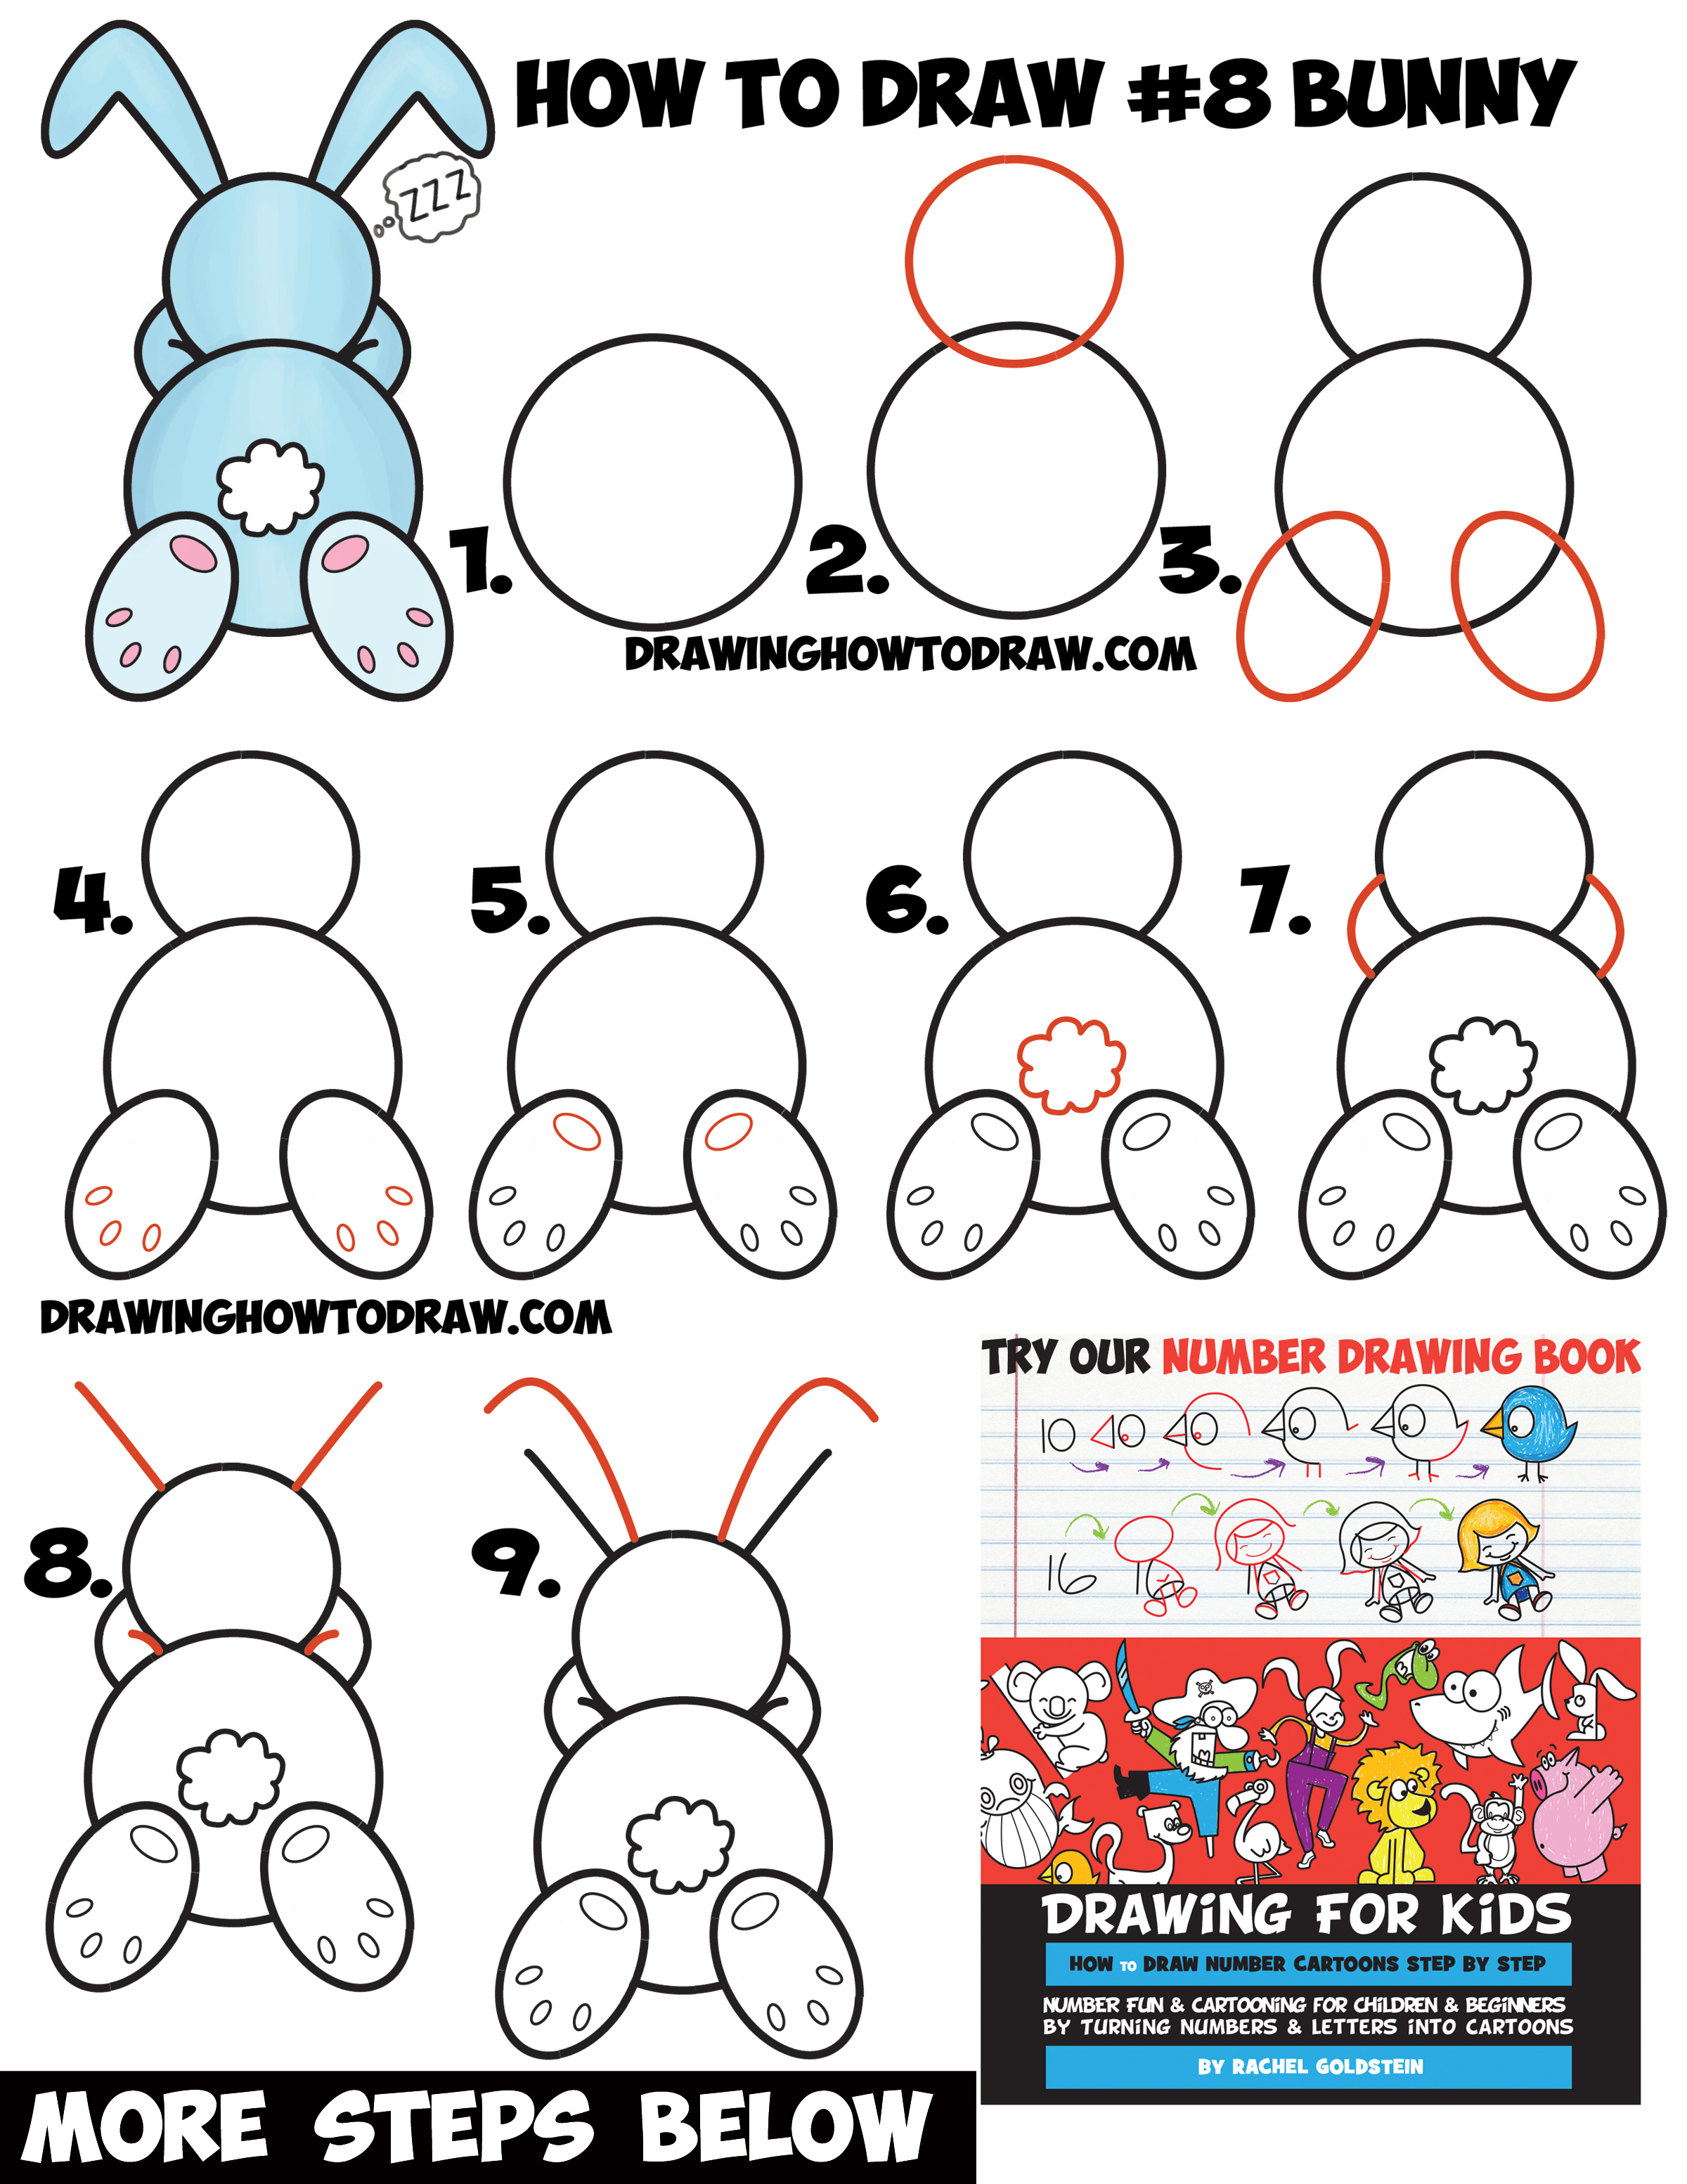
Web how to draw rabbit drawing from 22 number easy step by step @ drawing talent #rabbit #drawing #rabbit #drawing Even subtle changes can create a new facial expression or a different personality. Either way, start with the basic shapes of the rabbit. Draw two small circles in the middle of the larger circle for the bunny’s eyes. Web how.
Rabbit Drawing How To Draw A Rabbit Step By Step
Draw the bunny rabbit’s lower. How to draw a rabbit easy step by step for beginners. Add the bunny’s whiskers and two short lines on each of the bunny’s limbs. Completing the rough sketch of the rabbit. Web start by drawing a small circle that is a bit smaller at the top then the bottom.
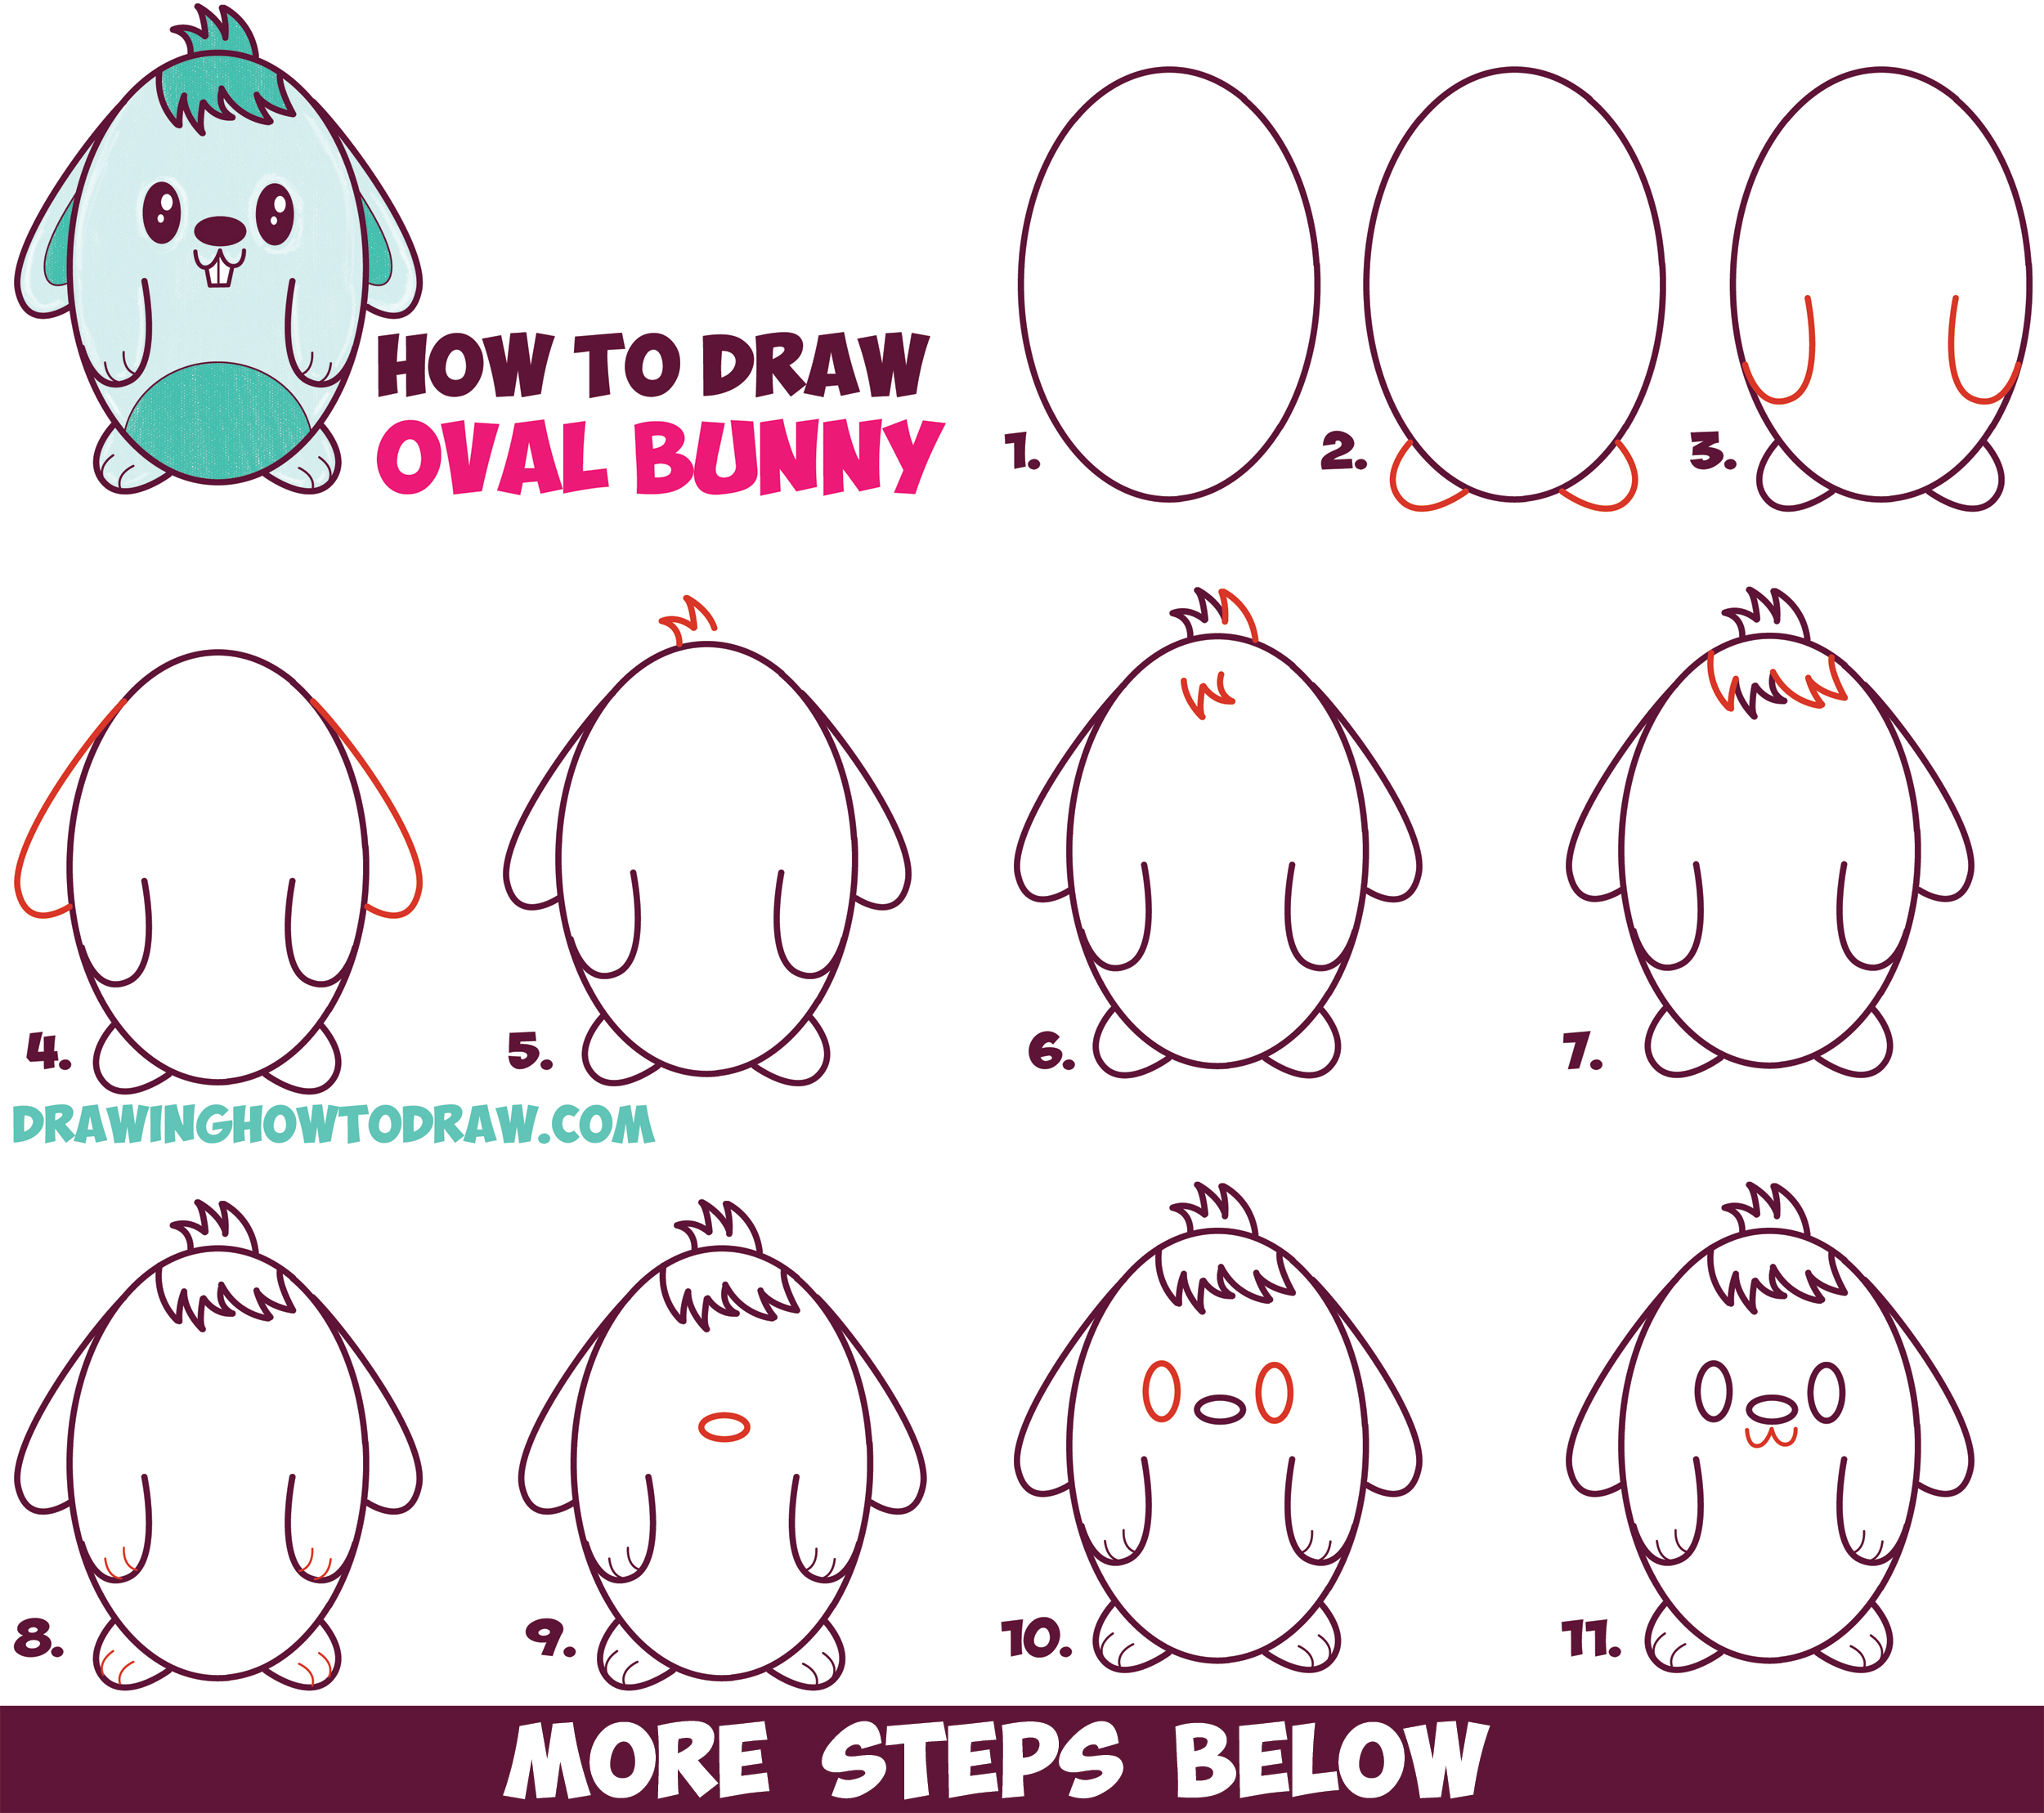
How to Draw a Cute Cartoon Bunny Rabbit from an Oval Easy Step by
Enclose a long, narrow shape within each ear. Web start by drawing a curved line, a little fuzzy, under your rabbit’s head to create his neck. At the base of the ear, overlap short curved lines in a jagged fashion to lend the appearance of fur. Play with the details to get a unique rabbit. How to draw cartoon bunny.

How To Draw A Bunny Step By Step at Drawing Tutorials
Add the bunny’s whiskers and two short lines on each of the bunny’s limbs. Draw a small circle for the little nose. Then, you can extend a line from the back of the head to make the back of your rabbit. Next draw the first ear on the side and then add the second ear on the other side of.

Rabbit Drawing For Kids Easy Step By Step Jamie Paul Smith
Here's a list of drawing tools that are perfect for any beginner. Sketch your bunny step by step. Draw the side of the bunny's face. Draw the ear of the cartoon rabbit using a pair of curved lines that meet at a gentle point. Draw two small circles in the middle of the larger circle for the bunny’s eyes.
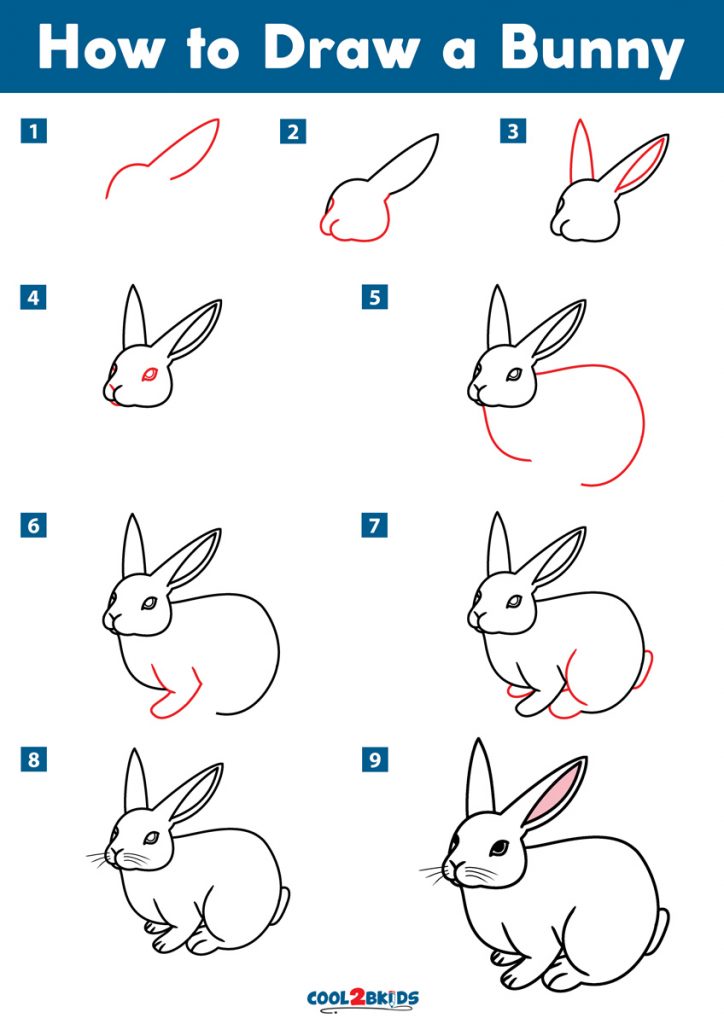
How to Draw a Bunny Cool2bKids
As you can see in the final images, the rabbit will. Draw a small circle for the little nose. Web draw the initial lines lightly so that you can easily erase them later. Web how to draw a cute bunny step by step. Draw the eyes using small circles, add the nose by sketching an inverted triangle, sketch the mouth.
How to Draw a Bunny Easy Drawing Tutorial For Kids
Web how to draw rabbit drawing from 200 number | easy step by step#drawing #rabbit #drawingrabbit#dog #easydrawing #easyrabbitdrawing@mpdrawingtutorial @drawing. I draw a triangular figure of the nose in the bottom part of the long central shape. According to the foreshortening, only one side is fully visible to the viewer. 🐇💚 for drawing online videos visit my channel qwe. Start by.
How to Draw a Rabbit Step by Step Tutorial EasyDrawingTips
Use the cross in the middle of the face as a guide. As you can see in the final images, the rabbit will. How to draw cartoon bunny rabbits and hares with simple step by step drawing lesson. According to the foreshortening, only one side is fully visible to the viewer. Web how to draw a rabbit's nose step 1.
How To Draw A Bunny Step By Step
Web sketch a rough outline for the hands and feet. First, draw a short, curved line underneath the head of your rabbit to make a little chest. Here's a list of drawing tools that are perfect for any beginner. Go for this easy to fallow tutorial that will show you in a few illustrated steps how to draw rabbits. Draw.

How to Draw Cute Easter Bunny Guided Drawing Video Tutorial
Draw a small circle for the little nose. Fresco makes sketching easy with a powerful suite of drawing tools, but you might be working on paper with the plan to import into a digital space later. 🥰 learn how to draw a cute bunny rabbit easy, step by step to celebrate easter and spring. Now draw the eyes, nose and.
Add The Bunny’s Whiskers And Two Short Lines On Each Of The Bunny’s Limbs.
Draw the bunny rabbit’s lower. Make a drawing of the bunny’s face. Add detail to the bunny’s face. Web the final steps are all about adding in the quirks that will leave you satisfied with your work.
Web How To Draw Animals Playlist:
Start by using the 0.7mm marker to draw the bunny ear on the left. Enclose a small round shape to form the nose, and extend a short line beneath it. Web start by drawing a curved line, a little fuzzy, under your rabbit’s head to create his neck. First, draw a short, curved line underneath the head of your rabbit to make a little chest.
I Start With A Rough Shape Of The Rabbit’s Head, Using The Hb Graphite Pencil.
Make a curved line, connected to the ear, and extend it so it ends in roughly the same. Web thanks for watching!#drawing #art #simpledrawing #kids Go for this easy to fallow tutorial that will show you in a few illustrated steps how to draw rabbits. Draw the ear of the cartoon rabbit using a pair of curved lines that meet at a gentle point.
Learn A Simple Method For Developing An Original Character, From Mind Map To Finished Drawing.
Here's a list of drawing tools that are perfect for any beginner. At the base of the ear, overlap short curved lines in a jagged fashion to lend the appearance of fur. Fresco makes sketching easy with a powerful suite of drawing tools, but you might be working on paper with the plan to import into a digital space later. Web how to draw a cute bunny step by step.